Pages

Showing posts with label Kentmere. Show all posts

Wednesday 9 February 2022

Street Photography Part 1

 Recently I felt the need to get back to some form normality with a bit of street photography. A return to where I started making photographs all those years ago when I did not realize that the images I was making came under this heading.


Street photography has been around almost as long as the invention of photography One of the early makers of street, although at the time it was properly not known as such, was The Reverend Calvert Jones with a panorama of Santa Lucia, Naples in 1846. 

My need to do this has been fueled by the last three years, in my case with serious illness and then the covid lock downs, restrictions just as I'm well enough to go out. I had become a prisoner of circumstance that really needed to be broken. I also missed being out and about with the camera. Not that I stopped using a camera during lock down.


As camera technology has improved over the centuries and with it the cost of ownership so it has become more popular to the point where everyone has the ability to make street photos but what has not come with it is the understanding of what constitutes a street picture.


A plan was hatched, well! Not really more like an idea about exploring Lincoln's streets and see what images came along in true street photography style. I still needed to choose a camera I thought be bold, Bronica SQAi with 80 mm lens, look down viewfinder and 35mm film back done. Ah! Film?


Street Photograph is the over arching heading that encompasses the man made environment in which the image has been made such as people , portraits, candid, architecture, abstract, transport, still life, minimalist, photo journalist, paparazzo. You do not have to have people as part of the composition as long as the subject projects human involvement.


Those of you who know what a thunder clap the Bronica shutter makes will be thinking it was not a wise choice I did have the same thought. I did say be bold, as it turns out it has made no difference so far. I have made a couple of pictures of people standing very close to them and had no reaction to the shutter thundering shut. I have considered that photographers over play how loud they think the shutter is. 


The places we live, the way we get around them and what we get up to are all part of the scene. You only have to look back at some well know practitioners in recent history such as Saul Leiter, Walker Evans, Berenice Abbot, Lee Friedlander they would include street seen-s devoid of people. In Berenice Abbots case it was mainly the buildings that interested her. If you go back further to Charles Marville in the 1860s he depicted the back streets and allies without people. 


It is good to be out and about meeting people with a smile and a nod as I strolling along the streets looking here and there for images to make. But there is a change an underlying arrogance, a lack of manners of some that insist they cannot wait for you to make an image walking in front of the camera then complain you have them in a image with a snotty look I just smile back. I find this attitude laughable as all of us who walk and or drive round will have been photographed at least 150 times a day by the authorities is OK and yet someone with a camera making images that you maybe a part of get unfounded abuse. 

Maybe at this point I should share some advice on what kit and how to go about making pictures. That is not really me I do not tell people how to be creative we are all different and therefore should approach street from your point of view. There is no special kit you should use apart from what you already have. What I will say is have an open mind to what maybe possible, a good set of walking boots are a must, after a few hours of walking about you will wish you had, use the bear minimum of kit again the same applies even though the camera and meter spend most there time in my hands I find that my shoulder can ache from carrying a camera bag that has little in it apart from some extra film and lens cleaning kit.

This is the first part of a number of articles that will be posted.

If you would like to read more this link will take you there Street P2 Street P3

Images in order of appearance:

  1. Bronica SQAi with 80 mm lens enjoying the view over Lincoln.
  2. Panorama of Santa Lucia Naples 1846 The Reverend Calvert Richard Jones.
  3. 4.5.6.7 Placeses in Lincoln  
Technical data: 

Film: 35 mm Kentmere 100 at box speed, developed in HC 110 B for 6 Minutes. 
Photographs printed on Ilford multigrade RC g developed in Multigrade and scanned from print.


This article is the copyright of Mitch Fusco 2022 all rights reserved.


Saturday 9 June 2018

Out for a stroll with the Zero


It is always a joy to be out with the Pinhole camera. But it must be a strange sight to behold as I walk up the street. A little brown box attached to what could be construed as a big black stick (tripod). On this occasion it was a lovely bright day with a biting cold wind; I had not appreciated just how cold it was until I had been standing about making the first image.


As I strolled around the local lakes I took warmth from the brilliant sunshine and the anticipation of some interesting image making. By the time I was half a dozen pictures in I had forgotten how cold I was. I think the cold must have gotten to me as I could not remember what the reciprocity factor should be. Times 2 up five seconds and times 5 from then on. Dam and I had left my note book behind with the reminders in. Oh well I'm not going back.


from T max negative

This walk is turning to a bit of a jokers holiday which had started before I had even left the house. My Zero is a multi format camera Just before I loaded the film I checked to see where the dividers were and in my mind it was set to 6x6 I loaded the film and used the centre red window to view the frame count. I should explain there are three for the different sizes of negative. Later that day I had the chance to develop the film only to find it was set to 6 x 4.5 – ehh! Fortunately the second film was only part way through so rectified it by using the top window for the next days images.


The wind was that strong it was producing lots of fine ripples across the water. I was not quit sure how this would look in the final images not having made many photos of water with this camera. It just go's to show how cold it was, on the eastern side of the lake I found a lot of glass thick ice being smashed up on the shore. This brought back how cold I was feeling. Time to get back, to a home made slow cooked beef Currie that should be bubbling away by now.


Contact print at 2 seconds
the print is
also showing signs
of exhausted fix.
 
Just before I left the house the following day I filled my pocket with a mix of film from different manufacturers; I do not usually do this but so what! it was an off the cuff decision to go out picture making so why not mix it up completely! The previous day I had already loaded Kodak's T Max 400 which I thought might be a bit of a gamble seeing how bright it was, just as well I did, as I messed up the exposure completely. On subsequent trips I loaded Ilford's delta 100 and Fomapan 100 which is my fav film for the Zero. The others were first time use and this time I got the exposure right.

How badly the T Max was exposed showed it self when I contact printed the negatives. I had to re do it at 5 sec's instead of my usual 2, enlarging lens fully open with white light (with no grade filters set). The negatives when looked at showed full detail. The contact print indicated that the enlargement were going to need long exposures and a lot of dodging to get them the way I wanted.

From Fomapan 100 negative

I have developed all my negatives in Adox version of Rodinal. I use 1+50 for the time required. I have to keep reminding myself that this developer has a high acutance and therefore a lot more contrast. In some cases overly so. I had in mind to use Kentmere RC gloss but changed to Footspeed's RC gloss that has a more normal look. If I had kept to the original route they would have had super contrast. As it was, I had to drop the filtration for printing down to 0 from my normal grade 3 . With the contrast sorted it was time for the exposures. With the segmented test print in the holding tray the fun really started. As an example one print had a base exposure of twenty seconds but then needed an extra 40 seconds on top of that for the sky and some of the lake. Others longer.

From Ilford delta 100 negative.
I had a good time in the darkroom even though the printing sessions were challenging the prints came out a lot better than expected. They have a lot of atmosphere to them that I'm really pleased about. Some of the photographs show that there is ice on the lake in places. I was not sure if that would show up but it has in a couple of the images.


Saturday 14 January 2017

Living with Tetenal Eukobrom AC

Developer
Tetenal new Eukobrom AC is proving to be a delight to work with. I did not realize how much of a irritant the smell of the developer was until it had been removed from the equation. I no longer have developers nose where the smell lingers long after I have left the darkroom. 

In an early article on this developer I had a couple of questions: Personally the main questions yet to be resolved are its keeping qualities and whether or not the image will be warm when the developer starts to deplete. One of these has now been answered, that is it's keeping qualities. I have been using it in my slot processor, at the end of each print session I leave the developer in the slot and cover it with the lid. The amount of time between each print session varies a lot from days to weeks sometimes months.

Slot processor
 Two things have come to light. If you leave the developer in the slot you should give it a stir before you start using it again. The active ingredient can separate out dropping to the bottom. I was caught out thinking that the developer had come to the end of it's working life because it had been left for two weeks. Something I did regularly with Ilfords multigrade without loss of usability.


Something else I have not experienced before was a black and white crystalline substance on top of the stop bath. It was a very heavy build up making it difficult to remove the top off the stop. The stop it's self was clear and still at the level it had been left at, turning out to still be working even so I changed it. This maybe an interaction with the vitamin C - something to keep an eye on.

The other question about the warming of the prints as the developer depletes still remains unanswered. This due to the fact I have not processed enough prints with the fresh developer. Once I notice I'll let you know.


Finally I have used this developer with a number of makes of paper now - RC and FB, natural, warm, cool tone and tinted papers - With great results, so if you have not tried it yet, do so! you can get it in 250 ml shots which is More than enough to get a feel for the way it works and looks.


Technical Data:

Developer Tetenal Eukobrom AC, paper Kentmere RC gloss. 


Saturday 19 November 2016

Picture Post Fisheye.

I am very pleased to be able to share these images with you. From time to time I'm asked to process and print for an artist friend. This is my first exclusive you will not find any photographs by this artist anywhere else on the net.


Technical Data:

Camera lomograph Fisheye 2, hand held, Film Fomapan 400, box speed, developed in RO9, Printed on Kentmere VC RC gloss 9x12, developed in Tentenal Eukobrom AC.

All the images I print are chosen by the artist from a contact print of the whole film. I'm instructed not to dodge or burn  unless it is really necessary. 


Sunday 27 December 2015

Tetenal Eukobrom AC first look

I like trying new things out in the darkroom, so when an offer to use Tetenal's new monochrome paper developer Eukobrom AC came up I jumped at it. I would like to thank Matt of AG Photographic and Tetenal for the chance to be one of the first to give it a test drive. A few weeks later a package arrived at the door, since then I have been chafing at the bit to try it out.

This is a new developer made for twenty first century. It is also the first commercially to use isoascorbate, vitamin C (you're not seeing things) as the main developing agent, it is a direct replacement for Hydroquinone the most widely used ingredient in photographic developers, noted for it's fast action and high contrast. It is marketed as the alternative to Ilfords multigrade all purpose paper developer producing the same sort of neutral tones. The developer works with both Fiber Baryta and resin coated light sensitive papers, whether multigrade or graded.

Top row: Ilford multigrade RC paper. left side in
multigrade developer. Right side Tetenal.
Bottom row: Fomaspeed variant RC paper. 

The data at the moment is quite sparse.

Technical Data:

Fibre Baryta
Paper (FB)
Dilution
20C
25C
30C
1+4
90s
70s
50s
1+9
100s
80s
60s
Resin coated
paper
1+4
50s
30s
15s
1+9
70s
50s
30s

All information is provided for guidance only. Deviations may arise,
depending upon the paper used. Shortening or extending the development
time by up to 10% is possible.

Diluted 1+9  Eukobrom

In to the Darkroom.

The first thing you notice with this developer is it's lack of odour. The next is the colour of the liquid, a rich yellow. I decided to dilute at 1+9. Once done I poured the contents of the measuring jug into a tray. I would have used my up right paper processor but that already had fresh Ilford multigrade in it. Using the tray for the new developer would allow me to note how long it took for the image to start appearing.

The comparison.

I have several makes of light sensitive paper in stock. I chose three, the most obvious Ilfords multigrade, Fomaspeed Variant 311 and Kentmere VC select gloss, all resin coated papers. I went to these first as they are reasonable quick to process and give an insight into how the Eukobrom will perform. Before moving on to FB papers. (results to follow in another post)

The set up.


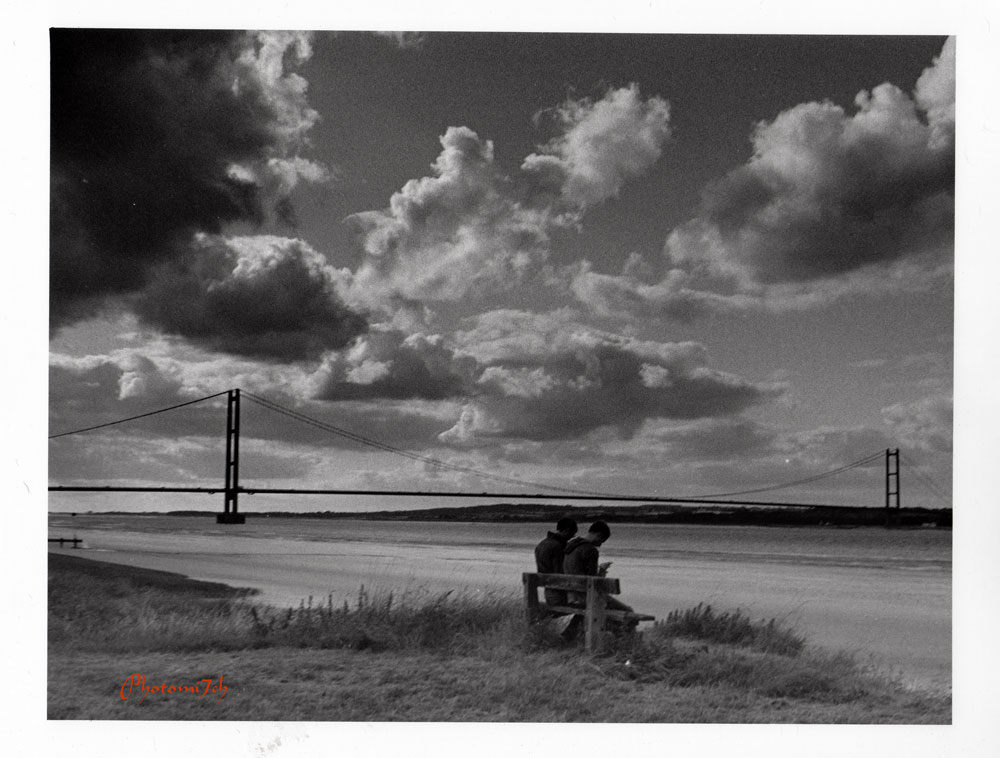
I chose a negative from a recently developed set of Agfa APX100. I set the height of the enlarger so it would produce an enlargement of 9 x 12 then set the easel to 8x10. I did this because the Kentmere paper I wanted to include I only had in 9x12, this would keep everything consistent.

Ilford multigrade RC  paper
 developed in Tetenal developer
 
 
The test strip was processed in the multigrade developer and it was indicating that the image would need to be dodged, if I wanted a picture I was happy with. I set the enlarger as follows lens F8, grade 3, exposure: The whole image was exposed for twelve seconds, the sky from the bridge upwards plus eighteen seconds and finally the sky from half way up to the top of the image plus eighteen seconds. I would produce two pictures on each paper all at the same setting. The developers temperature was set at 20C.


Ilford multigrade RC
 Paper developed in Multigrade
 
Results:

Both developers are advertised as neutral tone. To me this means they are subtlety on the cool side.

The differentiation started with:

  • The Ilford paper when compared with the other papers in the test, has a slight warmth to it's tone when developed in fresh multigrade. The Eukobrom is slightly cooler in look with a more intense black and crisper whites giving it a bit more contrast.
  • The Fomaspeed paper has a cooler look to it when developed in multigrade compared to the Ilford paper. The Eukobrom proved to be cooler looking again with more intense blacks and clearer whites again adding to the contrast.
  • The Kentmere paper is known to have a higher contrast level to the previous papers mentioned maybe as much as a grade. When developed in multigrade the image had a muddy look to it indicating over exposure with a slightly warm feel to it. The Eukobrom processed image had a cleaner crisper look. Again the midtones had better separation making it look more like a moon light picture instead of over exposed.
Fomaspeed variant RC
 developed in Tetenal
 
Once you understand that Eukobrom adds contrast to the image possibly more so than the Hydroquinone it replaces. It is easy to allow for by reducing the grade you would normally use. The blacks are wonderfully rich giving the pictures some real punch. The mid tones have more separation than Ilford multigrade but the surprise is the brightness of the whites.

Fomaspeed  variant RC
developed in Multigrade

Personally the main questions yet to be resolved are its keeping qualities and whether or not the image will be warm when the developer starts to deplete.


Kentmere paper.
Top Row:
exposed at grade three.
Right side Tetenal developer. Left multigrade.
Bottom row: exposed at grade two.
 
This is a nice developer to work with for prolonged periods as you do not get that developer smell lingering up your nose afterwards. Oh! It does look like OJ when diluted so keep it out of the reach of kids. It is a real gem and I will be ordering a bottle, it may even replace my favorite multigrade! Don't take my word for it try it for yourself you will not be disappointed. 


Friday 17 July 2015

A case of the wrong paper?

FG 1.  Ilford Multigrade RC developed in
Ilford multigrade developer


I was in the darkroom the other day doing some printing, when I noticed I had produced a print that did not match the test strip. This lead to a bit of head scratching. Then it occurred to me that the paper that was left from the last session in the test strip box was a different make. I had assumed it was Ilford, a logical thought, as it is the paper I use often.

I usually cut the paper I'm going to use into test strips at the beginning of each session. Only in this case I looked in the box and saw there were strips ready to go and just got on with printing. By strips I mean 8 x 10 paper cut in half.


FG 2.  Foma variant RC developed in
Multigrade 

I know that different makes of paper have different characteristics and levels of contrast. But I was not expecting such a big difference.

Lets set the scene: the negative is a 120 format Fomapan ISO 100. I had set the enlarger to F 11 and grade 2.5 - a good place to start due to the negatives contrast. The test strip indicated a 7 seconds exposure would provide an acceptable first print.

When I pulled the paper from the soup it did not look right even with the red light on. It lacked contrast almost flat in appearance. (fig 1 Ilford paper). I opened a box of Foma and exposed it at the same settings (fig 2 Fomatone), again it looks soft with a cooler tone to it. Finally I put a sheet of Kentmere (fig 3 ) in the easel and exposed it at the same setting. Found it! - this matched the test strip. What a difference! - it suggests a grade or two more contrast! 
FG 3.  Kentmere RC
 developed in Multigrade

I was surprised at the contrast between the Kentmere and the others was so striking. The paper developer I used was Ilfords Multigrade it has been in the processor for about a month. I note the time it takes for the first sign of the print to show - in this case 15 seconds - this gives me an idea of how exhausted the developer is. Also as the developer exhausts so the prints show signs of warmth. Once it reaches 30 seconds I tend to add fresh developer or change it.

 I did not intend to compare these papers - I was side tracked by my test strip. What I would suggest is that if your negatives are a bit on the soft side that maybe if you use Kentmere paper it may boost their contrast giving them more punch or should I say presence. I am not suggesting that you should change to Kentmere paper instead of setting the appropriate grade for the negative you are working with. It is something to keep in mind for those very thin and or flat negatives that do not respond very well when you cannot find a grade that works.
 

Monday 10 March 2014

A mistake comes good

Developed normally
In a recent chat I had with another photographer, there was a lamenting the fact that he had not noticed a problem with his new pinhole camera; well not the camera but a bit of kit he was using with it. He is not the only one not to notice the little tell tail signs that things are not going well. I had the same sort of thing with the lith 200 process I was trying out for the first time. It was not until I started to use different makes of paper that the fault struck me. Up to that point I thought it was part of the process. It turned out that the box of Kentmere paper had been light contaminated (fogged),but when I could not remember.  At this realization two things crossed my mind, what a waste of a box of paper and dam! it is not a peculiarity of the process.

lith 200 Kentmere paper
I changed to a different paper and continued to produce prints. Using the
negatives I had selected for the trial with the lith 200. While I was doing this I had the idea that maybe the fogged paper could be used to creative affect. I chose some of the negs that may lend themselves to this and processed them accordingly. As the first result appeared in the developer, I started to question this creative wisdom as it looked rubbish, but then my perception changed when the photograph of the bottles on the window sill appeared. It did not look out of place, in fact it added to it a sort of early twentieth century feel. Maybe my idea wasn't such a bad one after all!.


lith 200 Forma paper
What I'm getting at is just because it has gone wrong there is no need to throw the baby out with the water so to speak! With a little lateral thinking creatively you can turn things round. Some of you may think I'm talking a load of rubbish ( I'm being polite) but it is surprising how often a mistake can come good.
lith 200 Kentmere paper


Friday 31 January 2014

Easy lith 200 try out.

Easy lith 200
For the best part of a year I have been looking at a couple of bottles of Moesch easy Lith 200. It is there by mistake, having turned up in an order I placed and could not be bothered to send it back. After looking at the instructions again I decided to give it a go. How difficult could it be, after all it does say easy lith!? It is time to put 'easy' to the test.

What the instructions say:

The lith developer comes in two bottles marked A and B. the former has Hydrochinon and the latter Potassium Carbonate.

A and B can be diluted from 1+15 to 1+50 or any combination of the two. For example 1+25 = 40 ml of developer to 1000 ml of water. (20 ml A +20 ml B +1000 ml of water)

You should over expose your prints by 1 to 4 stops. The amount of over exposure and the strength of the developer influences the interaction between the two, e.g. with a small over exposure you should use a stronger developer of say 1 to 15 dilution, with a larger over exposure you should use a weaker developer of say 1 to 50 dilution.

Reaction when you add part A and B together
The image printed is dependent on the paper and exposure used i.e. lots of light plus weaker developer equals longer development time and greater colour.

If you are using variable contrast papers (VC) you should use white light as contrast is controlled by a combination of exposure and development time.

Short exposure equals higher contrast, underdeveloped middle tones and minimal colour.
Long exposure equals softer and colourful high lights.

It does not matter what combination of exposure or dilution you use it can take between four to twelve minutes for the image to appear whether RC or FB paper is being used. When in the developer it is recommended that the print is agitated continuously and that the emulsion side should not come into contact with the surface of the tray as it will damage it.

The water added in this case was at 26 degrees.
as you can see the milkiness disappears
The development time will extend from print to print as oxidation and bi products build up this can be compensated for by adding fresh developer to regenerate the working solution.

You can vary the relationship between part A and B. Different affects will be achieved by doing this. More part A equals more colour and harder prints but runs out of steam more quickly. More part B equals a softer print that appears more quickly relatively speaking and will produce more prints before it is exhausted.

It is suggested that by increasing the temperature of the developer to around 26 to 28 degrees centigrade it will reduce development times by 30 to 40% but by doing this it will soften the gelatin making it easier to damage.

The instructions above are not verbatim as they are translated from German but contain all the most important bits.

Some thing’s to think about before you start:

Oxidized lith developer after 24 hours
I would suggest where possible that if you are going to use the developer at the increased temperature of 26 degrees +, that it is done separately to the stop and fix which would normally be used at 20 degrees. This is really aimed at those of us who mainly use a slot processor for printing. By doing this you decrease the amount of fumes given off making the air more breathable. It also allows you to cool down the paper when it is moved to the stop therefore hardening the gelatin layer decreasing it's susceptibility to damage as you move it from bath to bath.

Collapsible bottle.
I added part A and B together when I mixed it up for the first time which I think was a mistake, it would be a better idea to dilute A and B separately as one exhausts more quickly than the other. The instructions do not state either way as to mixing the pair together.

It also states that the developer oxidizes quickly when used in a tray and that you should only mix enough for the session and when finished throw it all away. I found that if you pour the unused developer into collapsible bottles it will stay fresh for at least 48 hours. A slot processor slows the oxidation down but not to the extent that it will keep over night.


Because this post is getting a bit long my results will be posted separately. 

Results link


Saturday 11 January 2014

Paper flashing, Pre-flash examples.

I had not envisaged writing a second post on this subject so soon, but I thought I should have included some more examples with the first post.

Examples:

All the pictures that appear here have been printed on Kentmere VC RC at grade 0, developed in Ilford Multigrade and pre-flashed at one second increments with the enlarger light box at nearly full height and the lens shut down to F16.


Straight Grade Zero print


This picture is a straight grade zero print. When I took this picture I knew it would be a difficult scene to print.


Pre-flashed for one second

This picture has had a one second pre-flash the difference is quite subtle but you can just make out an increase in tone.


Two second flash

This picture has had a two second pre-flash and looks a bit washed out. The tonal range has increased in comparison to the last picture now making it necessary to add the grade five exposure to bring out the contrast and blacks.

Pre-flash test strip:


Exposure curve and Kentmere test strip
in second intervals


I have combined the pre-flash test strip for the Kentmere paper with the exposure curve to show how the test relates to the curve. Intervals 1 to 4 relate to the numbers on the curve.

Example two:

Grade zero print

This is also a grade zero print, when I took these shots I did not think the negatives would require pre-flashing.


Flashed for one second

This picture has had a one second pre-flash. If you compare the two carefully you can make out the subtle change in the sky which appears darker and the  additional tonal range in the details in the shadows.