 |
| Processed using Fuji Hunt chrome 6 |
Who's idea was it to process E6 film? I think the COVID 19 vaccine and lock down has addled my brain. Before we were trounced by COVID a friend had a stash of out dated slide film that he wanted to off load for a consideration. I considered, the films became mine.
 |
| Fuji Hunt chrome 6, out of the box. |
It was a mix of Fujichrome Sensia 100 35mm and MS 100/1000, some Provia 100f in120 format all from the early years of the millennium. He stated he did not know if they were any good because they had not been kept in a fridge. I told him no worries.
I thought I would have some fun with this film because of the dubious nature of the storage. With no particular plan or theme I went a snapping before I new it I had used nearly a dozen rolls mainly 120 format. Some with my Pinhole camera but mainly the Bronica SQAi.
 |
| Some of the film to be developed. |
After a little research I found that there were a number of E6 processing kits the trouble was the one I would have liked to use was out of stock at a number of suppliers due to the lock down. I settled on the Fuji hunt Chrome 6X processing kit, I say settled did not have much choice. With hind sight this may have been a good choice.
I received it really quickly from AG Photographic thanks guys. I opened the box to be presented with seven bottles of chemicals in different sizes and 7 pages of instructions I was not expecting that. It deflated my enthusiasm some what.
 |
| New bottles for litre dilution. |
I should own up to the fact that I have never been that interested in developing my own slide film hence my comments at the beginning with the kit sitting in front of me I suppose I better get to grips with it. I read the instructions a couple of times chucked them back in the box and kicked it in to the darkroom.
Some many month later I pulled the instruction out of the box again this time with a determination to get some film processed, about time! The first thing to note is once the bottles have been opened the first developer, reversal bath, pre bleach 2, colour developer last a max of six weeks. Which is a bit of a bummer what is also a bummer is this kit will make 5 litres of each chemical that is 35 litres in total, with a darkroom as small as mine that is a none starter I do not have the space to store it. you guessed it kicked back into the darkroom. If this carries on for to much longer maybe I should take up football instead.
 |
| Instructions. |
A few more month later I have got to grips with the instructions found a man on the bay that has supplied me with eight individual litre bottles and caps for roughly the same in pounds. I have also recalculated the chemical quantities to make a litre of each. I’m dancing in the rain now.
Having watched E6 processing on the tube you are lead to assume that it will be straight forward the truth is that approaching this for the first time there are a whole load of pit falls that can beset this notion. Without mentioning some of these you cannot be prepared for them. For example: chemicals that started out at the right temperature are not when you come to use them, you cannot get the Dev tank lid to sit properly allowing it to leak, you forget what comes next.
What follows is the methodology and ideas to negate some of the pit falls during the procedure.
 |
| Hot water holding tray. |
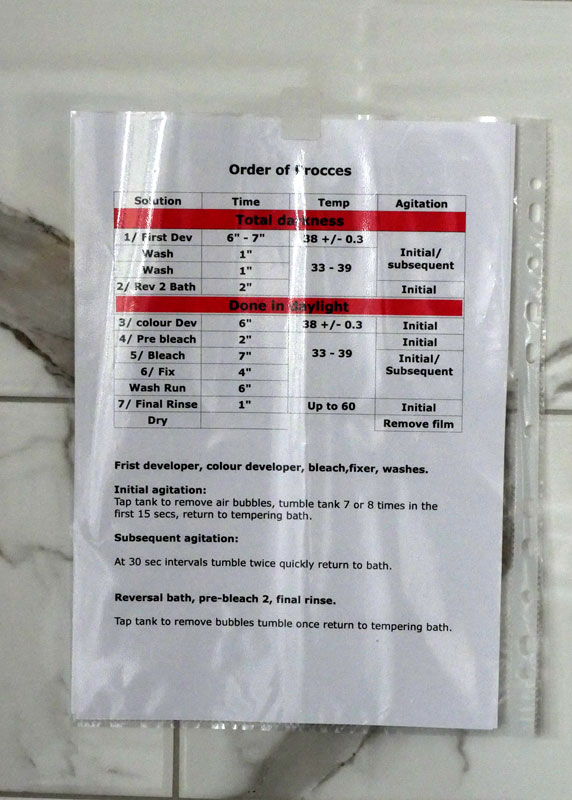
There are nine steps in the processing of slide film, two lots of temperature and two sets of agitation with total darkness and daylight sections Ooooh! my head is spinning just writing this. To keep things straight and more free flowing I produced an idiot list for reference. Numbering each step with the corresponding number on the bottle for easy recognition.
 |
| Hot water tempering bowl with boiling water jug. |
OK! let the fun begin, Just so you know I processed all the film at box speed. The first part of the development should be done in total darkness when I read this I though you must be having a giraffe can you imagine all the trouble you can get yourself into bearing in mind there are four steps to this bit alone two of which are washes. Needless to say I took a punt and did it all in daylight this turned out to be a very shroud move.
I had three baths of water, two hot, one to initially heat all the chemicals bring them almost to temp and the other as a tempering bath where I put the developing tank, jug of hot water and the bottles of chemicals I was about to use to bring them up to using temperature if need be. Checked with a thermometer. The cold water bath was for those that exceeded the needed heat.
 |
| Fuji Provia |
The [1] first developer gurgled into the developing tank at 38 degrees I filled it until I could see the liquid in the center hole put the lid on, tapped the tank several times to remove any air bubbles, inverted it 8 times in the first 15 secs putting it back in the tempering tank then inverting twice every 30 seconds. For the 7 minute Dev time.
When the time was up I poured the Dev back in the tank. There followed two, minute washes now this is where the jug of hot water in the tempering bowl comes into play. They have the same agitation as the developer. Once you have used the water it is a good idea to refill the jug with boiling to help keep the water of the tempering bowl stable. At the same time this is happening the [2] Reversal 2 bath needs to be brought up to temperature which should be between 33 to 39 degrees.
 |
| Pinhole double exposures Fuji Prova |
The reversal bath went in for 2 mins tap the tank with one inversion at the start. Trouble struck, I could not get the lid to seal while mucking about, I forgot to put the [3] Colour developer in the tempering bath to bring it up to 38 degrees. It is important to get this spot on. There was a 2 minute delay in pouring in the developer it takes roughly 1 min per degree for the boiling water to bring a litre up to temperature.
What seemed like a weeks wait the colour developer went in for 6 mins, tap the tank several times to remove air bubbles from the film invert 7 to 8 times in the first 15 seconds and then twice every 30 secs. Placing it back in the tempering bath.
While we wait for the developer to do its trick I should mention safety. I found this processes a lot messier than black and white developing. It is a good idea to wear gloves and a plastic pinny which turned out to be a good call on my part as I spilled some of it down me. The room needs to be well ventilated although the chemicals are not that pungent they give off a lot of vapor due to the heat.
 |
| Fuji Provia showing light damage |
[4]Pre-Bleach 2 went in for 2 mins at 33-39 degrees, it was about in the middle temp wise, several tank taps, invert once and back into tempering tank.
Another glitch again I forgot to put the Bleach into the tempering tank fortunately I only needed to raise the temperature to 33 degrees plus just a short delay.
With the [5] Bleach at 35 degrees it was poured in for 7 mins tank tapped to clear bubbles, inverted 8 times in first 15 sec and the twice every 30 sec.
This is turning into an epic, I understand why people batch develop their slide film it is a long haul to what I’m used to. I keep forgetting but you can fit two rolls of 120 film on the same reel and with a tank that can take two reels at once this is a big saving in time.
Now it is time to [6] Fix for 4 mins at 33-39 degrees, tap tank, invert 8 times in the first 15 seconds and then twice every 30 secs. This time I had remembered to put the fix in the tempering tank so when it was poured in it was about 37 degrees. A quick word about contamination it is inevitable as you go a long the process that the dregs of the previous stage will adulterate what come next it is only a problem if it go’s against the flow e.g. fix into bleach.
 |
| Fuji Provia a frame from damaged film |
Finally the Wash, it is for me as I do not use wash aid it is suggested that you wash in running water for 6 mins I chose to to use six changes of water with twenty four inversion with a minute stand between each. By using this method I saved 5 liters of water that I could reuse to flush the bog. I’m pleased that is over I felt like I have been on a marathon and I’ve only got ten more to do. It has got to be time for a cup of tea before I share the results.
Ah! just what the doc ordered. with all that has gone on with getting the film processed, you would think that the results would be a total shambles. I’m astonished at how good they are, colour saturation is spot on with no over development.
The results:
Eight rolls of slide film were developed it took over all about five hours over three days. All of them were spot on with the development. Of the three rolls of 35mm one roll had nowt on it half of it being clear the other black I think this is a camera fault and not processing as the other two roll were perfect. The rolls of 120 were all developed correctly with good colour saturation but suffered from camera problems in being over and under exposed and One of the film back had a light leak.
My initial thoughts on this process is never again it took a lot longer than I would have liked. Now that sometime has passed my thoughts have moved on to never say never.
For more slide pictures click this link Picture post personally processed
All words and images in this article are the copyright of Mitch Fusco 2022


