Pages

Saturday 11 November 2017

Picture post images made using a Zero multi format camera.

These are the photographs that were mentioned in Many formats in one camera


Print from 6 x 9 negative


Print from 6 x 6 negative
Print from 6 x 7 negative

Print from 6 x 7 negative
Print from 6 x 6 negative

Print from 6 x 6 negative


Print from 6 x 4.5 negative

Print from 6 x 4.5 negative.
Technical data:

Film Fomapan 100, ISO100, developed in RO9 at 1+50, Printed on Adox MCP RC gloss, 6 X 4.5 negatives printed on Silverproof paper  Matt no longer available. All developed in Ilford multi grade. 


Pictures for sale

Friday 10 November 2017

Many formats in one camera Zero 6 x 9 pinhole.

Zero 120 multi format pinhole camera
I've had my Zero 6 x 9 second edition multi format camera for years  I don't use it as much as I should this is because it comes into conflict with my Bronica SQAi which I really love using. I enjoy using the Zero but have found that it is spending a lot of time in my camera bag. This shouldn't be the case as they both have completely different characters. Since the beginning of the year I determined that I would use my pinhole camera more. I have been true to my word in that I have set time aside, it maybe the simplest way of making images, it also happens to take time to set up and expose the film. Not always conducive for the way I go about making images. The strange thing is I need a certain frame of mind when I want to use it. 

How the different negative
sizes look.
Being multi format I thought it was time to see how the other formats come out. I know after all these years it will be the first time I explore the formats ether side of my favored 6x6 negative size. So what are the other sizes, down stream is 6 x 4.5 I had not realised until I had moved the partitions to this position that with the camera horizontal it produced the frames in portrait format and that if you wanted landscape I had to stand the camera on it's side. I chose to keep it the way it is.


Upstream from 6x6 is 6 x 7 and 6 x 9 this will be the first time I have made images at these negative sizes so I'm excited to see what they will look like. Something else I did not realize was the large margin between the frames for 6 x 7. The margin is that big I think you could get another frame if the numbers were spaced differently on the backing paper. I'm used to the frames on some occasions with 6x6 bleeding into each other. When it came to the 6 x 9 negs there is no margin making it look like one image over the whole length of the film. Requiring precise cutting when putting them into the storage sheets.

How the different negative sizes are achieved.

It is simple to change the negative size with the Zero you just move the little divides into the preset slots once done you load the film and away you go. 

It has taken quite a time to realize that Fomapan 100 in my case developed in RO9 gives me a stile of image that I really like, making it my default film, dev combination when using this camera. Although that my change since I started using delta 100.

There is a picture post to follow showing some of the images made using the different formats. They have been posted click here.

Friday 3 November 2017

Ilfords Delta films A big surprise.


I read a lot of stuff in search of inspiration and ideas for this blog. And one of the strangest things I read a lot is the lack of willingness to push creativity. For example: 'I will only ever use FP4+ - I only make landscape images.' Why? I have never understood the idea of painting yourself into a corner, creatively speaking. I have been writing this blog for around a decade now, the one thing I have discovered is that choices, likes, dislikes move on naturally and to say never say never really only means for this period of time.

Delta 100 negs
Like wise I have never given Ilfords Delta range a second thought. Why? It just has not been on my radar. I have been happy making images using FP4+ and Fomapan 100 among others. All of a sudden I find myself saying to a friend that I will purchase his out of date delta. And now I have about 15 rolls delta 100 and 3200 120 format in a box on the floor waiting for me to use it.

 I have already exposed one roll of 3200 at box speed, which just happens not to be the rated speed of the film in this case. It is actually rated at 1000 ISO something I was not aware of at the time I used it. Which means that the film was pushed five stops, something of a first for me! I've also used a couple of rolls of 100 at box speed.


Delta 100 grain seen through a focus finder
OK so what is so special about Delta film? It is Ilfords offering in the T grain category of film emulsions, Kodak call theirs T Max and Fuji Neopan. Known as tabular grain film, meaning that the shape of the silver halide is relatively broad and thin, with two well developed parallel faces. This leads to the crystal absorbing more light sensitive dye. It also reduces the scatting of light which increases resolution. This leads to a film that works in all sorts of lighting conditions. If you think about it, it is ideally suited for beginners, making it very tolerant to bad exposure.

Print from delta 3200 ISO 3200
Tabular crystals dissolve more slowly than traditionally grained films when it comes to fixing them. You are advised to increase the fix time as it takes twice as long for the film to clear when using rapid fix.

In truth I am not someone who can go out and make images of anything just to try out a new film. Even when it is well out of date, some of you may think it's a bit risky. I believe it is a waste of time if the images you make are not well composed and of subjects that you enjoy. After all a good image is easy to print and share. A project that would suite the Delta 3200 droped in my lap. I had the opportunity to photograph a number of five week old pups. When it came to photographing them they had all worn themselves out and were fast asleep. That is until I started making pictures! Its funny how noisy a Bronica SQAi with an motor drive can be in hushed conditions!

Print from Delta 3200 ISO 3200

I was a little disappointed with the 3200, although it was very bright outside the room was a bit dark and on a couple of occasions I was down to 60th sec at F2.8 which is the minimum aperture for the lens I was using and as slow as I could go hand held. It was not practical to use a tripod as they had tucked them selves into lots of little cubby holes to sleep.


Print from Delta 100 ISO 100
I developed the film RO9 at 1+50 for the suggested time of eleven minutes. The negatives look a bit underdeveloped (thin) I will, for the next film, up the developing time.

When it came to printing the negatives the underdevelopment showed it's self on the segmented test prints. Indicating that 15 secs was the best exposure time. I chose to use Adox MCP paper set at grade 3. The enlarger was set to a height for 11 x 12 paper but the easel was set for 8 x 10 paper with white margins. I did this because there was a lot of dead space on the negatives. The down side is that the prints are a bit grainy. Something I should have expected to a certain extent seeing as I have used RO9 to develop them with. The final prints were a little soft even though they have been printed at grade three.


Print from delta 3200 ISO 3200
 
Having read the above it may lead you in to thinking it was a bad set of negatives. On the contrary I am very pleased with the results although a little disappointed with the contrast, but then you have to take into account that it is the very first time I have worked with this film. Fortunately I have more film to play with.

I have also exposed a couple of rolls of Delta 100 at box speed developed in RO9 and by comparison they are very punchy (high contrast) they remind me of the Fomapan 100 negatives I produce with the above developer. The 100 has produced super smooth looking photographs. Something I have been looking for for sometime. This may replace the need for a ultra fine developer.

Print from Delta 100 ISO 100.
last laugh goes to the cat a sleep in the sun.


Friday 22 September 2017

Water marks on film? You need to be bold!

It is a great sense of achievement to behold a set of wet glistening negatives in all their tonal glory. It is your first chance to see how well they have been exposed and a relief to see all those rectangles or squares in a row. But it is a time of controversy in how you get them dry and clean.

Normal wisdom states at the end of the processes you add half a dozen drops of wetting agent to the last rinse, swish the reel about a few times and leave to stand for a minute. This helps to break the tension of the water so when you hang it to dry the water forms little droplets that run off without leaving any water marks behind when it is dry. The reality is quite different for some.

Wetting agent is not some magic bullet that you cannot do without. Heresy! I hear shouted from the back of the room! It is true the inter web is filled with photographers bemoaning those calcium water marks unseen until the print is hanging up to dry. You film scanners need not sit there smugly because you can take it out using photoshop. I hear a lot of complaints from this sector as well - time lost to spotting. The real smug ones are those that never get this problem when they use wetting agent. Well bully for you! Most of us do not have super soft water that just caresses our film and falls off!


Please do not get me started on those delicate lovelies that believe that if you touch wet film it will be ruined. Lets have some reality here! Wet film is a lot more resilient than it is given credit. For those of a delicate disposition please look away as what I'm going to say next is going to be outrageous to the extreme. I do not use wetting agent and I use a damp shammy leather to wipe both sides of my film dry.


It is a shocking and stunning revelation, but I have had no choice in the matter - honest officer! I have been plagued with wetting agent contamination over recent times that no amount of cleaning and washing has put right. This has led me to hand drying the film. Before you start banging the door down I should point out that there is a very nasty bit of kit called a film squeegee that has in the past ruined countless frames of film by putting a scratch line through them all. It took a long time and many rolls film to discover. So I make no apologies for these outrageous actions.

 Seriously! I now have water mark free negatives that air dry more quickly and no more blotchy looking prints. I wrote an article on how I discovered that wetting agent was the problem. Called wetting agent contamination. 


Monday 11 September 2017

We are back!

Mad rush to get first dibs on there preferred films. 
We have not forsaken you my friends. We will be publishing a series of posts very soon. They have been written and now thankfully the editor is back in the hot seat after a prolonged bout of illness. They will be wiped into shape so you can read them.  

We look forward to seeing you all again. 

Sunday 2 April 2017

Picture Post, Planes

For me making images of aircraft is heaven. It is the combination of two loves. As you can see these are not the bog standard images you see, they are about the poetry of flight.

Antonov

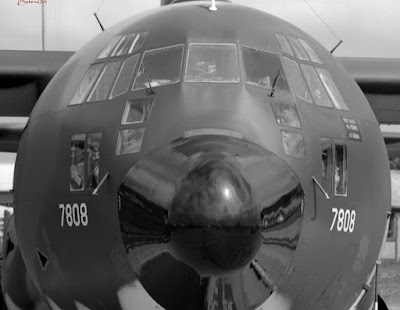
Hercules 

Hurricane 

Huey 

Tornado

Trident
Technical Data: Camera Nikon FM, Film Agfa APX iso 100, Printed on Ilford multigrade RC gloss, Developed in Multigrade.

Pictures for sale

Sunday 26 March 2017

Enlarging lens revisited

Recently black and white photography magazine has been celebrating it's two hundredth edition which gave me impetus to rediscover what was in some of those back issues. While thumbing through one issue, an article about enlarging lenses caught my eye, reminding me that I have been meaning to revisit the subject.

I have written a couple of small articles: Enlarging lens and which aperture  I re-read both before writing this one so as not to repeat myself. But that is not going to be easy as the main issue with enlarging lenses is quality. The rule of thumb is to choose a lens of six or more elements. The Componon-s and Rodagon are two modern designs that work very well - they are two quality makes of the few still available new.

Looking down a focus finder at F5.6- F8
In the 1970s Nikon special optics division set about producing a darkroom lens second to none ( Apo-EL-Nikkors ). It was done in a one off batch, releasing a number to the market over a ten year period until they were all gone. It has been said that at the end of this period they did consider doing another run but stopped doing so because they would have had to sell the lenses for £12,000 each. I do not know if this figure is true or not. If it is, it will have made the original runs price in the thousands and therefore out of the reach for most of us.

The enlarging lens has one job to do and that is to project the the image from the negative to the paper perfectly. The one hindrance to good enlargement method and creativity is poorly maintained or ignorantly used enlarging lens practice. It is not good enough to think if you close the lens right down, like you would a camera lens, that you will increase the sharpness of the image. The rule again is to close the lens down by two F numbers. In a lot of cases this produces the optimum sharpness. One stop more may result in a softening of the grain structure. This does not mean that you will notice a softening of sharpness with the mark one eye ball as the image is projected onto the paper. Like a lot of things in photography the kit is made to a greater quality than can be seen in normal life.

Focus finder
Enlarging lenses should not be treated as second class citizens as they are several time better in quality than the camera mounted counterparts. They do their best work in a very narrow range of magnifications. For 35mm negatives the lens is optimized to 10x its size which equates to an enlargement of 10x8. As you go up the format scale this decreases 6x6cm lenses 6x and 5x4in 4x magnification. As you push past the optimal point it increases the possibility's of grainy photographs. This is not to say you should not push beyond this point as experience has shown. You can negate this by using ultrafine film developers.

Grain at f11

How do you see which is the best apertures to use? You need to complement your lens with a good focus finder. This magnifies the grain of the negative so you can see it. The best way to use the finder is to have the enlarging lens fully open. Place the finder in the middle of the baseboard. While looking down it at the grain, adjusting the bellows until it separates into little defined specks. This will mean that you now have fine focus.

While still looking down the finder shut the lens down a stop at a time. There will be a point where the look of the grain go's slightly soft and becomes softer the more you close it down. You should remember that you are still at optimum focus. To test this you can try to adjust the sharpness in most cases it will get worse and become to difficult to regain any sharpness until you go back to the optimum aperture.

Grain at F16 looking down the focus finder.

What has been described above is my experience with one of my 35mm enlarging lens. I will point out that it is not a well known make. It is one I use often. The softening of the grain in the focus finder is not transferred to a softer looking image on the baseboard that can be detected with the naked eye but you will start to question whether it is affecting the quality of your images. The only way you will know is to borrow or buy a better quality lens and do a comparison.

When considering buying a lens you should spend as much as possible to ensure that you get a good to very good lens. Knowledge that the lens is not what you expected will impact on your photography subconsciously.  

Saturday 25 February 2017

Picture Post Eukobrom AC Developed photographs

Paper Kentmere RC gloss.
The images that appear in this gallery have been processed using Tetenals Eukobrom AC developer on a number of different papers.

I would like to thank Tetenal for there interest in and re-blogging of the first look post. It was a big surprise when they got intouch.

There is a new post on Eukobrom to be published not all good news.


Paper Fomatone  Chamois 542-11 matt


Paper Ilford FB gloss
Paper Fotospeed RC gloss

Paper Kentmere RC gloss

Paper Fomatone Chamois 542-11 matt


Technical Data:

Camera Bronica SQAi, lens 80mm, Film ilford FP4+ iso 125, Fomapan 100 iso 100, Negative size 120 6x6, Developed in Studional.

Scanned from paper size 9.5 x 12, paper used listed with each image.


Friday 17 February 2017

Double grade printing.


From time to time I find it strange the way events come together! for instance, I was in the darkroom working on some prints that I could not get the sky to burn in properly. There was nothing unusual in me burning in the sky, most of the photographs I produce have had the skies enhanced in some way. But this time I could not get it the way I wanted it.


The strangeness in this case was that a few days before, I was reading a thread on my favourite forum about how to deal with whited out skies when printing. I took part giving an account of my method of dealing with it. One of the other contributors suggested split grade printing. But when he described the process it is more akin to double grade printing - this is where you use another grade to bring out part of the image that will not burn in at the grade you are using.


All the circled images needed double grade printing.

The process:


The contact print in this case suggested that the stone work of the building and sky were under exposed when compared to the reflection. The segmented test print (grade 2) proved this by indicating that it may need to be burned in for an extra twenty seconds above base exposure of thirty seven seconds. Even with the extra light it did not make the difference. After a further print and forty seconds burn in, it still was not right. I decided to see if changing to a harder grade when burning in would make the difference.

With the discussion still fresh in my mind I opted to use the double grade method to see if it would solve the problem I was having. I normally would have used pre flashed paper but that would mean starting all over again with a pre-flashed test strip. I chose the simpler route of dialing in a harder grade, in this case 4, before burning in the sky and face of the building.

The red area indicates the over lap area of the mask.
Something to consider:

When using this method certain negatives can produce a grainier look to the picture which may not be to your liking and you need to be careful not to knock the masking frame when changing the settings and using the mask.

The burning in method:

It takes practice to get this method to look natural, which is easy to master when you have a nice defined area without things like buildings poking up above the horizon. A piece of card is needed to use as a mask. You do not need to use black card but if you have some all well and good. Otherwise any card will do, if one side is brighter than the other you should always make that side face the lens to reflect the light back. In my opinion you should make the mask smaller than the site that needs covering. Because the card is kept moving it will make up for the under size when used with an up and down motion. If you don't you can end up with a lighter shaded area a bit like an out line you would get if it was still. When you get it right it is very satisfying.

 Result:

I used forty seconds at grade four to burn in the building and sky. How did I know it would work? I further considered the segmented test print, took a calculated risk and listened to the little voice in the back of my head. In other words I went with the creative flow.


Basic outline for split grade printing.

Saturday 28 January 2017

Picture post Snow

This week I'm sharing these images of snow. Not that we have any but you never know.   


Technical Data:

In order of appearance:


  1. Nikon FM, 35mm, FP4, ISO 125, developed in Acufine, negative scanned.
  2. Bronica SQAi, 120, FP4+, ISO 125, developed in ID11, printed on Ilford Multigrade paper RC gloss, developed in  Ilford Multigrade. 
  3. Bronica SQAi, 120, FP4+, ISO 125, developed in ID11, printed on Ilford Multigrade paper RC gloss, developed in  Ilford Multigrade. 
  4. Bronica SQAi, 120, FP4+, ISO 125, developed in ID11, printed on Ilford Multigrade paper RC gloss, developed in  Ilford Multigrade. 
  5. Bronica SQAi, 120, FP4+, ISO 125, developed in ID11, printed on Ilford Multigrade paper RC gloss, developed in  Ilford Multigrade.
  6.  Bronica SQAi, 120, FP4+, ISO 125, developed in ID11, printed on Ilford Multigrade paper RC gloss, developed in  Ilford Multigrade. 
  7. Nikon F5 35mm,  Agfa APX, ISO 100, developed in ID11, printed on Ilford Multigrade paper RC gloss, developed in  Ilford Multigrade. 
  8. Nikon F5 35mm,  Agfa APX, ISO 100, developed in ID11, printed on Ilford Multigrade paper RC gloss, developed in  Ilford Multigrade. 
  9. Nikon F5 35mm,  Agfa APX, ISO 100, developed in ID11, printed on Ilford Multigrade paper RC gloss, developed in  Ilford Multigrade. 


Pictures for sale