Pages

Showing posts with label black and white. Show all posts

Tuesday 21 December 2021

Trouble in the darkroom


My darkroom is a very personal space, the only acknowledgement to it being standard is the separation of wet and dry working areas. It is just big enough for one person to work in comfortable. A bit of a glorified closet really! which has meant I have had to find ways of making the space work hard to meet the needs of both wet-and dry sides working areas.


One of the things I have had to do is to put the 12 x16 paper processor under the work top on a pull out shelf. It was done originally to save space but has proved to be inspired in a way I had not foreseen. Being able to look down on the print process has made it a more relaxed way to work. Keeping the work top clear for other wet side needs has not worked so well, the top is being dominated by the tray I use to put the tube covers that keep the chemicals fresh in the slot processor. It was a large tray so that the tops could be spaced far enough apart to stop cross contamination. 


However, it all came to a head when I wanted to try a new print developer and use it with a tray so I could monitor when the first signs of the image appeared, then transfer it to the processor for stop and fix. I should explain that the darkroom does not have running water. I usually part fill a tray with water to put the fixed photographs in then wash them at the end of the session in the bathroom. Anyway I had the water tray precariously balanced on top of the slot covers in their tray as the rest of the top was taken up with the developing tray. It must have been a good day as I did not manage to tip the whole lot over myself. 

I now seriously considered ways of storing the slot tops that would keep the worktop clear. It came to me that the best way was to stand them on end. My first thought was to use a number of metal clips attached to the wall. I cannot understand why I had not come to this conclusion sooner. Once I had thought about it. It was not such a good idea as fix attacks metal. I decided it would be better to use plastic, so took some measurements, sat down and did a number of drawings of a tray that would hold the tubes upright. Then thought about how to stop cross contamination, so added sections to the base. Once I had refined the basic look and measurements I showed the idea to my mate at Plasweld, he helped to simplify the design and added a splash back to stop chemicals running all over the place when loading the tops into the stand. 


A few weeks later the stand is finished. It works very well and has freed up lots of space on the worktop allowing me to work more safely. Such a simple idea that has made a big difference.


A typical layout for a darkroom

Monday 20 December 2021

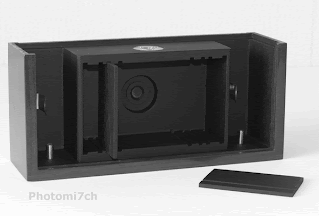
Preparing the Zero Pinhole Camera for use.


Using this camera is a real step back in time requiring you to put aside all those luxuries that the modern photographer has taken for granted. After all, it is just a box with a pinhole in it, the ultimate manual experience from loading the film and remembering to wind it on, to calculating the shutter speed.


Loading the film:

To start with you need to load a roll of film. That's obvious, most film cameras need film to work. If you are like me it has been a long time since you looked at the backing paper of a roll 120 film. I had forgotten that it is marked for the four different sizes in the 120 family and with the multi format camera it has three red coloured windows in which to view the film numbers. It also has a set of symbols that tell you when the number is about to appear in the window which also marks the middle of the frame. With this set up you cannot blame anyone else for winding it on to far, so it is a good idea to take it slow and gentle in the beginning. Before loading the film you need to set the format your going to use, once the back and top are in place, it is time to advance the film so the light-sensitive material is in front of the pinhole. When winding on you may notice that it becomes quite tight, this is where the celluloid attached to the backing paper is being drawn in front of the light box. Just continue gently on until the first frame number appears behind the little red window. Now the camera is primed for light capture.


Calculating exposure;

The Zero cameras aperture is set at F 235, it is important to remember this as this number is not written on the calculator attached to the back of the camera. The calculators outer ring shows shutter times from 8000 ths of a second too 15 hours, the inner ring shows F numbers from F 1.4 to F 500.


Please note that all the figures that follow are based on a film speed of 100 ISO.

Today, for example, my light meter is showing a light reading of F 5.6 @ 500 ths of a second. Now using the calculator move the dials so F5.6 is opposite 500 ths of a sec., then find F 235 on the outer ring and read off the time opposite which is about 3 second; you will need to make an adjustment for reciprocity effect by a factor of 2 making an exposure time of 6 seconds. I say 'about' because the next F number is 250 with an indicated shutter time of 4 seconds. To start with it is a bit hit and miss, that is why it is a good idea to make notes on shutter times so you can see where to make adjustments once the film has been developed.

You will need to make adjustments for the reciprocity effect as follows:

  • From 1 second and over compensate by multiplying by 2 giving an exposure of 2 seconds.
  • From 5 seconds and over compensate by multiplying by 5 giving an exposure of 25 seconds
  • From 50 seconds and over compensate by multiplying by 12 giving an exposure of 600 seconds/11 mins.


Monday 6 September 2021

Out of date film Home truths.

The use of out of date film has become very popular over the last few years. So much so that it has become a bit of a sub culture within the film world, with some photographers stating that it is all they use. I get the impression that in some cases there is a bit of grand standing, look at me, my photography is better because of it! If it has improved your picture making then all well and good, but I have to say that some of the images I have seen makes me wonder why did they bother! I personally see no advantage in using out of date, apart from the fact it is slightly less expensive than fresh. 

Lets be honest about this how often do you end up with a blank film?

But then again there is a certain extra thrill in the knowledge that when you take the lid off the developing tank and view the wet film with nicely exposed negatives, a sense of relief at your gay abandonment to the natural order of things was worth the risk. In my experience the risk is very small but if you read some blogs it is a step to far to contemplate.


120 Fujicolour Superia
out of date by 10 years.
So why would you treat out of date film to a different set of process times?

I have always used out of date film long before it became popular. I just keep using the film stock till it runs out. It was not until recent times that I have taken note of the process before date and now that I have that knowledge it has not made any difference to the way I make images and process the film. When comparing them to in date negatives of the same make I can see no difference.


120 Fujicolour Superia
out of date by 10 years.
So how do you store your film?

There is a lot of myth and misunderstanding about how to store your film after you have purchased it. The one thing that destroys film faster than anything else is humidity. Even in these situations, as long as the film is kept in its sealed containers and wrappers (medium format) it will remain in good condition. So common sense would suggest that you only break the film out when you are about to use it. Surely? 


So why would you need to store it in a fridge or freezer?

I used to do this until I was caught out by not getting the film from the fridge the day before. I seriously questioned whether there was any advantage to doing it. Common sense suggested that the weather in the UK never really gets that extreme so why bung the fridge up? -(there was a cheer from the other half when I removed it all!) - after all, I purchased it to use, not stock pile. Obviously everyone's circumstances are different. But I have found a growing number of people who store film in a draw find it more convenient and allows for spontaneity. Not having to second guess myself about will I or Won't I need a film tomorrow has freed up creativity.

 With this in mind I purchased a carton of out of date film. It is a mixed box of T max 400, Ilford delta 100, 3200 and XP2 400. I did this because I had been toying with the idea of trying out TMAX 400, but it then occurred to me that I had never used the others either. So now is my chance. I was told they had all been stored in a draw and were still in the sealed wrappers. Good enough for me! 

This selection of emulsions are a maximum of seven years out of process date. I have used so far the delta 100 and 3200 at box speed. Developed in RO9 @1+50 @20C using my usual method. The results are what I would expect from fresh stock.

There is a down side, it can go wrong occasionally, but it is a lot rarer than people would have you believe and it is more than likely to be human error than failure of materials. Some of you will be uncomfortable with the idea and I understand that reticence, especially if you are new to film photography.

I have written two other posts on the subject: Film storage - is a more technical look and colour out of date - which talks about an old film left in the camera for years. My view on film storage has not changed as these other post will reinforce. Remember do not be influenced by other peoples narrow mindedness. Photography is about being creative and that means there are no rules. 

Out of film Delta 3200, dev RO9,
 printed on Adox MCP

Here is a link to the delta film mentioned earlier in the article.

Updated 2022:

Since writing this there is a downside to out of date film. It is unexpected and inconsistent in its appearance and affects black and white 120 film so far. The main reason for it is the paper backing, for some reason it can produce a blotchy look to the negatives which is most noticeable in the sky detail.  


The following pictures show the affect: 


Technical data:

The black and white images were scanned from photographs. 

Camera used was a Bronica SQAi with a 120-format film back.

Black and white film used for the pictures above Fomapan 100 with the black backing paper. They have recently changed the paper to the same one Ilford use. you can see what the different backing papers look like here


Monday 15 February 2021

Reciprocity How it may affect monochrome film


The use of a Zero pinhole camera means that long exposures are the norm.
It might be a good idea to give an insight into how reciprocity affects the negatives. It is a wide-ranging subject that afflicts colour and black and white materials in different ways at long exposures, extremely short exposures and with flash. Because of this I am limiting this post to long exposure times with black and white film.

The Law:

The formula E=IxT expresses reciprocal relationship between the intensity of light reaching the film and the time allowed to act on the film. If one increases the other decreases proportionally, no net change in exposure occurs.

Ansel Adams The Negative.

At long exposures this law breaks down, known as reciprocity failure. It is where a seconds worth of light is not enough to satisfactorily produce the required densities in the negative. So the longer the exposure the greater the compensation needs to be. With these exaggerated times comes a side effect in that the lower values recorded become under exposed more than the higher ones causing the contrast of the negative to increase. You can make adjustment for this when developing the film by a reduction of ten percent for up to ten seconds, from ten seconds by twenty percent and from a hundred seconds by thirty percent. These changes are easy to control for single frame exposure made with large format cameras but a little difficult to achieve with roll film. If all the frames on the film are exposed for no longer than ten seconds then the ten percent reduction will control the increase in contrast across the whole film, but in practice this is not always the case with exposure times being all over the place. I would suggest that a reduction of ten percent be the starting point and that with experimentation will find what works best for you. Having said all this the side effect of higher contrast maybe to your liking in which case where's the problem.


The picture included in this post shows a slight increase in contrast. The negatives Ilford FP4+ were processed in PMK Pyro without an adjustment for increased contrast. Printed on grade two multi grade paper developed using Moersch 6 blue.


The following images and those above were all made using a Zero multi format Pinhole camera. The pictures below are from negatives using Fomapan 100 at box speed developed in studional for 11 minutes. scanned from photographs printed on Ilford multigrade 4 developed in souped ilford multigrade. 


Saturday 9 June 2018

Out for a stroll with the Zero


It is always a joy to be out with the Pinhole camera. But it must be a strange sight to behold as I walk up the street. A little brown box attached to what could be construed as a big black stick (tripod). On this occasion it was a lovely bright day with a biting cold wind; I had not appreciated just how cold it was until I had been standing about making the first image.


As I strolled around the local lakes I took warmth from the brilliant sunshine and the anticipation of some interesting image making. By the time I was half a dozen pictures in I had forgotten how cold I was. I think the cold must have gotten to me as I could not remember what the reciprocity factor should be. Times 2 up five seconds and times 5 from then on. Dam and I had left my note book behind with the reminders in. Oh well I'm not going back.


from T max negative

This walk is turning to a bit of a jokers holiday which had started before I had even left the house. My Zero is a multi format camera Just before I loaded the film I checked to see where the dividers were and in my mind it was set to 6x6 I loaded the film and used the centre red window to view the frame count. I should explain there are three for the different sizes of negative. Later that day I had the chance to develop the film only to find it was set to 6 x 4.5 – ehh! Fortunately the second film was only part way through so rectified it by using the top window for the next days images.


The wind was that strong it was producing lots of fine ripples across the water. I was not quit sure how this would look in the final images not having made many photos of water with this camera. It just go's to show how cold it was, on the eastern side of the lake I found a lot of glass thick ice being smashed up on the shore. This brought back how cold I was feeling. Time to get back, to a home made slow cooked beef Currie that should be bubbling away by now.


Contact print at 2 seconds
the print is
also showing signs
of exhausted fix.
 
Just before I left the house the following day I filled my pocket with a mix of film from different manufacturers; I do not usually do this but so what! it was an off the cuff decision to go out picture making so why not mix it up completely! The previous day I had already loaded Kodak's T Max 400 which I thought might be a bit of a gamble seeing how bright it was, just as well I did, as I messed up the exposure completely. On subsequent trips I loaded Ilford's delta 100 and Fomapan 100 which is my fav film for the Zero. The others were first time use and this time I got the exposure right.

How badly the T Max was exposed showed it self when I contact printed the negatives. I had to re do it at 5 sec's instead of my usual 2, enlarging lens fully open with white light (with no grade filters set). The negatives when looked at showed full detail. The contact print indicated that the enlargement were going to need long exposures and a lot of dodging to get them the way I wanted.

From Fomapan 100 negative

I have developed all my negatives in Adox version of Rodinal. I use 1+50 for the time required. I have to keep reminding myself that this developer has a high acutance and therefore a lot more contrast. In some cases overly so. I had in mind to use Kentmere RC gloss but changed to Footspeed's RC gloss that has a more normal look. If I had kept to the original route they would have had super contrast. As it was, I had to drop the filtration for printing down to 0 from my normal grade 3 . With the contrast sorted it was time for the exposures. With the segmented test print in the holding tray the fun really started. As an example one print had a base exposure of twenty seconds but then needed an extra 40 seconds on top of that for the sky and some of the lake. Others longer.

From Ilford delta 100 negative.
I had a good time in the darkroom even though the printing sessions were challenging the prints came out a lot better than expected. They have a lot of atmosphere to them that I'm really pleased about. Some of the photographs show that there is ice on the lake in places. I was not sure if that would show up but it has in a couple of the images.


Friday 12 January 2018

Newton's rings. Updated


This effect can happen when using medium format and larger negative carriers as they use glass to keep the negative flat. Most carriers today use a frosted piece of glass above the negative known as anti Newton glass. 
The rings occur in the areas where two clear smooth flat pieces of glass lie next to each other but do not quite touch. The interference happens because the light rays are refracted, this produces irregular shaped dark rings in the projected image. This will happen more readily if any of the surfaces are wet. You can get round this by using a paper mask with the negative in the carrier. This will block out the light in the places where there is a gap between the glass surfaces. You will need to check the projected image to see if they are still visible.

Sunday 2 April 2017

Picture Post, Planes

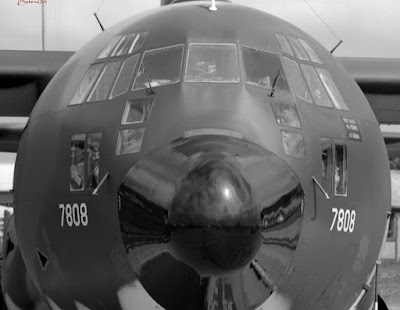
For me making images of aircraft is heaven. It is the combination of two loves. As you can see these are not the bog standard images you see, they are about the poetry of flight.

Antonov

Hercules 

Hurricane 

Huey 

Tornado

Trident
Technical Data: Camera Nikon FM, Film Agfa APX iso 100, Printed on Ilford multigrade RC gloss, Developed in Multigrade.

Pictures for sale

Saturday 25 February 2017

Picture Post Eukobrom AC Developed photographs

Paper Kentmere RC gloss.
The images that appear in this gallery have been processed using Tetenals Eukobrom AC developer on a number of different papers.

I would like to thank Tetenal for there interest in and re-blogging of the first look post. It was a big surprise when they got intouch.

There is a new post on Eukobrom to be published not all good news.


Paper Fomatone  Chamois 542-11 matt


Paper Ilford FB gloss
Paper Fotospeed RC gloss

Paper Kentmere RC gloss

Paper Fomatone Chamois 542-11 matt


Technical Data:

Camera Bronica SQAi, lens 80mm, Film ilford FP4+ iso 125, Fomapan 100 iso 100, Negative size 120 6x6, Developed in Studional.

Scanned from paper size 9.5 x 12, paper used listed with each image.


Friday 17 February 2017

Double grade printing.


From time to time I find it strange the way events come together! for instance, I was in the darkroom working on some prints that I could not get the sky to burn in properly. There was nothing unusual in me burning in the sky, most of the photographs I produce have had the skies enhanced in some way. But this time I could not get it the way I wanted it.


The strangeness in this case was that a few days before, I was reading a thread on my favourite forum about how to deal with whited out skies when printing. I took part giving an account of my method of dealing with it. One of the other contributors suggested split grade printing. But when he described the process it is more akin to double grade printing - this is where you use another grade to bring out part of the image that will not burn in at the grade you are using.


All the circled images needed double grade printing.

The process:


The contact print in this case suggested that the stone work of the building and sky were under exposed when compared to the reflection. The segmented test print (grade 2) proved this by indicating that it may need to be burned in for an extra twenty seconds above base exposure of thirty seven seconds. Even with the extra light it did not make the difference. After a further print and forty seconds burn in, it still was not right. I decided to see if changing to a harder grade when burning in would make the difference.

With the discussion still fresh in my mind I opted to use the double grade method to see if it would solve the problem I was having. I normally would have used pre flashed paper but that would mean starting all over again with a pre-flashed test strip. I chose the simpler route of dialing in a harder grade, in this case 4, before burning in the sky and face of the building.

The red area indicates the over lap area of the mask.
Something to consider:

When using this method certain negatives can produce a grainier look to the picture which may not be to your liking and you need to be careful not to knock the masking frame when changing the settings and using the mask.

The burning in method:

It takes practice to get this method to look natural, which is easy to master when you have a nice defined area without things like buildings poking up above the horizon. A piece of card is needed to use as a mask. You do not need to use black card but if you have some all well and good. Otherwise any card will do, if one side is brighter than the other you should always make that side face the lens to reflect the light back. In my opinion you should make the mask smaller than the site that needs covering. Because the card is kept moving it will make up for the under size when used with an up and down motion. If you don't you can end up with a lighter shaded area a bit like an out line you would get if it was still. When you get it right it is very satisfying.

 Result:

I used forty seconds at grade four to burn in the building and sky. How did I know it would work? I further considered the segmented test print, took a calculated risk and listened to the little voice in the back of my head. In other words I went with the creative flow.


Basic outline for split grade printing.

Saturday 28 January 2017

Picture post Snow

This week I'm sharing these images of snow. Not that we have any but you never know.   


Technical Data:

In order of appearance:


  1. Nikon FM, 35mm, FP4, ISO 125, developed in Acufine, negative scanned.
  2. Bronica SQAi, 120, FP4+, ISO 125, developed in ID11, printed on Ilford Multigrade paper RC gloss, developed in  Ilford Multigrade. 
  3. Bronica SQAi, 120, FP4+, ISO 125, developed in ID11, printed on Ilford Multigrade paper RC gloss, developed in  Ilford Multigrade. 
  4. Bronica SQAi, 120, FP4+, ISO 125, developed in ID11, printed on Ilford Multigrade paper RC gloss, developed in  Ilford Multigrade. 
  5. Bronica SQAi, 120, FP4+, ISO 125, developed in ID11, printed on Ilford Multigrade paper RC gloss, developed in  Ilford Multigrade.
  6.  Bronica SQAi, 120, FP4+, ISO 125, developed in ID11, printed on Ilford Multigrade paper RC gloss, developed in  Ilford Multigrade. 
  7. Nikon F5 35mm,  Agfa APX, ISO 100, developed in ID11, printed on Ilford Multigrade paper RC gloss, developed in  Ilford Multigrade. 
  8. Nikon F5 35mm,  Agfa APX, ISO 100, developed in ID11, printed on Ilford Multigrade paper RC gloss, developed in  Ilford Multigrade. 
  9. Nikon F5 35mm,  Agfa APX, ISO 100, developed in ID11, printed on Ilford Multigrade paper RC gloss, developed in  Ilford Multigrade. 


Pictures for sale