Pages

Showing posts with label film. Show all posts

Tuesday, 21 December 2021

Trouble in the darkroom


My darkroom is a very personal space, the only acknowledgement to it being standard is the separation of wet and dry working areas. It is just big enough for one person to work in comfortable. A bit of a glorified closet really! which has meant I have had to find ways of making the space work hard to meet the needs of both wet-and dry sides working areas.


One of the things I have had to do is to put the 12 x16 paper processor under the work top on a pull out shelf. It was done originally to save space but has proved to be inspired in a way I had not foreseen. Being able to look down on the print process has made it a more relaxed way to work. Keeping the work top clear for other wet side needs has not worked so well, the top is being dominated by the tray I use to put the tube covers that keep the chemicals fresh in the slot processor. It was a large tray so that the tops could be spaced far enough apart to stop cross contamination. 


However, it all came to a head when I wanted to try a new print developer and use it with a tray so I could monitor when the first signs of the image appeared, then transfer it to the processor for stop and fix. I should explain that the darkroom does not have running water. I usually part fill a tray with water to put the fixed photographs in then wash them at the end of the session in the bathroom. Anyway I had the water tray precariously balanced on top of the slot covers in their tray as the rest of the top was taken up with the developing tray. It must have been a good day as I did not manage to tip the whole lot over myself. 

I now seriously considered ways of storing the slot tops that would keep the worktop clear. It came to me that the best way was to stand them on end. My first thought was to use a number of metal clips attached to the wall. I cannot understand why I had not come to this conclusion sooner. Once I had thought about it. It was not such a good idea as fix attacks metal. I decided it would be better to use plastic, so took some measurements, sat down and did a number of drawings of a tray that would hold the tubes upright. Then thought about how to stop cross contamination, so added sections to the base. Once I had refined the basic look and measurements I showed the idea to my mate at Plasweld, he helped to simplify the design and added a splash back to stop chemicals running all over the place when loading the tops into the stand. 


A few weeks later the stand is finished. It works very well and has freed up lots of space on the worktop allowing me to work more safely. Such a simple idea that has made a big difference.


A typical layout for a darkroom

Monday, 20 December 2021

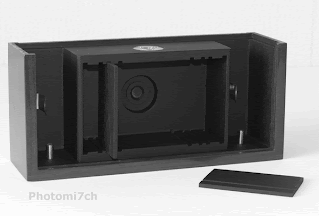
Preparing the Zero Pinhole Camera for use.


Using this camera is a real step back in time requiring you to put aside all those luxuries that the modern photographer has taken for granted. After all, it is just a box with a pinhole in it, the ultimate manual experience from loading the film and remembering to wind it on, to calculating the shutter speed.


Loading the film:

To start with you need to load a roll of film. That's obvious, most film cameras need film to work. If you are like me it has been a long time since you looked at the backing paper of a roll 120 film. I had forgotten that it is marked for the four different sizes in the 120 family and with the multi format camera it has three red coloured windows in which to view the film numbers. It also has a set of symbols that tell you when the number is about to appear in the window which also marks the middle of the frame. With this set up you cannot blame anyone else for winding it on to far, so it is a good idea to take it slow and gentle in the beginning. Before loading the film you need to set the format your going to use, once the back and top are in place, it is time to advance the film so the light-sensitive material is in front of the pinhole. When winding on you may notice that it becomes quite tight, this is where the celluloid attached to the backing paper is being drawn in front of the light box. Just continue gently on until the first frame number appears behind the little red window. Now the camera is primed for light capture.


Calculating exposure;

The Zero cameras aperture is set at F 235, it is important to remember this as this number is not written on the calculator attached to the back of the camera. The calculators outer ring shows shutter times from 8000 ths of a second too 15 hours, the inner ring shows F numbers from F 1.4 to F 500.


Please note that all the figures that follow are based on a film speed of 100 ISO.

Today, for example, my light meter is showing a light reading of F 5.6 @ 500 ths of a second. Now using the calculator move the dials so F5.6 is opposite 500 ths of a sec., then find F 235 on the outer ring and read off the time opposite which is about 3 second; you will need to make an adjustment for reciprocity effect by a factor of 2 making an exposure time of 6 seconds. I say 'about' because the next F number is 250 with an indicated shutter time of 4 seconds. To start with it is a bit hit and miss, that is why it is a good idea to make notes on shutter times so you can see where to make adjustments once the film has been developed.

You will need to make adjustments for the reciprocity effect as follows:

  • From 1 second and over compensate by multiplying by 2 giving an exposure of 2 seconds.
  • From 5 seconds and over compensate by multiplying by 5 giving an exposure of 25 seconds
  • From 50 seconds and over compensate by multiplying by 12 giving an exposure of 600 seconds/11 mins.


Monday, 15 February 2021

Reciprocity How it may affect monochrome film


The use of a Zero pinhole camera means that long exposures are the norm.
It might be a good idea to give an insight into how reciprocity affects the negatives. It is a wide-ranging subject that afflicts colour and black and white materials in different ways at long exposures, extremely short exposures and with flash. Because of this I am limiting this post to long exposure times with black and white film.

The Law:

The formula E=IxT expresses reciprocal relationship between the intensity of light reaching the film and the time allowed to act on the film. If one increases the other decreases proportionally, no net change in exposure occurs.

Ansel Adams The Negative.

At long exposures this law breaks down, known as reciprocity failure. It is where a seconds worth of light is not enough to satisfactorily produce the required densities in the negative. So the longer the exposure the greater the compensation needs to be. With these exaggerated times comes a side effect in that the lower values recorded become under exposed more than the higher ones causing the contrast of the negative to increase. You can make adjustment for this when developing the film by a reduction of ten percent for up to ten seconds, from ten seconds by twenty percent and from a hundred seconds by thirty percent. These changes are easy to control for single frame exposure made with large format cameras but a little difficult to achieve with roll film. If all the frames on the film are exposed for no longer than ten seconds then the ten percent reduction will control the increase in contrast across the whole film, but in practice this is not always the case with exposure times being all over the place. I would suggest that a reduction of ten percent be the starting point and that with experimentation will find what works best for you. Having said all this the side effect of higher contrast maybe to your liking in which case where's the problem.


The picture included in this post shows a slight increase in contrast. The negatives Ilford FP4+ were processed in PMK Pyro without an adjustment for increased contrast. Printed on grade two multi grade paper developed using Moersch 6 blue.


The following images and those above were all made using a Zero multi format Pinhole camera. The pictures below are from negatives using Fomapan 100 at box speed developed in studional for 11 minutes. scanned from photographs printed on Ilford multigrade 4 developed in souped ilford multigrade. 


Friday, 12 January 2018

Newton's rings. Updated


This effect can happen when using medium format and larger negative carriers as they use glass to keep the negative flat. Most carriers today use a frosted piece of glass above the negative known as anti Newton glass. 
The rings occur in the areas where two clear smooth flat pieces of glass lie next to each other but do not quite touch. The interference happens because the light rays are refracted, this produces irregular shaped dark rings in the projected image. This will happen more readily if any of the surfaces are wet. You can get round this by using a paper mask with the negative in the carrier. This will block out the light in the places where there is a gap between the glass surfaces. You will need to check the projected image to see if they are still visible.

Friday, 22 September 2017

Water marks on film? You need to be bold!

It is a great sense of achievement to behold a set of wet glistening negatives in all their tonal glory. It is your first chance to see how well they have been exposed and a relief to see all those rectangles or squares in a row. But it is a time of controversy in how you get them dry and clean.

Normal wisdom states at the end of the processes you add half a dozen drops of wetting agent to the last rinse, swish the reel about a few times and leave to stand for a minute. This helps to break the tension of the water so when you hang it to dry the water forms little droplets that run off without leaving any water marks behind when it is dry. The reality is quite different for some.

Wetting agent is not some magic bullet that you cannot do without. Heresy! I hear shouted from the back of the room! It is true the inter web is filled with photographers bemoaning those calcium water marks unseen until the print is hanging up to dry. You film scanners need not sit there smugly because you can take it out using photoshop. I hear a lot of complaints from this sector as well - time lost to spotting. The real smug ones are those that never get this problem when they use wetting agent. Well bully for you! Most of us do not have super soft water that just caresses our film and falls off!


Please do not get me started on those delicate lovelies that believe that if you touch wet film it will be ruined. Lets have some reality here! Wet film is a lot more resilient than it is given credit. For those of a delicate disposition please look away as what I'm going to say next is going to be outrageous to the extreme. I do not use wetting agent and I use a damp shammy leather to wipe both sides of my film dry.


It is a shocking and stunning revelation, but I have had no choice in the matter - honest officer! I have been plagued with wetting agent contamination over recent times that no amount of cleaning and washing has put right. This has led me to hand drying the film. Before you start banging the door down I should point out that there is a very nasty bit of kit called a film squeegee that has in the past ruined countless frames of film by putting a scratch line through them all. It took a long time and many rolls film to discover. So I make no apologies for these outrageous actions.

 Seriously! I now have water mark free negatives that air dry more quickly and no more blotchy looking prints. I wrote an article on how I discovered that wetting agent was the problem. Called wetting agent contamination. 


Sunday, 2 April 2017

Picture Post, Planes

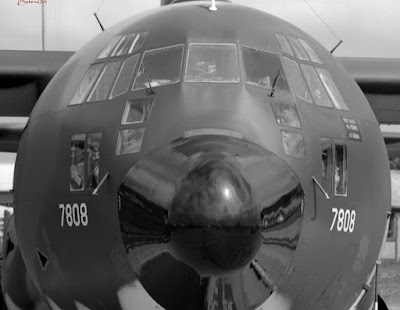
For me making images of aircraft is heaven. It is the combination of two loves. As you can see these are not the bog standard images you see, they are about the poetry of flight.

Antonov

Hercules 

Hurricane 

Huey 

Tornado

Trident
Technical Data: Camera Nikon FM, Film Agfa APX iso 100, Printed on Ilford multigrade RC gloss, Developed in Multigrade.

Pictures for sale

Saturday, 10 December 2016

What can Contact prints tell you.

I have written on this subject before outlining the advantages of making a contact print for your negatives. The subject has come to the fore because a recent example shows that the negatives are poorly exposed and possibly have a higher than normal amount of contrast.


 So where to start? With the sheet of negatives. The first thing you notice about them is that they are well developed with good tone and detail but on the dense side, meaning they could be over exposed / developed. Something that can sometimes be difficult to judge from the neg's only.
 
The contact print is saying that the negatives are well and truly over exposed and or over developed meaning that to get a balanced image is going to require a longer than normal exposure. It is also suggesting that the images are hard (a lot of contrast) How much will not become apparent until the segmented test print has been produced.


My normal exposure set up for the enlarger is F8 at grade 3 this is my datum point to which I judge how well I have exposed and developed the film. The first test print confirms that the negatives are very over exposed, requiring a second test because the results are so weak. I must admit that I was a bit blasé with my pinhole camera exposure times. This camera tends to bring the worst out in me when it comes to proper control but then it is all part of the fun.


I have already compensated for the longer exposure time by opening up the enlarging lens to F5.6 doubling the amount of light I would usually need. I also know that the contrast is higher than normal from a previous set of exposed photographs. It is to do with the Studional I used to develop the negatives in. A previous session showed that the softer grade 2 would give better results.


Without the contact print I would have spent much longer in the darkroom making test prints to find what the base exposure should be, if I had not been pre warned. It also indicated that the completely white looking skies would require a lot of burning in to bring the detail out shown on the negatives.


For me making a contact print ensures that I get the most out of my printing session. It allows me to preplan what I need to do to get the best out of each negative without wasting a lot paper and time. The later for me is always in short supply.


Technical data:

Zero pinhole multi format 120, tripod used, Film Fomapan 100, ISO 100, Developed in Studional, Printed on Ilford multigrade gloss RC 8 x 10, Developed in Tetenal Eukobrom 
AC.


Unintended double exposure.


Saturday, 19 November 2016

Picture Post Fisheye.

I am very pleased to be able to share these images with you. From time to time I'm asked to process and print for an artist friend. This is my first exclusive you will not find any photographs by this artist anywhere else on the net.


Technical Data:

Camera lomograph Fisheye 2, hand held, Film Fomapan 400, box speed, developed in RO9, Printed on Kentmere VC RC gloss 9x12, developed in Tentenal Eukobrom AC.

All the images I print are chosen by the artist from a contact print of the whole film. I'm instructed not to dodge or burn  unless it is really necessary. 


Wednesday, 16 March 2016

H. BC word of wisdom 2


Photography seems like an easy job but it demands a strength of concentration together with an enthusiasm and a particular discipline of mind. It is through great economy of means that simplicity of expression is attained. One must always take photographs with the greatest respect for the subject and from one's point of view.


This is my personal choice: from this I have a very strong prejudice against photographs that seem ' pre-arranged' or 'set up' 

By Henry Cartier Bresson

Wednesday, 9 March 2016

Agfa film grain comparision.

This set of images proved more difficult than the last set of grain pictures. I think I need more practice or a better method.


Developer ID11
I checked back through my archive of negatives and found that over the years I have used four makes of developer with this film - ID11, PMK Pyro, RO9, and RO9s. 


The RO9s negatives were processed in developer that was more than the suggested best before time of three months. Although this developer was still viable it starts to produce a courser looking grain pattern than when it is used fresh. 


Developer RO9 Special


Developer RO9


Developer PMK Pyro


Saturday, 16 January 2016

Welcome to 2016

Seeing as this is the first post of the year I would like to say a big thank you to our subscribers and follows for dropping by over the past year and anyone else who happens to stumble across us. I would also like to thank the back office for all there help with editing etc. I have to admit if it was not for their over site some of what you have read would have been incomprehensible rambling in jigsaw puzzle.

I have changed the header picture for 2016 . It is the back of an Agfa Isolette that was given to me. I would use it more but it has a light leak that I have not had time to repair. Something I may get round to this year but I will not hold my breath. Also I'm going to mix it up with some different types of post, for instance - all picture. Not sure exactly what else I am going to do but I'm sure you will let me know if they are any good. 

The blog ended the year with a bit of a flourish adding a number articles for the festive period to keep you amused. If you missed them here is a list:
I also released a book of drawings on blurb - not what you would expect but that is the point, here is a link if you are interested in having a look.

I have been reading an online Photography magazine from New Zealand called F11 (current issue) it features three photographers each month with an in depth look at their work. They have featured over the months some stunning images made by digital and analogue practitioners.

You can only get the magazine online by subscribing for the free app! Yes that's right free! - to read live or download for later. It has a host of live links in among the articles that take you to more pictures and or related info. It is well produced and a bit of a gem seeing the amount of work that must go in to producing each issue. There is also a list of back issues you can read or download to read off line as well. Here's the link if you are interested.

Before I go I'm going to leave you with this from Henry Carter Bresson.

The photograph is to hold one's breath, when all faculties converge to capture fleeting reality.
It is that precise moment that mastering the image becomes a great physical and intellectual joy.  


Wednesday, 30 December 2015

Oh for the grain.

It is a fact of life for film users, if it was not for the those tiny light sensitive particles we would not have some of the world greatest pictures. All the same overly grainy negatives are a pain if you have not planned for it to happen it's a big let down. You must not forget that it is not all about the journey it is about the results as well and what looks like rubbish to you now. Maybe an inspired choice to others.

The fact you have a negative to look at is a result and something that will print and or scan. At one time grainy pictures were all the rage. Producing some wonderfully expressive images. Admittedly they are not everyone's cup of tea. In other words keep an open mind.


The object of developer is to bring out the latent image held in the emulsion. This is achieved by a chemical reaction, acting on the silver, producing dark areas where it is light and bright areas where there is shadow. The negative is reversed later with the print. There are three important things to keep at the front of your mind are: the development time, the temperature and dilution. It is these three factors that ensure the ultimate image quality when it comes to printing. Too short a development time will produce too thin a negative, like wise too long a process time will make the negative too dense, leading to very short and very long print times respectively.

Agitation is important as well and one of the most over looked parts of the film development, it can in some cases make the difference in how well your negatives turn out. As the developer interacts with the emulsion of the film, it vigorously attacks the silver it comes into contact with and becomes exhausted. By inverting the tank you refresh this action, producing evenly developed negatives. It is important to get this right. To little agitation will allow by-products of the process to build up, leaving pale-toned streamers as they slide to the bottom of the film. Likewise excessive inversions will produce currents in the developer, creating uneven development. Most process times allow for agitation.

Developers:

The first thing to look at is the developer. This has the most influence over how your negatives will look. Before you settle on one in particular make sure you understand its attributes. On a practical note you also need to know how often you will process a film. If you are going to process a film every week or so then it may be better to use one in powder form like ID11 or D76. Or a one shot liquid for occasional use, like Ilfotec HC or Kodak HC110. I have suggested these developers because they are main stream fine grain developers. RO9 is not recognized as a fine grain.

For example:

Ilford ID11: A full speed developer with fine grain. Supplied as a two pack powder. Down side is that you have to make up 5 liters of stock solution. This then leads to question over it's keeping qualities. ( I have taken a year to use a 5ltr batch without any loss of quality) It can be used as one shot or multi use with allowance for depletion. ( I have only ever used as a one shot.)

Ilfords Ilfotec HC: A highly concentrated, fine grain liquid developer. It is suggested that this is the liquid equivalent to ID11.

Kodak D76: Fine grain developer recognized as Kodak's ID11. It has been reformulated as a one pack powder. The down side is that it needs very hot water to mix it easily.

Kodak HC 110: A fine grain sharp working developer. In a highly concentrated liquid syrup form. This is Kodak's answer to ID11/D76 as a liquid.

One more developer to what could be a very long list and that is:

RO9 Special/ Studional. These are the finer bred brothers of RO9 and Rodinal. They are very concentrated liquids with the good keeping qualities you would expect from this family. 

The unexpected.

It is the developer you choose that has the most influence over what your negatives and grain looks like. Inter mixed with the way you apply the agitation method you adopt and making sure that the temperature is right. Master this and the rest will fall into place. Yes you will make mistakes we all do even with years and years of experience it is all part of the rich tapestry of processing. It is and can be a pain when the results effect that special set of negatives. I know, it's that spanner that has landed with a big thud at times. The trick is understanding what went wrong, then put it right and move on. Now a days there is no such thing as a bad set of negatives - just conceptually challenging. You just have to look at all the apps you can get now that put back all things analogue photographers try to avoid. So what maybe unacceptable at first will change over time.

Really what I'm saying is to keep an open mind, the analogue process can, if you embrace it, give an unexpected creative lift to your images. Which today is more acceptable than it used to be.