Pages

Showing posts with label monochrome. Show all posts

Wednesday 9 February 2022

Street Photography Part 1

 Recently I felt the need to get back to some form normality with a bit of street photography. A return to where I started making photographs all those years ago when I did not realize that the images I was making came under this heading.


Street photography has been around almost as long as the invention of photography One of the early makers of street, although at the time it was properly not known as such, was The Reverend Calvert Jones with a panorama of Santa Lucia, Naples in 1846. 

My need to do this has been fueled by the last three years, in my case with serious illness and then the covid lock downs, restrictions just as I'm well enough to go out. I had become a prisoner of circumstance that really needed to be broken. I also missed being out and about with the camera. Not that I stopped using a camera during lock down.


As camera technology has improved over the centuries and with it the cost of ownership so it has become more popular to the point where everyone has the ability to make street photos but what has not come with it is the understanding of what constitutes a street picture.


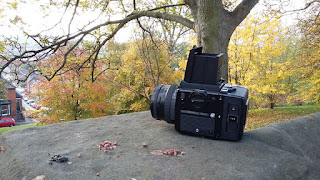
A plan was hatched, well! Not really more like an idea about exploring Lincoln's streets and see what images came along in true street photography style. I still needed to choose a camera I thought be bold, Bronica SQAi with 80 mm lens, look down viewfinder and 35mm film back done. Ah! Film?


Street Photograph is the over arching heading that encompasses the man made environment in which the image has been made such as people , portraits, candid, architecture, abstract, transport, still life, minimalist, photo journalist, paparazzo. You do not have to have people as part of the composition as long as the subject projects human involvement.


Those of you who know what a thunder clap the Bronica shutter makes will be thinking it was not a wise choice I did have the same thought. I did say be bold, as it turns out it has made no difference so far. I have made a couple of pictures of people standing very close to them and had no reaction to the shutter thundering shut. I have considered that photographers over play how loud they think the shutter is. 


The places we live, the way we get around them and what we get up to are all part of the scene. You only have to look back at some well know practitioners in recent history such as Saul Leiter, Walker Evans, Berenice Abbot, Lee Friedlander they would include street seen-s devoid of people. In Berenice Abbots case it was mainly the buildings that interested her. If you go back further to Charles Marville in the 1860s he depicted the back streets and allies without people. 


It is good to be out and about meeting people with a smile and a nod as I strolling along the streets looking here and there for images to make. But there is a change an underlying arrogance, a lack of manners of some that insist they cannot wait for you to make an image walking in front of the camera then complain you have them in a image with a snotty look I just smile back. I find this attitude laughable as all of us who walk and or drive round will have been photographed at least 150 times a day by the authorities is OK and yet someone with a camera making images that you maybe a part of get unfounded abuse. 

Maybe at this point I should share some advice on what kit and how to go about making pictures. That is not really me I do not tell people how to be creative we are all different and therefore should approach street from your point of view. There is no special kit you should use apart from what you already have. What I will say is have an open mind to what maybe possible, a good set of walking boots are a must, after a few hours of walking about you will wish you had, use the bear minimum of kit again the same applies even though the camera and meter spend most there time in my hands I find that my shoulder can ache from carrying a camera bag that has little in it apart from some extra film and lens cleaning kit.

This is the first part of a number of articles that will be posted.

If you would like to read more this link will take you there Street P2 Street P3

Images in order of appearance:

  1. Bronica SQAi with 80 mm lens enjoying the view over Lincoln.
  2. Panorama of Santa Lucia Naples 1846 The Reverend Calvert Richard Jones.
  3. 4.5.6.7 Placeses in Lincoln  
Technical data: 

Film: 35 mm Kentmere 100 at box speed, developed in HC 110 B for 6 Minutes. 
Photographs printed on Ilford multigrade RC g developed in Multigrade and scanned from print.


This article is the copyright of Mitch Fusco 2022 all rights reserved.


Wednesday 26 January 2022

A surprise in the post Wows in the darkroom


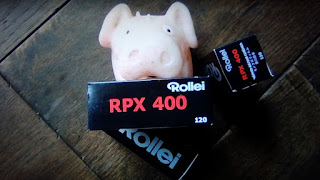
I must admit that Rollei’s 120 RPX 400 was not on my list of film to use. Until, that is, an unexpected package was handed to me by the postman. I usually tend not to use film rated at 400 ISO, as it is usually too fast for the weather I prefer to make images in - bright days with cloud and to a certain extent, warm. 

I did ask a question on the forum (FADU) and was advised that the film can be grainy. With this in mind, my thoughts turned to which developer I should use. HC 110 seems to fit the bill, producing a fine grain and sharp images. The problem with using a new make of film is that any choices you make towards processing are all down to past experience and gut feeling. The Rollei retro and R 3 (the latter no longer made) I have used in the past have always produced some wonderful negatives developed in ID11. What’s different about this one?

With the developer chosen, all I had to do was load the film into my Bronica SQAi with 250 mm lens, set 400 ISO and wait, wait and wait for a break in the weather. It finally did, with some wicked, bright days.


Fortunately I had access to an ancient wood in need of some TLC. The piercing sun presented some great interlaced shadows to play with and a look of dereliction. The four of us spent an hour or so going this way and that looking for interesting shapes, angles, plays of light and dark. A good test of the film’s capability. I tend to take my time lining up an image and, once done, I move on, making each frame count. I know that some people make a back up shot in case the original is damaged in some way. Others bracket above and below the light meter reading they settle on. My counter argument to this is that when using the Bronica SQAi, you only have twelve frames. I accept that I do not always get the light reading spot on with it, which just makes things interesting when printing in the darkroom. Oh! If you are scanning the negs, it won’t matter anyway.

Some days later, the film is loaded in the developing tank and it’s time to process it in HC 110 diluted 1 to 39 for a suggested six minutes. There is always a little apprehension when developing a new film for the first time, wondering if the time will be long enough. As it turned out, there was a nice set of well toned negatives hanging up to dry. Now a bit of impatience sets in while I wait for them to dry - the burning question being how big the grain will be?


24 hours later, the negatives have been cut and sleeved, but not all is well. I have noticed on a number of the negatives that there is a darkened area - something I glimpsed while making one of the pictures. My Bronica 250 mm lens had sustained some damage along the front edge that I should have dealt with by blacking it out. This led to a number of the negatives having a flare of light across them. How bad would be revealed when I print them in the darkroom.


The following is the official line on Rollei RPX 400s capabilities - Panchromatic black and white negative film, 400 ISO with standard development, fine grain and sharpness, broad tonality and contrast range. It is forgiving in that it has a broad latitude of exposure, making it a good choice for push pull development. It’s Panchromatic sensitivity is from 360-660 nm at 2850 k. You will need to bear in mind that this information was sourced after I started the developing process. I tend to do this so I can form my own opinion on what I’m presented with. 


Having removed the cobwebs from the darkroom, it is time to fill the print processor with fresh chemicals and a holding tray with water. The first exposure will be to make a contact print of all the negatives - this will show how many and to what extent the light flare has interfered.

It is disappointing to see that the light damage has touched nearly all the negatives in some way, but never mind - my cropping skills will need to be at their best here. One of the things I have noticed over the years is never to dismiss a set of negatives just because they have not turned out perfectly. It can mean that you produce something more creative than you had in mind in the first place. Serendipity can be a good friend.


Looking at the contact print, it suggested that the negatives could be printed at grade 2 or 3. With further consideration, I opted for grade three because I thought I would get better separation of the tones. To check my decision I would do a second print at grade 2.

I chose to use Ilford multigrade paper and developer - the latter, when fresh, produces some really crisp, rich blacks at the right grade. I set the paper easel to 8 x 10, the enlarging lens to F8 and the filtration to grade 3. With the negative in place, I turned on the test light and used the focus finder to make sure the focus was sharp. Trying to get sharp focus took a bit of time as the grain was very small, much to my amazement.


I always time paper development. It is a way of keeping an eye on how exhausted the developer is becoming. It is obvious, looking at the segmented test print, that the negative is on the thin side and my choice of F8 was a good first step.

As I look at the test print, it is suggesting that 10 to 15 seconds should produce a really good photograph. So I opt for 12 seconds. As I pull the print from the developer ready for the stop, it looks as though I have over exposed. Disappointing maybe, but you should not make quick judgements under red light conditions. 

As I pull the picture from the fix, I turn the room light on. I’m presented with a crisp, high contrast print with some very defined smooth tones. Wow! WOW! It stopped me in my tracks for a bit as I took in the view. Shame about the light pollution, but I can crop that out.


The next print was exposed at grade two for 18 seconds and has a completely different feel to it - again I was impressed. Next, I enlarged the negative to 10 x 20, printing part of it on 8 x 10 paper to see what grain it would produce. None that I could see. 

I have printed a number of the negatives and have been impressed with each of them. I’m not sure why I do not use Rollei film more often. It has a look and feel that I really like - I think some more rolls will be on the cards. Please try this film. You will not be disappointed. 


 This article is the copyright of Mitch Fusco all rights reserved 


Tuesday 21 December 2021

Trouble in the darkroom


My darkroom is a very personal space, the only acknowledgement to it being standard is the separation of wet and dry working areas. It is just big enough for one person to work in comfortable. A bit of a glorified closet really! which has meant I have had to find ways of making the space work hard to meet the needs of both wet-and dry sides working areas.


One of the things I have had to do is to put the 12 x16 paper processor under the work top on a pull out shelf. It was done originally to save space but has proved to be inspired in a way I had not foreseen. Being able to look down on the print process has made it a more relaxed way to work. Keeping the work top clear for other wet side needs has not worked so well, the top is being dominated by the tray I use to put the tube covers that keep the chemicals fresh in the slot processor. It was a large tray so that the tops could be spaced far enough apart to stop cross contamination. 

However, it all came to a head when I wanted to try a new print developer and use it with a tray so I could monitor when the first signs of the image appeared, then transfer it to the processor for stop and fix. I should explain that the darkroom does not have running water. I usually part fill a tray with water to put the fixed photographs in then wash them at the end of the session in the bathroom. Anyway I had the water tray precariously balanced on top of the slot covers in their tray as the rest of the top was taken up with the developing tray. It must have been a good day as I did not manage to tip the whole lot over myself. 

I now seriously considered ways of storing the slot tops that would keep the worktop clear. It came to me that the best way was to stand them on end. My first thought was to use a number of metal clips attached to the wall. I cannot understand why I had not come to this conclusion sooner. Once I had thought about it. It was not such a good idea as fix attacks metal. I decided it would be better to use plastic, so took some measurements, sat down and did a number of drawings of a tray that would hold the tubes upright. Then thought about how to stop cross contamination, so added sections to the base. Once I had refined the basic look and measurements I showed the idea to my mate at Plasweld, he helped to simplify the design and added a splash back to stop chemicals running all over the place when loading the tops into the stand. 


A few weeks later the stand is finished. It works very well and has freed up lots of space on the worktop allowing me to work more safely. Such a simple idea that has made a big difference.


A typical layout for a darkroom

Monday 20 December 2021

Preparing the Zero Pinhole Camera for use.


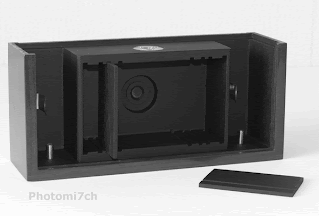
Using this camera is a real step back in time requiring you to put aside all those luxuries that the modern photographer has taken for granted. After all, it is just a box with a pinhole in it, the ultimate manual experience from loading the film and remembering to wind it on, to calculating the shutter speed.


Loading the film:

To start with you need to load a roll of film. That's obvious, most film cameras need film to work. If you are like me it has been a long time since you looked at the backing paper of a roll 120 film. I had forgotten that it is marked for the four different sizes in the 120 family and with the multi format camera it has three red coloured windows in which to view the film numbers. It also has a set of symbols that tell you when the number is about to appear in the window which also marks the middle of the frame. With this set up you cannot blame anyone else for winding it on to far, so it is a good idea to take it slow and gentle in the beginning. Before loading the film you need to set the format your going to use, once the back and top are in place, it is time to advance the film so the light-sensitive material is in front of the pinhole. When winding on you may notice that it becomes quite tight, this is where the celluloid attached to the backing paper is being drawn in front of the light box. Just continue gently on until the first frame number appears behind the little red window. Now the camera is primed for light capture.


Calculating exposure;

The Zero cameras aperture is set at F 235, it is important to remember this as this number is not written on the calculator attached to the back of the camera. The calculators outer ring shows shutter times from 8000 ths of a second too 15 hours, the inner ring shows F numbers from F 1.4 to F 500.


Please note that all the figures that follow are based on a film speed of 100 ISO.

Today, for example, my light meter is showing a light reading of F 5.6 @ 500 ths of a second. Now using the calculator move the dials so F5.6 is opposite 500 ths of a sec., then find F 235 on the outer ring and read off the time opposite which is about 3 second; you will need to make an adjustment for reciprocity effect by a factor of 2 making an exposure time of 6 seconds. I say 'about' because the next F number is 250 with an indicated shutter time of 4 seconds. To start with it is a bit hit and miss, that is why it is a good idea to make notes on shutter times so you can see where to make adjustments once the film has been developed.

You will need to make adjustments for the reciprocity effect as follows:

  • From 1 second and over compensate by multiplying by 2 giving an exposure of 2 seconds.
  • From 5 seconds and over compensate by multiplying by 5 giving an exposure of 25 seconds
  • From 50 seconds and over compensate by multiplying by 12 giving an exposure of 600 seconds/11 mins.


Monday 15 February 2021

Reciprocity How it may affect monochrome film


The use of a Zero pinhole camera means that long exposures are the norm.
It might be a good idea to give an insight into how reciprocity affects the negatives. It is a wide-ranging subject that afflicts colour and black and white materials in different ways at long exposures, extremely short exposures and with flash. Because of this I am limiting this post to long exposure times with black and white film.

The Law:

The formula E=IxT expresses reciprocal relationship between the intensity of light reaching the film and the time allowed to act on the film. If one increases the other decreases proportionally, no net change in exposure occurs.

Ansel Adams The Negative.

At long exposures this law breaks down, known as reciprocity failure. It is where a seconds worth of light is not enough to satisfactorily produce the required densities in the negative. So the longer the exposure the greater the compensation needs to be. With these exaggerated times comes a side effect in that the lower values recorded become under exposed more than the higher ones causing the contrast of the negative to increase. You can make adjustment for this when developing the film by a reduction of ten percent for up to ten seconds, from ten seconds by twenty percent and from a hundred seconds by thirty percent. These changes are easy to control for single frame exposure made with large format cameras but a little difficult to achieve with roll film. If all the frames on the film are exposed for no longer than ten seconds then the ten percent reduction will control the increase in contrast across the whole film, but in practice this is not always the case with exposure times being all over the place. I would suggest that a reduction of ten percent be the starting point and that with experimentation will find what works best for you. Having said all this the side effect of higher contrast maybe to your liking in which case where's the problem.


The picture included in this post shows a slight increase in contrast. The negatives Ilford FP4+ were processed in PMK Pyro without an adjustment for increased contrast. Printed on grade two multi grade paper developed using Moersch 6 blue.


The following images and those above were all made using a Zero multi format Pinhole camera. The pictures below are from negatives using Fomapan 100 at box speed developed in studional for 11 minutes. scanned from photographs printed on Ilford multigrade 4 developed in souped ilford multigrade. 


Friday 13 April 2018

Recall magazine

I have been looking for a way to do justice to a series of photographs as a collection. I have shared some of them on the blog as a picture post called Tenth Floor. To be honest I have not really been satisfied with this method. It is great that they can be viewed as a set but it does not convey what they are like as photographs in the real world.

Having scanned them and then adjusted them in Photoshop to get them as close to the original, this still does not do them justice. I had thought about putting them in a book but it's an expensive way of putting ten pictures together as a series, so I looked at a magazine format which is quite an inexpensive way of printing a collection.

I decided to test the idea out with blurb. I have to say up front I am not a fan of the online print service since they screwed up a wedding book I got involved in some years ago.

Anyway having down loaded the updated software I set about putting the magazine together. It was good to see that the standard length was twenty pages - just right for my ten image project, giving me just enough space to add a few words of intro and some tec stuff at the end.

Not having produced anything book wise for a while, I had forgotten how involved it is just to get a basic structure together. For instance, what paper, font, title, how many images to a page the list go's on! The picture issue was easy to solve – one per page. The font was a bit more difficult, I wanted the theme to convey a type of note book look so I chose a font that looked like hand writing and easy to read.

The paper was quite easy in that you only had two choices. I plump for the better quality, I wanted the images to look like the resin coated paper that the original photographs had been made on. The title took a lot longer than anticipated and was suggested by the blogs editor.

Now that all the the bibs and bobs had been ironed out I could save the templates for the next issue. I expected it to be easy to produce the next issue but it is not! I maybe missing something in the workflow from one issue to the next we shall see.

The moment of truth came a week or so later. when a very thin cardboard package arrived. I was a little apprehensive when opening it. I hope this was going to be a lot better than the last package I had from blurb. OK WOW! it has well and truly exceeded my expectations it is a lovely thing to behold the gloss paper complemented the prints so much so they could have been the original photographs. In fact they could be cut out and framed. High praise I know but when it is right it is right - well done Blurb!

Would I recommend them? NO. A lot more water will have to pass under the bridge before I even consider it. A good start though.

The plan was to get one out a month this has not happened. Shortly after this article I was very ill, it took a long time to get passed. I did produce a second volume sometime later. 

So if you are interested in a copy here is the link and here is the link to the blog post Tenth Floor that this volume is based on.


If you would like a copy of the Magazine click on the link below.
http://www.blurb.co.uk/b/8533877-recall-volume-1

Sunday 2 April 2017

Picture Post, Planes

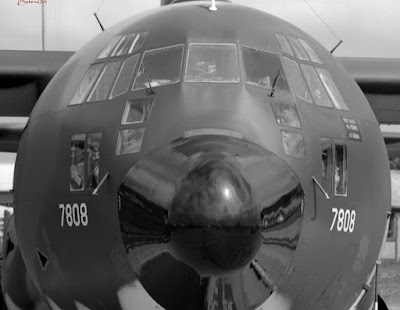
For me making images of aircraft is heaven. It is the combination of two loves. As you can see these are not the bog standard images you see, they are about the poetry of flight.

Antonov

Hercules 

Hurricane 

Huey 

Tornado

Trident
Technical Data: Camera Nikon FM, Film Agfa APX iso 100, Printed on Ilford multigrade RC gloss, Developed in Multigrade.

Pictures for sale

Saturday 25 February 2017

Picture Post Eukobrom AC Developed photographs

Paper Kentmere RC gloss.
The images that appear in this gallery have been processed using Tetenals Eukobrom AC developer on a number of different papers.

I would like to thank Tetenal for there interest in and re-blogging of the first look post. It was a big surprise when they got intouch.

There is a new post on Eukobrom to be published not all good news.


Paper Fomatone  Chamois 542-11 matt


Paper Ilford FB gloss
Paper Fotospeed RC gloss

Paper Kentmere RC gloss

Paper Fomatone Chamois 542-11 matt


Technical Data:

Camera Bronica SQAi, lens 80mm, Film ilford FP4+ iso 125, Fomapan 100 iso 100, Negative size 120 6x6, Developed in Studional.

Scanned from paper size 9.5 x 12, paper used listed with each image.


Friday 17 February 2017

Double grade printing.


From time to time I find it strange the way events come together! for instance, I was in the darkroom working on some prints that I could not get the sky to burn in properly. There was nothing unusual in me burning in the sky, most of the photographs I produce have had the skies enhanced in some way. But this time I could not get it the way I wanted it.


The strangeness in this case was that a few days before, I was reading a thread on my favourite forum about how to deal with whited out skies when printing. I took part giving an account of my method of dealing with it. One of the other contributors suggested split grade printing. But when he described the process it is more akin to double grade printing - this is where you use another grade to bring out part of the image that will not burn in at the grade you are using.


All the circled images needed double grade printing.

The process:


The contact print in this case suggested that the stone work of the building and sky were under exposed when compared to the reflection. The segmented test print (grade 2) proved this by indicating that it may need to be burned in for an extra twenty seconds above base exposure of thirty seven seconds. Even with the extra light it did not make the difference. After a further print and forty seconds burn in, it still was not right. I decided to see if changing to a harder grade when burning in would make the difference.

With the discussion still fresh in my mind I opted to use the double grade method to see if it would solve the problem I was having. I normally would have used pre flashed paper but that would mean starting all over again with a pre-flashed test strip. I chose the simpler route of dialing in a harder grade, in this case 4, before burning in the sky and face of the building.

The red area indicates the over lap area of the mask.
Something to consider:

When using this method certain negatives can produce a grainier look to the picture which may not be to your liking and you need to be careful not to knock the masking frame when changing the settings and using the mask.

The burning in method:

It takes practice to get this method to look natural, which is easy to master when you have a nice defined area without things like buildings poking up above the horizon. A piece of card is needed to use as a mask. You do not need to use black card but if you have some all well and good. Otherwise any card will do, if one side is brighter than the other you should always make that side face the lens to reflect the light back. In my opinion you should make the mask smaller than the site that needs covering. Because the card is kept moving it will make up for the under size when used with an up and down motion. If you don't you can end up with a lighter shaded area a bit like an out line you would get if it was still. When you get it right it is very satisfying.

 Result:

I used forty seconds at grade four to burn in the building and sky. How did I know it would work? I further considered the segmented test print, took a calculated risk and listened to the little voice in the back of my head. In other words I went with the creative flow.


Basic outline for split grade printing.

Saturday 28 January 2017

Picture post Snow

This week I'm sharing these images of snow. Not that we have any but you never know.   


Technical Data:

In order of appearance:


  1. Nikon FM, 35mm, FP4, ISO 125, developed in Acufine, negative scanned.
  2. Bronica SQAi, 120, FP4+, ISO 125, developed in ID11, printed on Ilford Multigrade paper RC gloss, developed in  Ilford Multigrade. 
  3. Bronica SQAi, 120, FP4+, ISO 125, developed in ID11, printed on Ilford Multigrade paper RC gloss, developed in  Ilford Multigrade. 
  4. Bronica SQAi, 120, FP4+, ISO 125, developed in ID11, printed on Ilford Multigrade paper RC gloss, developed in  Ilford Multigrade. 
  5. Bronica SQAi, 120, FP4+, ISO 125, developed in ID11, printed on Ilford Multigrade paper RC gloss, developed in  Ilford Multigrade.
  6.  Bronica SQAi, 120, FP4+, ISO 125, developed in ID11, printed on Ilford Multigrade paper RC gloss, developed in  Ilford Multigrade. 
  7. Nikon F5 35mm,  Agfa APX, ISO 100, developed in ID11, printed on Ilford Multigrade paper RC gloss, developed in  Ilford Multigrade. 
  8. Nikon F5 35mm,  Agfa APX, ISO 100, developed in ID11, printed on Ilford Multigrade paper RC gloss, developed in  Ilford Multigrade. 
  9. Nikon F5 35mm,  Agfa APX, ISO 100, developed in ID11, printed on Ilford Multigrade paper RC gloss, developed in  Ilford Multigrade. 


Pictures for sale