Pages

Showing posts with label darkroom print. Show all posts

Wednesday, 15 December 2021

20 x 24 photographic paper out of date challenge

I have been having a clear out in the darkroom. More like seeing what printing paper I have in stock and how close to date they were getting. While checking I came across a pack of Ilford multigrade 4 peal RC 20 x 24 to large to miss but I have managed not to notice it for a long time.

It has been over looked all this time partly because it is pearl paper and that I am unable to use paper this size. I know why, then why have you not cut it down to size? Without trying to make excuses it is difficult to cut any size papers when you only have enough space on the dry side of the darkroom for your enlarger and I did not want to waste it if I could help it. A sort of unintended waiting game for the right project only I did not think it would take about 15 years.


A few days ago I was setting up the enlarger to make some 9.5 x 12 prints from Kentmere 100 35mm film. That had some images of poppies made in the garden. All though they all turned out well. I had noticed, I was loosing about an inch or so off the side of the negative.

I started to speculate wouldn't it be nice to include that missing edge at the same ratio of enlargement without having to down size it to make it fit. This idea was going to be difficult to fulfill as my main sizes are 8 x 10 and 9.5 x 12. This left the 20 x 24 this maybe it's finest hour. 

After a certain point in time old paper starts to increase their latency. This means you need to start adding more exposure time (light ) to the paper to receive the same results you would get with the fresh stuff.

With paper this old you may as well chuck it in the bin. Yes! it is coming, if it was this article would be at an end. But! while I am processing anyway I may as well see if I can get any sort of image.


Where to start? a Segmented test print. Where you increase the amount of exposure at set times. The problem with this is you have no idea how many increments of light will be needed to arrive at the exposure. I short cut it by using the exposure time from the negative already set up using that exposure time as a starting point.

Fortunately the developer was fresh in that it had only half a dozen prints through it. To allow for the sluggish latency I would develop the print for two minutes. Twice normal for RC papers to give it a chance to produce tones.

Before we go any further we need to look at the negative I was using. It had been exposed to Foma 311 RC paper. It took 27 seconds at grade 3 with the lens set to F5.6. This would be the starting point then with one change the enlarger had to have the filter setting changed for multigrade 4.

After a little bit of contortionist cutting, the paper was in two bits of equal size well almost and the easel adjusted to allow for the new size, the paper was exposed. 

Surprisingly when I remove the paper from the processor after 2 mins there was a soft image, emboldened I increased the exposure to 30 secs. A slight increase but not enough. Time to get radical and doubled the light by opening the enlarging lens to F4.

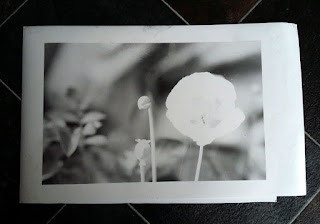
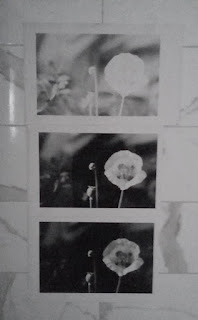
The print was darker again but not enough to get a good black, so I opened the lens to f 2.8 at 30 secs. Effectively four time the light from when I started. When the print came off of the processor this time it was nearly perfect. I did another print adding 15 sec burn to the highlighted poppy. Done.

I did consider pre-flashing the paper this is where you add light to the point just before recording a tone to overcome the latency. I explain how it is done in a previous article link at the bottom of the page. You will properly have to make time changes from part seconds to seconds in the case of old papers. A case of testing to see what works to get the right result. There is also double grade printing a link at the bottom of the page explains this method as well.

A note of caution what works well for one pack of paper may not for another keeping your grey matter on its toes. It will be the case that no matter what is done you will not get the result you are looking for it is at that point a decision needs to be made to bin it.

I am pleased that I had a go with this paper. It has introduced me to a new format size for 35mm printing. I feel it is more pleasurable to look at with that bit of extra width. A sort of shortened panoramic feel.

When the same image is compared with the Foma 311 version it has a slight warmth to it which could be down to its age, if anything this adds to it. Making the Foma composition a little clinical looking. It is a unintended consequence of mixing different papers and throws up a question about creative choice. Which I'm go to leave you with to ponder.


All the photographs were reproduced using a phone camera and edited in Photoshop.

The first four pictures were made using Ilford multigrade 4 pearl RC.

The fifth is on Foma 311 gloss RC.

Links 

Paper flashing

Paper flashing more examples

Double grade printing


Friday, 3 November 2017

Ilfords Delta films A big surprise.


I read a lot of stuff in search of inspiration and ideas for this blog. And one of the strangest things I read a lot is the lack of willingness to push creativity. For example: 'I will only ever use FP4+ - I only make landscape images.' Why? I have never understood the idea of painting yourself into a corner, creatively speaking. I have been writing this blog for around a decade now, the one thing I have discovered is that choices, likes, dislikes move on naturally and to say never say never really only means for this period of time.

Delta 100 negs
Like wise I have never given Ilfords Delta range a second thought. Why? It just has not been on my radar. I have been happy making images using FP4+ and Fomapan 100 among others. All of a sudden I find myself saying to a friend that I will purchase his out of date delta. And now I have about 15 rolls delta 100 and 3200 120 format in a box on the floor waiting for me to use it.

 I have already exposed one roll of 3200 at box speed, which just happens not to be the rated speed of the film in this case. It is actually rated at 1000 ISO something I was not aware of at the time I used it. Which means that the film was pushed five stops, something of a first for me! I've also used a couple of rolls of 100 at box speed.


Delta 100 grain seen through a focus finder
OK so what is so special about Delta film? It is Ilfords offering in the T grain category of film emulsions, Kodak call theirs T Max and Fuji Neopan. Known as tabular grain film, meaning that the shape of the silver halide is relatively broad and thin, with two well developed parallel faces. This leads to the crystal absorbing more light sensitive dye. It also reduces the scatting of light which increases resolution. This leads to a film that works in all sorts of lighting conditions. If you think about it, it is ideally suited for beginners, making it very tolerant to bad exposure.

Print from delta 3200 ISO 3200
Tabular crystals dissolve more slowly than traditionally grained films when it comes to fixing them. You are advised to increase the fix time as it takes twice as long for the film to clear when using rapid fix.

In truth I am not someone who can go out and make images of anything just to try out a new film. Even when it is well out of date, some of you may think it's a bit risky. I believe it is a waste of time if the images you make are not well composed and of subjects that you enjoy. After all a good image is easy to print and share. A project that would suite the Delta 3200 droped in my lap. I had the opportunity to photograph a number of five week old pups. When it came to photographing them they had all worn themselves out and were fast asleep. That is until I started making pictures! Its funny how noisy a Bronica SQAi with an motor drive can be in hushed conditions!

Print from Delta 3200 ISO 3200

I was a little disappointed with the 3200, although it was very bright outside the room was a bit dark and on a couple of occasions I was down to 60th sec at F2.8 which is the minimum aperture for the lens I was using and as slow as I could go hand held. It was not practical to use a tripod as they had tucked them selves into lots of little cubby holes to sleep.


Print from Delta 100 ISO 100
I developed the film RO9 at 1+50 for the suggested time of eleven minutes. The negatives look a bit underdeveloped (thin) I will, for the next film, up the developing time.

When it came to printing the negatives the underdevelopment showed it's self on the segmented test prints. Indicating that 15 secs was the best exposure time. I chose to use Adox MCP paper set at grade 3. The enlarger was set to a height for 11 x 12 paper but the easel was set for 8 x 10 paper with white margins. I did this because there was a lot of dead space on the negatives. The down side is that the prints are a bit grainy. Something I should have expected to a certain extent seeing as I have used RO9 to develop them with. The final prints were a little soft even though they have been printed at grade three.


Print from delta 3200 ISO 3200
 
Having read the above it may lead you in to thinking it was a bad set of negatives. On the contrary I am very pleased with the results although a little disappointed with the contrast, but then you have to take into account that it is the very first time I have worked with this film. Fortunately I have more film to play with.

I have also exposed a couple of rolls of Delta 100 at box speed developed in RO9 and by comparison they are very punchy (high contrast) they remind me of the Fomapan 100 negatives I produce with the above developer. The 100 has produced super smooth looking photographs. Something I have been looking for for sometime. This may replace the need for a ultra fine developer.

Print from Delta 100 ISO 100.
last laugh goes to the cat a sleep in the sun.


Saturday, 25 February 2017

Picture Post Eukobrom AC Developed photographs

Paper Kentmere RC gloss.
The images that appear in this gallery have been processed using Tetenals Eukobrom AC developer on a number of different papers.

I would like to thank Tetenal for there interest in and re-blogging of the first look post. It was a big surprise when they got intouch.

There is a new post on Eukobrom to be published not all good news.


Paper Fomatone  Chamois 542-11 matt


Paper Ilford FB gloss
Paper Fotospeed RC gloss

Paper Kentmere RC gloss

Paper Fomatone Chamois 542-11 matt


Technical Data:

Camera Bronica SQAi, lens 80mm, Film ilford FP4+ iso 125, Fomapan 100 iso 100, Negative size 120 6x6, Developed in Studional.

Scanned from paper size 9.5 x 12, paper used listed with each image.


Sunday, 27 December 2015

Tetenal Eukobrom AC first look

I like trying new things out in the darkroom, so when an offer to use Tetenal's new monochrome paper developer Eukobrom AC came up I jumped at it. I would like to thank Matt of AG Photographic and Tetenal for the chance to be one of the first to give it a test drive. A few weeks later a package arrived at the door, since then I have been chafing at the bit to try it out.

This is a new developer made for twenty first century. It is also the first commercially to use isoascorbate, vitamin C (you're not seeing things) as the main developing agent, it is a direct replacement for Hydroquinone the most widely used ingredient in photographic developers, noted for it's fast action and high contrast. It is marketed as the alternative to Ilfords multigrade all purpose paper developer producing the same sort of neutral tones. The developer works with both Fiber Baryta and resin coated light sensitive papers, whether multigrade or graded.

Top row: Ilford multigrade RC paper. left side in
multigrade developer. Right side Tetenal.
Bottom row: Fomaspeed variant RC paper. 

The data at the moment is quite sparse.

Technical Data:

Fibre Baryta
Paper (FB)
Dilution
20C
25C
30C
1+4
90s
70s
50s
1+9
100s
80s
60s
Resin coated
paper
1+4
50s
30s
15s
1+9
70s
50s
30s

All information is provided for guidance only. Deviations may arise,
depending upon the paper used. Shortening or extending the development
time by up to 10% is possible.

Diluted 1+9  Eukobrom

In to the Darkroom.

The first thing you notice with this developer is it's lack of odour. The next is the colour of the liquid, a rich yellow. I decided to dilute at 1+9. Once done I poured the contents of the measuring jug into a tray. I would have used my up right paper processor but that already had fresh Ilford multigrade in it. Using the tray for the new developer would allow me to note how long it took for the image to start appearing.

The comparison.

I have several makes of light sensitive paper in stock. I chose three, the most obvious Ilfords multigrade, Fomaspeed Variant 311 and Kentmere VC select gloss, all resin coated papers. I went to these first as they are reasonable quick to process and give an insight into how the Eukobrom will perform. Before moving on to FB papers. (results to follow in another post)

The set up.


I chose a negative from a recently developed set of Agfa APX100. I set the height of the enlarger so it would produce an enlargement of 9 x 12 then set the easel to 8x10. I did this because the Kentmere paper I wanted to include I only had in 9x12, this would keep everything consistent.

Ilford multigrade RC  paper
 developed in Tetenal developer
 
 
The test strip was processed in the multigrade developer and it was indicating that the image would need to be dodged, if I wanted a picture I was happy with. I set the enlarger as follows lens F8, grade 3, exposure: The whole image was exposed for twelve seconds, the sky from the bridge upwards plus eighteen seconds and finally the sky from half way up to the top of the image plus eighteen seconds. I would produce two pictures on each paper all at the same setting. The developers temperature was set at 20C.


Ilford multigrade RC
 Paper developed in Multigrade
 
Results:

Both developers are advertised as neutral tone. To me this means they are subtlety on the cool side.

The differentiation started with:

  • The Ilford paper when compared with the other papers in the test, has a slight warmth to it's tone when developed in fresh multigrade. The Eukobrom is slightly cooler in look with a more intense black and crisper whites giving it a bit more contrast.
  • The Fomaspeed paper has a cooler look to it when developed in multigrade compared to the Ilford paper. The Eukobrom proved to be cooler looking again with more intense blacks and clearer whites again adding to the contrast.
  • The Kentmere paper is known to have a higher contrast level to the previous papers mentioned maybe as much as a grade. When developed in multigrade the image had a muddy look to it indicating over exposure with a slightly warm feel to it. The Eukobrom processed image had a cleaner crisper look. Again the midtones had better separation making it look more like a moon light picture instead of over exposed.
Fomaspeed variant RC
 developed in Tetenal
 
Once you understand that Eukobrom adds contrast to the image possibly more so than the Hydroquinone it replaces. It is easy to allow for by reducing the grade you would normally use. The blacks are wonderfully rich giving the pictures some real punch. The mid tones have more separation than Ilford multigrade but the surprise is the brightness of the whites.

Fomaspeed  variant RC
developed in Multigrade

Personally the main questions yet to be resolved are its keeping qualities and whether or not the image will be warm when the developer starts to deplete.


Kentmere paper.
Top Row:
exposed at grade three.
Right side Tetenal developer. Left multigrade.
Bottom row: exposed at grade two.
 
This is a nice developer to work with for prolonged periods as you do not get that developer smell lingering up your nose afterwards. Oh! It does look like OJ when diluted so keep it out of the reach of kids. It is a real gem and I will be ordering a bottle, it may even replace my favorite multigrade! Don't take my word for it try it for yourself you will not be disappointed.