Pages

Friday 24 August 2018

Zone System really


Love it or hate it Ansel Adams zone system has become the cornerstone of film exposure and printing that a lot of people cannot get their head round. I was one of those people until I made a point of sitting down many years back with a copy of what he actually wrote.

 It is important to stress that when reading his method on the zone system that it comes from the source and that now a days is his volume on the Negative. This is the best place to start your understanding of the process. How do I know this? I read an abridged version of The Camera, The Negative and The Print. To my amazement some of the important parts of the method were left out which made it impossible to understand.


 It was a friends encouragement that I obtain all three volumes and if I did It would improve my understanding of the relationship between the camera and the final print. He was not wrong. I ended up reading all three from cover to cover. I must admit reading the bit on the zone system left me cold. I was none the wiser from this first read. I speculated that I was producing nicely exposed negatives so what was the point.
A year or so later I started to see a number of references to the Zone system on the internet. Some condoning it and other condemning it. This reignited my curiosity in trying to understand it; so I made a loose leaf copy that I carried around with me so I could read it whenever I got the chance and make notes.
I cannot remember how many times I re read it or how many notes I made to remind me what I did not understand and how that fitted in with the rest but all of a sudden it made sense. I could work out how it related to what the light meter was telling me.


It made a difference to the way I metered and exposed the film it also settled down my sometimes erratic results. I noticed that the negatives started to be more consistent in there density which transferred to the darkroom. The number of segmented test prints reduced across a series of images on the same film.

It has been more than a decade since I set out to understand the Zone system. It will always be there in the background of my mind jumping to the fore when I have a particularly difficultly scene to meter. In the main, I use a sort of high bred method that gives me the style of negatives I'm looking for.
All I'm saying is a better understanding of where different tones and textures appear on the tonal scale in relation to the exposure data can only lead to better more consistent results.


Tuesday 14 August 2018

Be noticed

How often do you review your images before you edit and or print them? There is a well kept secret among film photographers. The photo board or should I say the noticeboard - and yes they do get noticed.

On it I put all my new contact sheets and recently printed images. It is placed across the room from my computer and put there on purpose, allowing me to view the sheets and prints often, in those moments where I need a break from looking at the screen. It is a good reviver and helps to formulate how and which images to print. So when I take the negatives into the darkroom, things run more smoothly. 


I test whether or not the way it is printed and the paper used is right by putting the photograph on the board. Leaving it there for about three weeks or more. It also gives the print time to mature especially if I have used an FB paper. I have found that some of the fainter details show themselves when the print completely dries out. Along with any spotting that maybe needed. If at the end of this time I'm not compelled to reprint it. It becomes a print I'm happy to reproduce for sale.

I also use the noticeboard for editing sets of prints. This is a collaborative thing where anyone can move the order about or remove an image if they do not think it works. When this happens a discussion about the way the story should be told ensues, this a great way of getting the run of the pictures right.

Saturday 9 June 2018

Out for a stroll with the Zero


It is always a joy to be out with the Pinhole camera. But it must be a strange sight to behold as I walk up the street. A little brown box attached to what could be construed as a big black stick (tripod). On this occasion it was a lovely bright day with a biting cold wind; I had not appreciated just how cold it was until I had been standing about making the first image.


As I strolled around the local lakes I took warmth from the brilliant sunshine and the anticipation of some interesting image making. By the time I was half a dozen pictures in I had forgotten how cold I was. I think the cold must have gotten to me as I could not remember what the reciprocity factor should be. Times 2 up five seconds and times 5 from then on. Dam and I had left my note book behind with the reminders in. Oh well I'm not going back.


from T max negative

This walk is turning to a bit of a jokers holiday which had started before I had even left the house. My Zero is a multi format camera Just before I loaded the film I checked to see where the dividers were and in my mind it was set to 6x6 I loaded the film and used the centre red window to view the frame count. I should explain there are three for the different sizes of negative. Later that day I had the chance to develop the film only to find it was set to 6 x 4.5 – ehh! Fortunately the second film was only part way through so rectified it by using the top window for the next days images.


The wind was that strong it was producing lots of fine ripples across the water. I was not quit sure how this would look in the final images not having made many photos of water with this camera. It just go's to show how cold it was, on the eastern side of the lake I found a lot of glass thick ice being smashed up on the shore. This brought back how cold I was feeling. Time to get back, to a home made slow cooked beef Currie that should be bubbling away by now.


Contact print at 2 seconds
the print is
also showing signs
of exhausted fix.
 
Just before I left the house the following day I filled my pocket with a mix of film from different manufacturers; I do not usually do this but so what! it was an off the cuff decision to go out picture making so why not mix it up completely! The previous day I had already loaded Kodak's T Max 400 which I thought might be a bit of a gamble seeing how bright it was, just as well I did, as I messed up the exposure completely. On subsequent trips I loaded Ilford's delta 100 and Fomapan 100 which is my fav film for the Zero. The others were first time use and this time I got the exposure right.

How badly the T Max was exposed showed it self when I contact printed the negatives. I had to re do it at 5 sec's instead of my usual 2, enlarging lens fully open with white light (with no grade filters set). The negatives when looked at showed full detail. The contact print indicated that the enlargement were going to need long exposures and a lot of dodging to get them the way I wanted.

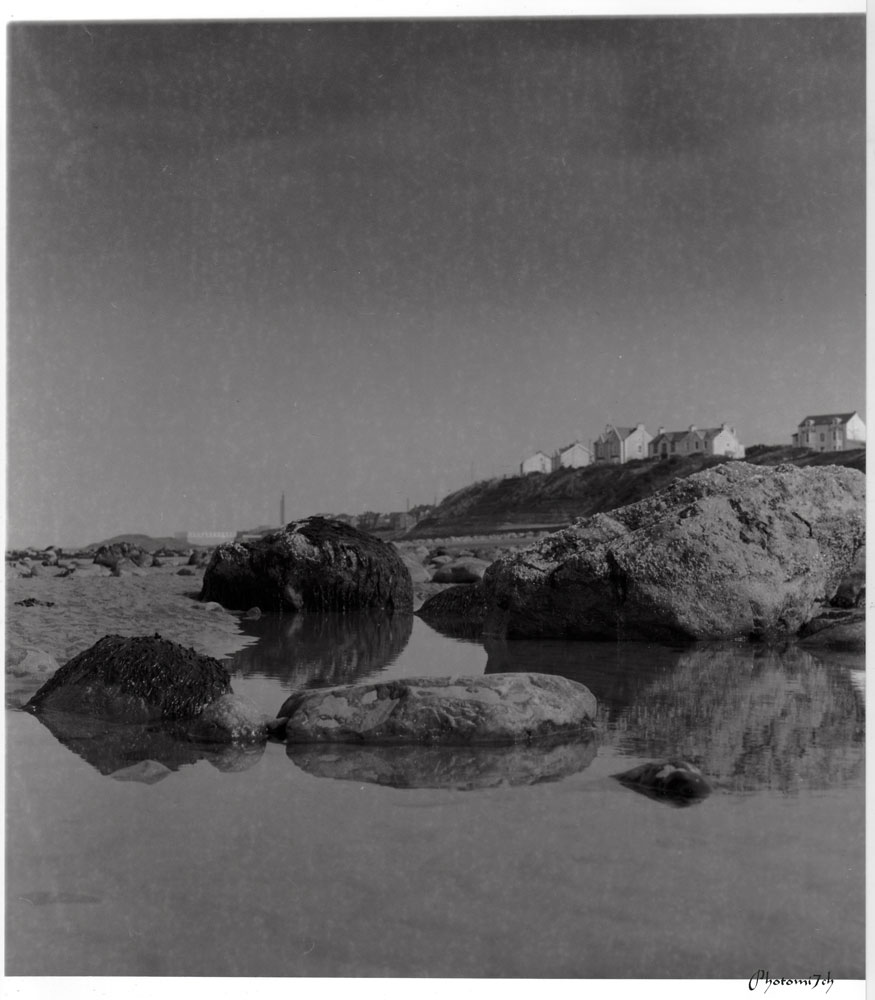
From Fomapan 100 negative

I have developed all my negatives in Adox version of Rodinal. I use 1+50 for the time required. I have to keep reminding myself that this developer has a high acutance and therefore a lot more contrast. In some cases overly so. I had in mind to use Kentmere RC gloss but changed to Footspeed's RC gloss that has a more normal look. If I had kept to the original route they would have had super contrast. As it was, I had to drop the filtration for printing down to 0 from my normal grade 3 . With the contrast sorted it was time for the exposures. With the segmented test print in the holding tray the fun really started. As an example one print had a base exposure of twenty seconds but then needed an extra 40 seconds on top of that for the sky and some of the lake. Others longer.

From Ilford delta 100 negative.
I had a good time in the darkroom even though the printing sessions were challenging the prints came out a lot better than expected. They have a lot of atmosphere to them that I'm really pleased about. Some of the photographs show that there is ice on the lake in places. I was not sure if that would show up but it has in a couple of the images.


Friday 13 April 2018

Recall magazine

I have been looking for a way to do justice to a series of photographs as a collection. I have shared some of them on the blog as a picture post called Tenth Floor. To be honest I have not really been satisfied with this method. It is great that they can be viewed as a set but it does not convey what they are like as photographs in the real world.

Having scanned them and then adjusted them in Photoshop to get them as close to the original, this still does not do them justice. I had thought about putting them in a book but it's an expensive way of putting ten pictures together as a series, so I looked at a magazine format which is quite an inexpensive way of printing a collection.

I decided to test the idea out with blurb. I have to say up front I am not a fan of the online print service since they screwed up a wedding book I got involved in some years ago.

Anyway having down loaded the updated software I set about putting the magazine together. It was good to see that the standard length was twenty pages - just right for my ten image project, giving me just enough space to add a few words of intro and some tec stuff at the end.

Not having produced anything book wise for a while, I had forgotten how involved it is just to get a basic structure together. For instance, what paper, font, title, how many images to a page the list go's on! The picture issue was easy to solve – one per page. The font was a bit more difficult, I wanted the theme to convey a type of note book look so I chose a font that looked like hand writing and easy to read.

The paper was quite easy in that you only had two choices. I plump for the better quality, I wanted the images to look like the resin coated paper that the original photographs had been made on. The title took a lot longer than anticipated and was suggested by the blogs editor.

Now that all the the bibs and bobs had been ironed out I could save the templates for the next issue. I expected it to be easy to produce the next issue but it is not! I maybe missing something in the workflow from one issue to the next we shall see.

The moment of truth came a week or so later. when a very thin cardboard package arrived. I was a little apprehensive when opening it. I hope this was going to be a lot better than the last package I had from blurb. OK WOW! it has well and truly exceeded my expectations it is a lovely thing to behold the gloss paper complemented the prints so much so they could have been the original photographs. In fact they could be cut out and framed. High praise I know but when it is right it is right - well done Blurb!

Would I recommend them? NO. A lot more water will have to pass under the bridge before I even consider it. A good start though.

The plan was to get one out a month this has not happened. Shortly after this article I was very ill, it took a long time to get passed. I did produce a second volume sometime later. 

So if you are interested in a copy here is the link and here is the link to the blog post Tenth Floor that this volume is based on.


If you would like a copy of the Magazine click on the link below.
http://www.blurb.co.uk/b/8533877-recall-volume-1

Saturday 3 February 2018

Kiroku by Dadio Moriyama.

I was flicking through some book reviews, when I came across one about Daido Moriyama's new book 'Record' known as Kiroku in Japanese. It is the collection of the first 30 issues of his personal magazine dating back to 1970s. Basically it chronicles his image making and some thoughts over the time period.

After reading the revue I had an irresistible feeling that I should obtain a copy. Although I am interested in Japanese photography I cannot say I know anything about Moriyama's work apart from he is a street photographer, which has a strong appeal.

 With a copy of Record in my hand and weight being the measure of quality, this is in the five star category. When you slide the book out of it's slip case you are presented with black edged pages and flush black edge hard cover something I have not seen before. This in itself brings a drama to what is to follow. 


When you open the book you are presented with silky smooth gloss white pages that keeps you in suspense as Mark Holborn introduces you to Daido Moriyama and sets the stage for the images to come. 

Wow! And what a shock they are! pulling no punches in their very high contrast look making full use of the term black and white. It takes time for your eyes to adjust to the rich black, making it difficult to see what the images are about. This is partly because these images are made on film at night without the use of flash making them very grainy. This graininess has been translated to the gloss pages by the printing technique making the pages gritty to the touch and adding a textural impact to the pictures.

He does not just use monochrome film there are some magazines in colour where he plays with the vibrancy of the colour. 


For a book that I decided to obtain on a whim, I have been very impressed by the images within. Yes the blackness, odd angles and graininess of the images are an assault on your sensibility's but that is what makes his work different.

It is a book to be enjoyed at leisure over many days and not all at once.


Wednesday 31 January 2018

Welcome to the new Year.

What a great start to the New Year for some with all that snow turning the landscape into a photographs paradise! Unfortunately, this part of the country is in the middle of a monsoon, in fact we have had that much rain I'm surprised we have not floated off into the North sea! Dull, dark and uninspiring, I am pleased to have a darkroom when the weather is like this.


A bit late I know, Welcome New Year! I had told some of my regulars that I would be posting a number of articles over the Christmas period. It did not happen and you have my apologies. December was so busy and passed by so quickly I feel I have lost a month from last year.


In case you did not know, this blog has always been a collaboration - so I need to say a big thank you to the editor for keeping it legible and concise. With that in mind we are looking for contributors and it does not matter if you blog or not. Maybe you have had an inkling to blog but do not want the hassle of doing the whole thing yourself or you would like to try it out before you get stuck in. Needless to say it should be photograph related. If you would like to contribute your thoughts and pictures please do. We have no set length, a few hundred words will do but definitely no more than a 1000. You will get full credit and links to your web site, blog if you have them.

 As you will have noticed I have refreshed the header for the new year. Something that has become a bit of a tradition. We may refresh the whole site in line with our mobile offering. Along with other subtle changes when we get the time.

I am not one for New Years resolutions it is just something I don't do. But I am going to try and use my Multi format pinhole camera even more than last year now that I have found a film, developer combination that gives the images a certain style that I like. I'm just not sure which of the 120 format family to use or what paper to print them on. I have some ideas as to what I will make pictures of and already know some of them will be double exposures whether I like it or not.


All I need to do now is thank you all for reading the articles from the year just passed and wish you all the best for the Year ahead. Keep well and creative.

Accompanying images:

Were all made using 35 mm Kodak  gold colour negative. A number of different cameras were used I know one of them was a Nikon FM. Locations of the images are not remembered apart from the first one which is Yosemite valley looking towards the falls.