Pages

Showing posts with label zero. Show all posts

Monday, 20 December 2021

Preparing the Zero Pinhole Camera for use.


Using this camera is a real step back in time requiring you to put aside all those luxuries that the modern photographer has taken for granted. After all, it is just a box with a pinhole in it, the ultimate manual experience from loading the film and remembering to wind it on, to calculating the shutter speed.


Loading the film:
To start with you need to load a roll of film. That's obvious, most film cameras need film to work. If you are like me it has been a long time since you looked at the backing paper of a roll 120 film. I had forgotten that it is marked for the four different sizes in the 120 family and with the multi format camera it has three red coloured windows in which to view the film numbers. It also has a set of symbols that tell you when the number is about to appear in the window which also marks the middle of the frame. With this set up you cannot blame anyone else for winding it on to far, so it is a good idea to take it slow and gentle in the beginning. Before loading the film you need to set the format your going to use, once the back and top are in place, it is time to advance the film so the light-sensitive material is in front of the pinhole. When winding on you may notice that it becomes quite tight, this is where the celluloid attached to the backing paper is being drawn in front of the light box. Just continue gently on until the first frame number appears behind the little red window. Now the camera is primed for light capture.


Calculating exposure;

The Zero cameras aperture is set at F 235, it is important to remember this as this number is not written on the calculator attached to the back of the camera. The calculators outer ring shows shutter times from 8000 ths of a second too 15 hours, the inner ring shows F numbers from F 1.4 to F 500.


Please note that all the figures that follow are based on a film speed of 100 ISO.

Today, for example, my light meter is showing a light reading of F 5.6 @ 500 ths of a second. Now using the calculator move the dials so F5.6 is opposite 500 ths of a sec., then find F 235 on the outer ring and read off the time opposite which is about 3 second; you will need to make an adjustment for reciprocity effect by a factor of 2 making an exposure time of 6 seconds. I say 'about' because the next F number is 250 with an indicated shutter time of 4 seconds. To start with it is a bit hit and miss, that is why it is a good idea to make notes on shutter times so you can see where to make adjustments once the film has been developed.

You will need to make adjustments for the reciprocity effect as follows:

  • From 1 second and over compensate by multiplying by 2 giving an exposure of 2 seconds.
  • From 5 seconds and over compensate by multiplying by 5 giving an exposure of 25 seconds
  • From 50 seconds and over compensate by multiplying by 12 giving an exposure of 600 seconds/11 mins.


Sunday, 19 December 2021

Zero pinhole camera


Pinhole cameras have been with us for a long time in all sorts of shapes and sizes. Aristotle wrote about this naturally occurring in the fourth century. It was not until the 1850 s when the Scottish scientist Sir David Brewster used a pinhole camera to produce the first photograph. It has taken on many forms ever since!

Over recent years the pinhole camera has come to the fore as a desired method of producing a different style of photograph. This popularity has been helped by the zero image company, making some wonderfully crafted boxes for the pinhole photographer. They are not just great looking collectibles but are fully working cameras that take some excellent photographs. They come in the three main formats of 35 millimetres, 120 medium format and 5 x 4 large format.

This camera has not been an easy acquisition for me, with several false starts I have had to compromise to get a deluxe model but it is in my format of choice if not the camera I really wanted for the project. Having said that I am not disappointed with the multi format camera. On hindsight this could be a good thing, as it allows me to play with the different sizes that make up the 120 family at a later date.

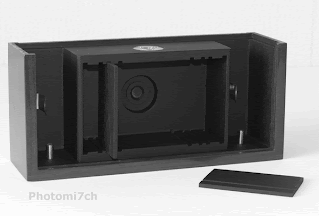
So whats in the box apart from a well crafted wooden camera that some quarters think would make a good jewelry box. Thinking about it, I can see what they mean with the multi format version!

  • A plastic view finder marked out in the different 120 formats.
  • A very nicely presented instruction manual that needs to be read if you are serious about getting the most from your camera.
  • A grey cord? Not sure why this in the box.
  • A certificate telling you who hand crafted your camera.

There are some other bits of kit you need to gather before you stroll down the road with your camera.

  • You will not get far without a spare spool to wind the film on to.
  • A light meter unless you are going to use sun rule 16.
  • A cable release is a good idea if you have the deluxe version as it removes any chance of camera shake.
  • Tripod.
  • A note-book and pencil is a good idea for recording frame numbers and exposure times. That then can be checked against the negatives once they have been developed. Giving you an indication as to whether you are over or under exposing.

Tuesday, 16 February 2021

Zero double take project first results.


Zero 6x9 pinhole camera.


As I sit here reviewing the first batch of photographs from double take, the wind and the rain is still lashing the property - something it has been doing for the last twenty four hours. I'm pleased to be inside in front of a warm fire with Tabatino who is stretched out in front of it like a rug. 


Zero 6x9 pinhole camera.


The contact print shows that the second exposures are quite weak and will require dodging and burning to make their presence felt. With this in mind I  have been using half page test strips  so I can see how much more exposure is needed to bring out the weaker parts of the negative. This has given me a better overall idea of how much extra time the weaker parts of the picture need so I can get as close as possible to what the final print will look like. Having  chosen to use 6x6 negatives I find myself cropping them to a landscape frame size giving me more choice over which parts of the negative make the final composition and partly to get the best use out of the paper size. I'm using Silverprint's gloss proof paper mainly because I believe it has added something to the overall expression of the photographs.


Zero 6 x 9 pinhole camera.


The results of this first film have been a pleasant surprise in that most of the negatives have produced picture combinations that work well. Whether this is down to luck or the pre-planning in the picture combinations only time will tell. The day I took the pictures was a challenge in that it was windy with a broken cloud sky that was fast moving making metering each shot difficult. By the time I had worked out the shutter speed and opened it the scene in some cases had gone from bright sunshine to dull and overcast or vice versa. It just goes to show how forgiving film is when it comes to exposing it in rapidly changing light conditions over extended periods. These were printed at grade 3 and not my more common split procedure.


Technical data: 

Film 120 FP4+ set to 6 x 6 negative size, developed in PMK Pyro, Printed on silverproof paper, developed in Ilford warmtone developer.

Monday, 15 February 2021

Reciprocity How it may affect monochrome film


The use of a Zero pinhole camera means that long exposures are the norm.
It might be a good idea to give an insight into how reciprocity affects the negatives. It is a wide-ranging subject that afflicts colour and black and white materials in different ways at long exposures, extremely short exposures and with flash. Because of this I am limiting this post to long exposure times with black and white film.

The Law:

The formula E=IxT expresses reciprocal relationship between the intensity of light reaching the film and the time allowed to act on the film. If one increases the other decreases proportionally, no net change in exposure occurs.

Ansel Adams The Negative.

At long exposures this law breaks down, known as reciprocity failure. It is where a seconds worth of light is not enough to satisfactorily produce the required densities in the negative. So the longer the exposure the greater the compensation needs to be. With these exaggerated times comes a side effect in that the lower values recorded become under exposed more than the higher ones causing the contrast of the negative to increase. You can make adjustment for this when developing the film by a reduction of ten percent for up to ten seconds, from ten seconds by twenty percent and from a hundred seconds by thirty percent. These changes are easy to control for single frame exposure made with large format cameras but a little difficult to achieve with roll film. If all the frames on the film are exposed for no longer than ten seconds then the ten percent reduction will control the increase in contrast across the whole film, but in practice this is not always the case with exposure times being all over the place. I would suggest that a reduction of ten percent be the starting point and that with experimentation will find what works best for you. Having said all this the side effect of higher contrast maybe to your liking in which case where's the problem.


The picture included in this post shows a slight increase in contrast. The negatives Ilford FP4+ were processed in PMK Pyro without an adjustment for increased contrast. Printed on grade two multi grade paper developed using Moersch 6 blue.


The following images and those above were all made using a Zero multi format Pinhole camera. The pictures below are from negatives using Fomapan 100 at box speed developed in studional for 11 minutes. scanned from photographs printed on Ilford multigrade 4 developed in souped ilford multigrade. 


Saturday, 9 June 2018

Out for a stroll with the Zero


It is always a joy to be out with the Pinhole camera. But it must be a strange sight to behold as I walk up the street. A little brown box attached to what could be construed as a big black stick (tripod). On this occasion it was a lovely bright day with a biting cold wind; I had not appreciated just how cold it was until I had been standing about making the first image.


As I strolled around the local lakes I took warmth from the brilliant sunshine and the anticipation of some interesting image making. By the time I was half a dozen pictures in I had forgotten how cold I was. I think the cold must have gotten to me as I could not remember what the reciprocity factor should be. Times 2 up five seconds and times 5 from then on. Dam and I had left my note book behind with the reminders in. Oh well I'm not going back.


from T max negative

This walk is turning to a bit of a jokers holiday which had started before I had even left the house. My Zero is a multi format camera Just before I loaded the film I checked to see where the dividers were and in my mind it was set to 6x6 I loaded the film and used the centre red window to view the frame count. I should explain there are three for the different sizes of negative. Later that day I had the chance to develop the film only to find it was set to 6 x 4.5 – ehh! Fortunately the second film was only part way through so rectified it by using the top window for the next days images.


The wind was that strong it was producing lots of fine ripples across the water. I was not quit sure how this would look in the final images not having made many photos of water with this camera. It just go's to show how cold it was, on the eastern side of the lake I found a lot of glass thick ice being smashed up on the shore. This brought back how cold I was feeling. Time to get back, to a home made slow cooked beef Currie that should be bubbling away by now.


Contact print at 2 seconds
the print is
also showing signs
of exhausted fix.
 
Just before I left the house the following day I filled my pocket with a mix of film from different manufacturers; I do not usually do this but so what! it was an off the cuff decision to go out picture making so why not mix it up completely! The previous day I had already loaded Kodak's T Max 400 which I thought might be a bit of a gamble seeing how bright it was, just as well I did, as I messed up the exposure completely. On subsequent trips I loaded Ilford's delta 100 and Fomapan 100 which is my fav film for the Zero. The others were first time use and this time I got the exposure right.

How badly the T Max was exposed showed it self when I contact printed the negatives. I had to re do it at 5 sec's instead of my usual 2, enlarging lens fully open with white light (with no grade filters set). The negatives when looked at showed full detail. The contact print indicated that the enlargement were going to need long exposures and a lot of dodging to get them the way I wanted.

From Fomapan 100 negative

I have developed all my negatives in Adox version of Rodinal. I use 1+50 for the time required. I have to keep reminding myself that this developer has a high acutance and therefore a lot more contrast. In some cases overly so. I had in mind to use Kentmere RC gloss but changed to Footspeed's RC gloss that has a more normal look. If I had kept to the original route they would have had super contrast. As it was, I had to drop the filtration for printing down to 0 from my normal grade 3 . With the contrast sorted it was time for the exposures. With the segmented test print in the holding tray the fun really started. As an example one print had a base exposure of twenty seconds but then needed an extra 40 seconds on top of that for the sky and some of the lake. Others longer.

From Ilford delta 100 negative.
I had a good time in the darkroom even though the printing sessions were challenging the prints came out a lot better than expected. They have a lot of atmosphere to them that I'm really pleased about. Some of the photographs show that there is ice on the lake in places. I was not sure if that would show up but it has in a couple of the images.


Monday, 23 January 2017

Welcome to the New Year

 On a grey and dull day I am going to say a big, bright THANK YOU to all my follows, subscribers and supports for visiting the blog over this last year. Views are up big time even though it has been a bad year personally.

As is the custom for this time of year I have a new header picture that shows a hand picking up or putting down an Agfa Isolette I will leave it up to you how you interpret my intent. If any of you have any suggestion please share your thoughts.

As I sit here writing this, it is peeing down with rain, which has inspired me to set up my pinhole camera to make an image that will take eighteen minutes to expose. Not the longest exposure I have made but getting there. This is  the start of my rediscovery of the wonders of  pinhole photography and the Zero camera in   articular which I hope to use more this year  instead of leaving it in the camera bag. A new   years resolution of sorts!

Talking of new year resolutions photograph wise -  have you set any? I don't as a rule but this  year is  going to be different I have two things I  could like  to achieve one I have already  mentioned the  other is to spend more time in the darkroom  printing, something that I can neglect. I find it  difficult to spend anytime at all during the  summer months in the darkroom I  o not like  wasting time inside if the weather is  bright and  warm, even in the evenings. I  suspect I'm not the  only one. What are your thoughts? 


I'm looking forward to seeing you all again this year. Don't be shy if you drop by - have a chat (leave a comment) - always interested in what you get up to. I shall leave you now as my mistress the darkroom is calling! I will chat with you all again later. Before I leave I would like to wish you all the best for the year ahead. 

Friday, 28 October 2016

Picture Post Zero

It has been sometime since my last article reasons behind this absence will become clear in later posts.

To get things going here are some images I made with a Zero pinhole camera multi-format.  


Technical Data:

Zero multi format, Negative size 6x6, Film FP4+, Developed in ID11 (first five), Developed in RO9 (last three) Printed on Ilford multigrade RC gloss, Grade 3, Developed in Multigrade.


Saturday, 9 June 2012

Light meter.


The weather has been great this past week and not one to pass up such a rare opportunity I have moved my office to the end of the garden where it is shaded  by some silver birch trees. If it was not for the shade I would not be able to see the computer screen.


As you know from previous posts I have become quite smitten with my Zero 6x9 deluxe camera. It's lack of through the lens metering! Your right no lens, I have had to revert to using a hand held one. NO! I'm not going to take another camera with TTL with me. Why load myself down, believe it or not even with a tripod it is lighter than my standard kit. Besides I don't need the light readings to be that spot on especially when needing to account for reciprocity.


While writing this I'm joined by a baby starling. It looks like the one I saved from the jaws of the cat the other day. The bird seems happy for me to be here as he/she walks up to and around the chair I'm sitting in looking for local delicacies. It appears I'm the last thing it needs to worry about.


Two types of hand held light meter
I have two types of meter to choose from they are tried and trusted run of the mill units. The oldest one uses a selenium cell which is a type of photovoltaic / solar cell. When the front of the meter is exposed to the light it produces a small current which moves a needle that indicates how much light there is. This type of meter is batteryless but one of the down sides is in low light situation it requires a certain light level to read accurately.


The other light meter is a CdS unit or Cadmium Sulfide cell that has a greater low light sensitivity. This light meter works by regulating the energy in the battery rather than producing a current as in the former. With this type of meter it can suffer from drifting this is where the meter has been shown a bright light temporarily making it blind. The cell has a memory and can fool you into thinking the level of light has not changed. It is a good idea to let the meter read the scene for several seconds to make sure it has read it properly.


Note the starling casting a
critical eye over the
photographs.
Todays meters do not suffer from this they use silicon blue or gallium arsenide photocell coupled to a memory chip  so are unlikely to have a time lag in changing light conditions.

My light meters are general purpose, they read reflective light from a fairly large area of the subject which is about 30 degrees. They round this reading to an average of 18% ( a mid grey) no matter how dark or bright the scene is. This is where the zone system ( See Ansel Adams The Negative for more info) comes into its own or a system of your own to allow for it. I have my own method that works well with a little bit of intuition thrown in. Well! Most of the time.

Since writing this my CdS light meter has passed away. It will be missed.

Saturday, 5 May 2012

Light striped prints


Another printing fault is light pollution known as fog. This is assuming it hasn't happened in the camera.


The dark line you see running up this picture
 it the result of light
getting to the light sensitive material. Fogging .

         It Could be where stray light from a darkroom not properly blacked out has found its way to the light sensitive side of the the paper you're using.

         Your safe light is too close to the enlarger and or the wrong colour.

         It can also happen if your enlarger leaks light when being used.

         Badly stored and out of date paper can also be fogged.

The causes of these faults, also point to ways of curing them. This post suggests a way of detecting light induced fog.

Sunday, 22 April 2012

Zero pinhole camera Project double take.


Camera Zero 6x9 delux
FP4+ 120 format, 6x6 neg,
 developed in PMK Pyro no afterbath,
Printed on silver proof paper gloss
Developed in Moersch 6 blue tone.
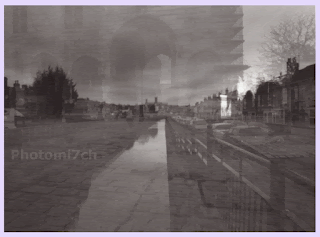
My attitude when using the Zero camera has become very relaxed. My approach is to look at the scene, roughly point the camera at the subject, take a light reading, calculate the exposure and open the shutter for about the right amount of time. Once taken move on to the next one. I'm not sure if this is such a good thing as I'm making a number of double exposures, which have turned out well more from luck than design.


Camera Zero 6x9 delux,
FP4+ 120 format, 6x6 neg,
developed in PMK Pyro with afterbath
printed on silver proof paper matt
 developed in Ilford warm tone
This has led to project double take but lets be honest basing an idea on a set of lucky mistakes does not bode well for the results. But then history is littered  with stumbled upon ideas that have gone well. With this in mind I'm going to carry on with the blindfold method of not winding on. I could be more controlled by making single shots and then combining the negatives in the enlarger to produce a double exposure but  this may take away the element of surprise and randomness to the results. With that said there needs to be some planning to the picture taking, so I'm going to use a location I know quite well in order to make the combination of double exposures easier to plan cutting down time looking for shots. It will be hit and miss anyway with this approach but hopefully not so many misses. The first roll is going to be a bit of an experiment so I'm not expecting many good printable photographs. But in this context what is going to be a good picture I think it will boil down to how well the combinations work together; once the first film is developed I'll be able to refine my method.


I'm setting the zero 6x9 deluxe to 6x6 neg size, loading FP4+ which will be developed in PMK Pyro using my revised method of inverting with an after-bath. I may not continue the bath for subsequent rolls if the photos look to soft. And so the project begins.

Wednesday, 22 February 2012

FP4+ developed in PMK Pyro method update


Zero camera, FP4+ developed
in PMK Pyro
The first permanent change is to go from two inversions every twenty seconds to one every fifteen seconds which is a reduction of two per minute. When I did this I wasn't sure if this would make the density of the negative less, as it turns out it has increased it, making for better toned prints. My conclusion is by decreasing the time between each inversion the developer in contact with the film surface is fresher for longer hence the increase in density. 

Zero Camera  FP4+ developed in PMK Pyro
Pelham bridge road Lincoln


I have also used an after-bath  (only with 120 FP4+) which does change the colour of the film base and seems to make them easier to print and at a softer grade. It has been suggested that the bath can reduce the sharpness of the negatives. Is this reduction noticeable? That's an answer you will have to find for yourselves as  I have only been using it so far with the film that's been exposed with the Zero pinhole camera, which is not known for it's ultra-sharp negative production. I will not be introducing it across the range of other makes of film I develop in PMK. I'm happy with the fine toned negatives it produces and see no reason to add the bath. 

Zero Camera FP4+ developed in PMK Pyro
Those of us who like to go against the mainstream will use it for creative or pictorial purposes but you need to be sure that the grain is sharp across the negative, it may add that extra something you are looking for to the final photograph.


Related posts:

PMK Pyro after-bath
PMK Pyro developer part B
PMK Pyro working solution