Whilst
putting an order in and perusing a suppliers web site I suddenly
had this urge to find out what the cost of using Kodak's T Max 400
would be in 120 format. I have no idea where this thought came from
or why! Anyway I had a look and by chance it was out of stock. I
still do not understand why I should want to use it. In the main I
have not used film faster than 200 ISO for decades. I have been happy
to go about my picture making at 100 or 125 ISO.
Some
months later out of the blue I find myself buying ten rolls of 120
out of date Tmax 400 which just so happened to be part of a job lot.
If I'm honest I would not have purchased them at all if it had not
been for the Tmax. All I can gather is my creative subconscious has
an idea of some sort that will reveal it's self over time!

I
am no expert in the way the mind works but I get a sense of when it
is the right time to get things done. I sometimes find myself sitting
back waiting for that feeling to get on with projects, when it
happens I find I am very creative for a short intense period of time.
Once that need to be creative is fulfilled the project has to be more
or less complete, which happened in this case with the images that
accompany this article.
We
had a pile of logs in the garden waiting for me to chop up when I had
the time. They were starting to nag at me to get on with the job when
I noticed the way a particular branch was lit - it brought out the
texture of the wood in an interesting way. For some reason it also
made me think of a severed arm the more I explored the pile of wood
the more macabre it became to the point where another branch looked
like a limbless torso. My god! my mind has gone into overdrive and it
was not Halloween! It just goes to show how powerful your imagination
can be - I could no longer bring myself to cut the wood up!

Some
weeks later I was looking out the window at the logs again - I know!
But what struck me was the quality of the light. It was very bright
in a soft way as though some one had put a soft box in front of the
sun. I went out to look at the sky it was covered with very thin
cloud, like a mist. All at once the idea for making images of the
logs fell into place.
To
make the images as surreal as possible I had to separate them from
the landscape, which meant I had to set up a background in this case
- I felt that white would do the best job. I worked as quickly as I
could because I was not sure how long this wonderful soft light would
last. I had no time to test the white background idea just go with
the flow. The lumps of wood were very large and heavy for a set of
still life images.
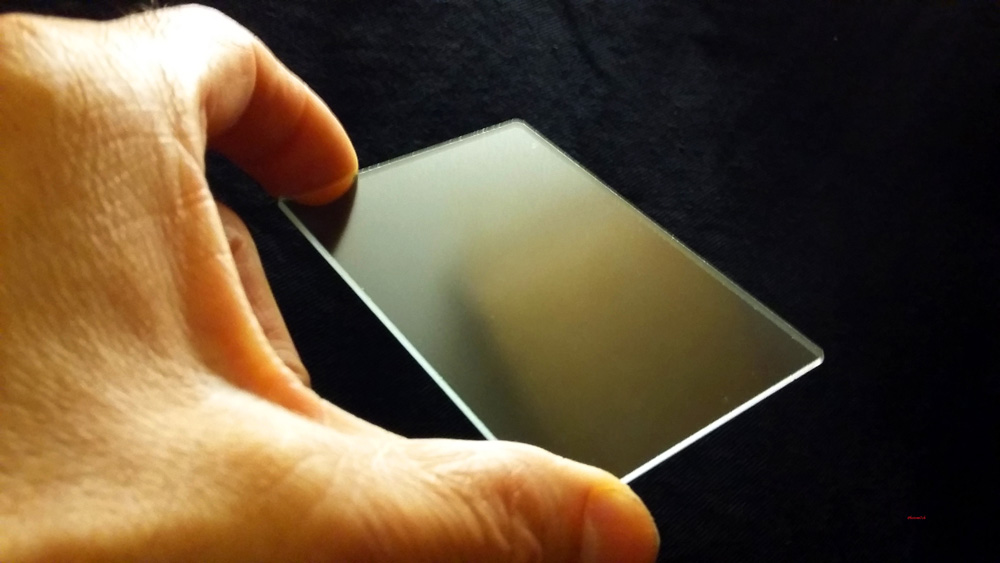
 |
| T Max 400 grain, film developed in RO9. |
As
to what film I should use there were no second thoughts - the out of
date T Max 400. I pulled a number of rolls out of the cupboard before
I loaded them into my Bronica SQAi. I used my hand held light meter
to check how bright it was. The rest as they say is history.
The
light lasted the best part of the morning and a number of rolls of
Tmax. Which was fortunate I was in a creative wonderland that stopped
abruptly after about a couple of hours. The flow of ideas had gone so
it was time to pack up and move on. The intensity of the project had
left me worn out! The images do not convey the size and weight of the
logs I had been moving around. It was time to sit down, regain my
energy over a cup of tea and consider how they would be printed.

I
was excited and apprehensive all at the same time. Excited to see how
the negatives and prints turned out but also apprehensive at the
possibility that the light readings could be wrong as there was not
time to double check so the film could be empty of images. My other
concern was with the development of the film. I had a time of 10
minutes at 1+50 for the RO9 I would be using. Having not used this
film developer combination before I could not tell how well they
would come out until the wet negatives were hanging up to dry. In
these situations I process the film one at a time so I can adjust
development if needs be.
I
was shocked in a pleasant way when I first looked at the dripping
negs. The detail and tone were superb. The superlatives kept coming
as the printing got under way. The negatives have a super fine grain
with great tone and detail. I printed them on Kentmere RC gloss
paper because of the arctic white tint which tends to increase the
contrast of the negatives. I would have used FB paper but I did not
have any cool tone paper in stock so used the next best thing. I
needed the bright white background to enhance the surreal look, not
that they weren't that already.

It
became clear that if I wanted to keep the stark white background then
there would need to be some burning in of the light wooded areas to
bring out the detail and maintain the softness to the shadow. It
would have been criminal not to exploit all the fine details the
negatives held. This extra work did not take away the Eminence pleasure it was to make these prints - even the ones that went wrong
- believe me I make some stupid mistakes sometimes that I can't
believe!
I
really did not know what to expect from the T max 400 especially as I
was using RO9 ( it depends on which manufacturer you use as some are
finer working than others) not known for it's fine grain and less so
with film as fast as 400 ISO. The grain produced is quite fine
considering the developer used I suspect it would be even smoother
with a developer noted for it. These T grain films really are a jump
on from the more traditional emulsions. Is it better than Delta? it
is difficult to say without doing a straight comparison between the
two. I'm exceptionally pleased with the results.
Oh
by the way the pile of logs are still there! Thanks to a friend the
pile has grown in size and weight and will take even longer to chop
up!
UPDATE:
The log pile finally disappeared a couple of months later.