Pages

Showing posts with label photography. Show all posts

Thursday 22 December 2011

Spun dry?


This is the fastest way you can dry your negatives. I had forgotten about this method until recently. Why? because it is the first time I have had access to a spinner. I recollect that there was/is opposition from other photographers in the use of the centrifuge method but cannot recall for what reasons.

The process is quite simple, you leave the film in the spiral attach a long hook to the side of the drum so you can hange the spool from it, close the lid and run for one minute. When removed the film is completely dry. That's quick! and no drying marks!

Monday 19 December 2011

Dust in the darkroom.


If you look at a beam of light whether projected from your enlarger's negative carrier or a shaft of light shinning across a room you will notice lots of particals floating in the air. Dust over the course of time will settle on the upper surface's of your enlarger and lens.

It does not take long for a considerable amount of dust to build up on the surface of your lens greatly reducing the brilliance of light passing through it. You should make it a rule that once or twice a year you clean the lens thoughly. It is also a good idea to cover the enlarger at the end of each session with its cover if it has one or a black plastic bag this will greatly reduce the dust build up.

If you have a window in your darkroom that needs to be blacked out it is not a good idea to use curtains as these are dust traps. You are better off using a wooden shutter made of hard board painted matt black or a roller blind made of light tight material that has some way of being sealed along the sides.

What you have on the floor is also important. If it is carpet it needs to be removed, as this is a dust trap too. It should be an easy clean material like lino if you have floor boards or garage floor paint for concrete floors these keep the dust at bay making it easy to mop the floor with water, it also means that you do not have to vacuum very often leaving more time to print.

Friday 16 December 2011

Drying the negatives.


Where to dry your film once they have been washed and you do not have a drying cabinet. It is not good practice to hang them near a vent or radiator. The turbulent air that these areas create can force hair, dust specs etc to land and stick to your damp film. One of the best places is in the bathroom where in most cases the room is at constant temperature and the level of dust is less because of the higher humidity.

You should attach a special film clip to the top end of the film and one to the bottom to add weight. This will also reduce curl once it has dried. The film is best hung wet and any excess water is removed with wiping tongs (double-sided squeegee). This also helps with the elimination of drying spots. I can tell you from experience that if these tongs are not spotlessly clean they will scratch your negatives. It is better to leave the film to air dry and remove the water with a well washed soft leather cloth, you keep especially for the job. You can wait till it is dry, use a film cleaner and soft lens cloth to remove the water marks. In both cases only wipe the shiney side of the film.

Wednesday 14 December 2011

Fixing negatives and papers


It is important to fix your negatives fully, this will ensure their longevity.

Fixing removes the last of any light-sensitive material from the negatives stabilising and securing the images so they can be viewed in day light. The temperature of the fix should be the same as the developer and stop bath, 20 degrees C.
Most fixers nowadays are rapid fixers supplied in liquid concentrate form and will complete the fixing process in about two to five minutes. (always check the instructions on the bottle) over fixing will start to bleach the negative. These fixers are usually suitable for film and paper. There is a chance in the case of warm tone papers that they may suffer from bleaching of their warmth with rapid fixers, it would therefore be better to use a more traditional fixer made up from a powder to ensure no loss of tone.


Thursday 8 December 2011

How to keep Fiber base photographs flat


This must be one of the most frustrating things about fiber base paper. It comes out of the wash tank like a limp rag and when it is drying it curls up like corrugated plastic but there is no getting away from the fact that photographs on fiber base paper have that something extra and it is worth the trouble in making sure they are flat.

Over the years I have used the cartridge paper and heavy books route to keeping my prints flat. I could use a special machine that dry's the prints using heat but I prefer the slower air dried method.

It wasn't until Dave Miller the founder of the film and darkroom users forum posted an article on his method for ensuring they dry flat, that life with FB paper has become so much easier. A big thank you to Dave for that article, without it I would still be using heavy books and would not be writing this post with my own refinement to his excellent method. My adaptation allows you to print right up to the edge with out trimming.

Equipment needed:

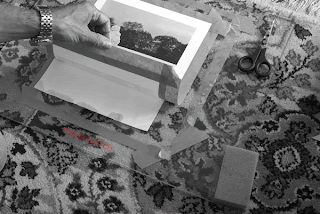
  1. Stick gummed tape to back of print
    A pane of glass large enough to cope with your largest print size.
  2. Adhesive brown paper tap that is made sticky by water. Available from most art suppliers.
  3. Craft knife.
  4. Scissors.
  5. Metal rule/ straight edge.
  6. Cartridge/ blotting paper.
  7. Sponge.
  8. Print squeege or leather.

My adaptation:

First of all you will need to remove any excess water from the print by hanging it for a short while and/or use a leather to dab it away.

  • Place pint on blotting paper before sticking to glass
    Cut a piece of cartridge/blotting paper slightly smaller than the print size.
  • Place on the glass.
  • Then place the photograph picture side down on the blotting paper.
  • Cut to length a strip of gummed brown adhesive tap.
  • Pull the tape tight and stick half the width on to the back of the print and smooth out. Remember that the print will still be damp so the tape will not need to be wetted.
  • Do the same for the other three sides. Once done turn the print over so it is picture side up.
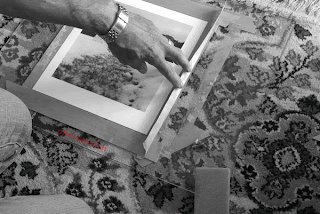
  • sticking third strip of tape to glass
    Again cut a length of tape this time dampen it do not make it wet as it will not stick on contact but slide and fail to stick.
  • Pull the tape tight and stick to the tape at the top of the print half on and half off.
  • Wipe the damp sponge across the glass (again do not make wet as the tape will slide across the glass) and stick down.
  • Lift the print and place the blotting paper under the print and smooth down.
  • Next cut another length of tape for the bottom and do as before but once the tape is stuck to the tape and the glass is damp pull the print tight and stick down. This slight tension will keep the print flat.
  • Do the same for the sides.
  • Leaving to dry over night
    Leave to dry overnight.
  • To remove the prints once they are dry place a metal rule/straight edge along the side of the print and cut along all the sides with a craft knife. This will release the print perfectly flat.

Notes:


Used craft knife to free picture from glass
When moistening the tape to stick to the backing tape you only need to make it damp enough for it to contact stick - it is important that the whole length has been dampened. Then press it down firmly to the back of the print along its lengths and do the same when sticking tape to tape, otherwise it will allow the print to curl as it dry's, leaving a wavy edge. You can re-wet the print and lay it up again but it is better to get it right first time if you can.


To remove the tape from the glass it can be re-wetted and scraped off or place the glass in a dish of water to soak for about five to ten minutes.It will lift off with ease.

Tuesday 6 December 2011

The story behind the Winter Picnic Photograph.


It was round about this time last year (November/December 2010) that the UK was in the grip of the worst cold spell for as it turns out a hundred years. The country may have just missed coming to a standstill but it stopped me in my tracks literally, as I couldn't get the truck off the drive. The ice was a solid two inches thick not allowing for any grip!

The snow brought a brand new look to the area that I had not seen before, so I thought I would go out and take some photographs of this fresh, clean new wonderland of soft edges. Armed with my Bronica SQAi 120 format camera loaded with FP4 film I trudged gingerly off into the countryside.

Picnic
I was quite surprised to find there we a lot of people out and about with the same idea, walking the dog, playing and enjoying their enforced day off work. As I strolled further afield the numbers thinned until I was alone enjoying the crisp white land the snow had laid out for me to photograph; so engrossed with the scenes before me I forgot how bitterly cold it was until my throbbing freezing fingers sent SOS messages to my brain and brought me back to reality -“Shhahhhoi!!! Its cold.!” Pulling my gloves on the best I could I made off in a hurry to warm up.

Briskly walking up a path by one of the lakes the path turns a corner at the top where there is a bench and from a distance it looks like someone is sitting there! As I got closer I could see it was two people! -”they must be mad!- and it looks like they are having a picnic!” As I got closer I could see steam from their cups as they ate their mince pies! An idea for this picture was forming as I approach them to ask if they would mind being in the photograph. They did not mind, so I walked back down the track a bit, set up the camera on the mono pod, took a light reading and pressed the shutter. You're right! I only used one frame, no back up or bracketing, the view that came to mind is the one I took. After the shot was taken I walked back and chatted for a while. Apparently they don't let a little bad weather get in the way of them coming to their favourite spot! I wish them the best of the season and moved on. Not so mad after all! I wish I had thought to bring a hot drink with me!

I am pleased to say that Picnic was one of the Pictures chosen for this years Film and darkroom users Year Book. Which can be obtained from Blurb.

FADU year books

Friday 2 December 2011

What does developer do?


The function of the developer is to bring out the latent image held in the emulsion. This is achieved by a chemical reaction, acting on the silver, producing dark areas where it is light and bright areas where there is shadow. The negative is reversed later with the print. The two most important things to keep at the front of your mind are: the development time and the temperature. It is these two factors that ensure the ultimate image quality you later produce in the print. Too short a development time will produce too thin a negative, like wise too long a process time will make the negative too dence, leading to very short and very long print times.

Wednesday 23 November 2011

Types of Enlarger Negative carriers


There are two main types of negative carrier, with and without glass. There are arguments for and against each type. Lets be honest there are three types, the adjustable.

Glass-less carriers avoid the Newton rings effect (a post for a later date) but also have the disadvantage of allowing the negative to buckle when they warm up, this is more pronounced with 6x6 negatives. To minimize this you should be very careful when focusing and use a smaller aperture to increase the sharpness across the negative.

Another disadvantage of a glass carrier is dust; to be honest it is not the big deal that everyone makes it out to be. It is just a case of being methodical in your approach. The main advantage of glass carriers is that they keep the negative flat. Another plus is that you can experiment with unusual effects by using various materials such as flower petals, salt crystals and soap suds etc in the carrier.


There are adjustable carriers also, which are very handy as they allow you to mask out badly illuminated edges without having to increase the magnification, or you can adjust them to include the rebate of the negative.

Enlarger


An enlarger consists of:

Enlarger for 35mmm negs
only. with out multigrade
head. Condenser type.

A baseboard on which enlargements are made; a column, which serves as a slide for the support arm, that holds the enlarging head, which consists of the lamp housing that contains the bulb; a single or double condenser; negative carrier, a place to fix the lens; a means of focusing and lastly a red filter that swings in front of the lens.

The lamp contained in the light housing is of the opal type and has a power output of 75, 100 or 150 watts. The pearlescents of the bulb with the help of a condenser distributes the light evenly across the negative. The lens focuses and projects the negative image on to the baseboard or rather an easel with paper on it. The higher the enlarging head is from the baseboard the closer the lens is to the negative the greater the magnification. The closer the head is to the baseboard the greater the distance the negative is from the lens the smaller the magnification of the picture. The typical focal length of lens for 35mm negative is 50mm and for a medium format (6x6) is about 75mm.
A multi format Enlarger with multi grade head.
Diffuser type.

The negative is clamped in the carrier which incorporates a mask that is the same size or format as the film and then placed in the light box. It is not a good idea to cut the negatives into single frames, it is better to leave them in strips to make it easier to line the frame up with the mask in the carrier, this also means you are less likely to scratched them.


Focusing is usually done manually, although there are enlargers available with automatic focus, these are usually more expensive.

Friday 11 November 2011

Safety in the darkroom


There are some health and safety issues in the darkroom. The most commonly used chemicals are no more dangerous than household detergents and bleaches, some of the more specialized chemicals can be hazardous. Here are some do's and don'ts to make things safer.
Do's
  • Wear gloves ( rubber or Latex), protective cloths and use eye protection.
  • Wash spillage's to skin and eyes quickly with lots of water.
  • Keep a tap hose for this purpose'
  • Clearly label everything.
  • Make sure there is good ventilation.
  • Dispose of solutions safely' seek advice if needed.
  • Mix chemicals slowly and in the right sequence.
  • Filter water and home-made solutions to remove bits especially for film processing.
  • KEEP ALL CHEMICALS OUT OF THE REACH OF CHILDREN.
Don'ts
  • Eat, drink or smoke when mixing chemicals.
  • Inhale dust from powders.
  • Fail to read instructions and warnings first.
  • Use kitchen scales for chemicals.
  • Use metal containers, mixers and trays.
  • Add chemicals together without knowing if the outcome is safe.
  • Add water to strong acids or alkali's ( e.g. caustic soda-Na OH). Always add them to water not the other way round and slowly.
  • keep large glass bottles on high shelves.

Darkroom layout


When setting out your darkroom it is best to set your work flow from left to right. By doing so you are less likely to contaminate the dry side with chemicals or water. You should keep the enlarger table separate from the development table. The dry side takes up less space than the wet side so can be put along a shorter wall. The support for the enlarger should be completely stable and set at a comfortable working level when standing. For a standing position the right height is 95cm (37").
A typical lay out
Remember electricity and water don't mix so take particular care when providing power for your equipment. If in doubt consult an electrician. It is not imperative that your darkroom has running water but ventilation is and will need a light proof grate.

This may sound strange but make sure that the illumination is sufficient to allow you to see round the room when printing.