Pages

Showing posts with label light sensitive. Show all posts

Tuesday 16 February 2021

Zero double take project first results.


Zero 6x9 pinhole camera.


As I sit here reviewing the first batch of photographs from double take, the wind and the rain is still lashing the property - something it has been doing for the last twenty four hours. I'm pleased to be inside in front of a warm fire with Tabatino who is stretched out in front of it like a rug. 


Zero 6x9 pinhole camera.


The contact print shows that the second exposures are quite weak and will require dodging and burning to make their presence felt. With this in mind I  have been using half page test strips  so I can see how much more exposure is needed to bring out the weaker parts of the negative. This has given me a better overall idea of how much extra time the weaker parts of the picture need so I can get as close as possible to what the final print will look like. Having  chosen to use 6x6 negatives I find myself cropping them to a landscape frame size giving me more choice over which parts of the negative make the final composition and partly to get the best use out of the paper size. I'm using Silverprint's gloss proof paper mainly because I believe it has added something to the overall expression of the photographs.
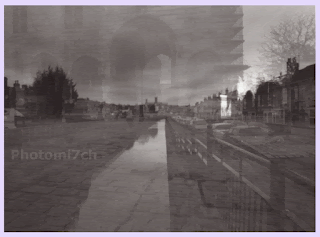

Zero 6 x 9 pinhole camera.


The results of this first film have been a pleasant surprise in that most of the negatives have produced picture combinations that work well. Whether this is down to luck or the pre-planning in the picture combinations only time will tell. The day I took the pictures was a challenge in that it was windy with a broken cloud sky that was fast moving making metering each shot difficult. By the time I had worked out the shutter speed and opened it the scene in some cases had gone from bright sunshine to dull and overcast or vice versa. It just goes to show how forgiving film is when it comes to exposing it in rapidly changing light conditions over extended periods. These were printed at grade 3 and not my more common split procedure.


Technical data: 

Film 120 FP4+ set to 6 x 6 negative size, developed in PMK Pyro, Printed on silverproof paper, developed in Ilford warmtone developer.

Friday 17 July 2015

A case of the wrong paper?

FG 1.  Ilford Multigrade RC developed in
Ilford multigrade developer


I was in the darkroom the other day doing some printing, when I noticed I had produced a print that did not match the test strip. This lead to a bit of head scratching. Then it occurred to me that the paper that was left from the last session in the test strip box was a different make. I had assumed it was Ilford, a logical thought, as it is the paper I use often.

I usually cut the paper I'm going to use into test strips at the beginning of each session. Only in this case I looked in the box and saw there were strips ready to go and just got on with printing. By strips I mean 8 x 10 paper cut in half.


FG 2.  Foma variant RC developed in
Multigrade 

I know that different makes of paper have different characteristics and levels of contrast. But I was not expecting such a big difference.

Lets set the scene: the negative is a 120 format Fomapan ISO 100. I had set the enlarger to F 11 and grade 2.5 - a good place to start due to the negatives contrast. The test strip indicated a 7 seconds exposure would provide an acceptable first print.

When I pulled the paper from the soup it did not look right even with the red light on. It lacked contrast almost flat in appearance. (fig 1 Ilford paper). I opened a box of Foma and exposed it at the same settings (fig 2 Fomatone), again it looks soft with a cooler tone to it. Finally I put a sheet of Kentmere (fig 3 ) in the easel and exposed it at the same setting. Found it! - this matched the test strip. What a difference! - it suggests a grade or two more contrast! 
FG 3.  Kentmere RC
 developed in Multigrade

I was surprised at the contrast between the Kentmere and the others was so striking. The paper developer I used was Ilfords Multigrade it has been in the processor for about a month. I note the time it takes for the first sign of the print to show - in this case 15 seconds - this gives me an idea of how exhausted the developer is. Also as the developer exhausts so the prints show signs of warmth. Once it reaches 30 seconds I tend to add fresh developer or change it.

 I did not intend to compare these papers - I was side tracked by my test strip. What I would suggest is that if your negatives are a bit on the soft side that maybe if you use Kentmere paper it may boost their contrast giving them more punch or should I say presence. I am not suggesting that you should change to Kentmere paper instead of setting the appropriate grade for the negative you are working with. It is something to keep in mind for those very thin and or flat negatives that do not respond very well when you cannot find a grade that works.
 

Saturday 7 July 2012

The masking frame


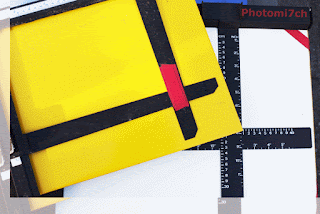
Also called an easel they come in different sizes. It is a good idea to pick one that is larger than your current needs therefore not limiting the proportions of your enlargements. The main reasons for using a masking frame are to hold the paper flat, to reconfigure the composition, allow the margins to be adjusted to the various format sizes you wish to use and to crop out some of those bits that creep in at edges, that you didn't see before you pressed the shutter. 

The frames come with two or four independently adjustable blades on a yellow or white base. I have noticed that some blades are not set at right angles to each other so it is a good idea to check them at various settings with a set square to make sure they are true. Also make sure that the edges of the blades are not bevelled under. This will reflect the light and produce a thin black line around the edge of the picture. It can be a nice affect but one you should have control over. The light colour of the baseboard is so you can see the projected negative, enabling you to frame the image before you put the photo paper in place.

When using single weight papers on a white baseboard, it is possible for the light to pass through the paper and be reflected back, changing the value of the exposure. You can stop this by laying a dark coloured card on the baseboard with the light sensitive paper on top.

The most versatile of the masking frames is the four blade, it allows you to mask the image by only having to move the blades of the frame without having to re-a line the whole easel each time. It also gives better control over how big or small you make the margins and in some cases gives you the ability to produce borderless prints. The versatility of these frames makes them quite expensive to purchase.

Saturday 9 June 2012

Light meter.


The weather has been great this past week and not one to pass up such a rare opportunity I have moved my office to the end of the garden where it is shaded  by some silver birch trees. If it was not for the shade I would not be able to see the computer screen.


As you know from previous posts I have become quite smitten with my Zero 6x9 deluxe camera. It's lack of through the lens metering! Your right no lens, I have had to revert to using a hand held one. NO! I'm not going to take another camera with TTL with me. Why load myself down, believe it or not even with a tripod it is lighter than my standard kit. Besides I don't need the light readings to be that spot on especially when needing to account for reciprocity.


While writing this I'm joined by a baby starling. It looks like the one I saved from the jaws of the cat the other day. The bird seems happy for me to be here as he/she walks up to and around the chair I'm sitting in looking for local delicacies. It appears I'm the last thing it needs to worry about.


Two types of hand held light meter
I have two types of meter to choose from they are tried and trusted run of the mill units. The oldest one uses a selenium cell which is a type of photovoltaic / solar cell. When the front of the meter is exposed to the light it produces a small current which moves a needle that indicates how much light there is. This type of meter is batteryless but one of the down sides is in low light situation it requires a certain light level to read accurately.


The other light meter is a CdS unit or Cadmium Sulfide cell that has a greater low light sensitivity. This light meter works by regulating the energy in the battery rather than producing a current as in the former. With this type of meter it can suffer from drifting this is where the meter has been shown a bright light temporarily making it blind. The cell has a memory and can fool you into thinking the level of light has not changed. It is a good idea to let the meter read the scene for several seconds to make sure it has read it properly.


Note the starling casting a
critical eye over the
photographs.
Todays meters do not suffer from this they use silicon blue or gallium arsenide photocell coupled to a memory chip  so are unlikely to have a time lag in changing light conditions.

My light meters are general purpose, they read reflective light from a fairly large area of the subject which is about 30 degrees. They round this reading to an average of 18% ( a mid grey) no matter how dark or bright the scene is. This is where the zone system ( See Ansel Adams The Negative for more info) comes into its own or a system of your own to allow for it. I have my own method that works well with a little bit of intuition thrown in. Well! Most of the time.

Since writing this my CdS light meter has passed away. It will be missed.

Wednesday 4 January 2012

Test strips before printing.


The test strip is the foundation to obtaining a good final print. Unless you have one of RH designs excellent Analsyser Pro enlarging meters. If not the most common way of producing a test strip is with a sheet of card moved at timed intervals across light-sensitive paper. There are several things you need to set before doing the test: the size of the print, the aperture of the enlarging lens and making sure you have sharp focus.

10 x 8 test strip.
Once all this is done how big should the test print be? This is down to personal choice but you should consider whether the use of whole sheet, half, third or strips give the best test results. If using a test strip of about two inches (50 mm) you need to make sure that each segment includes a full range of tones from the lightest to darkest so you can see at which timed interval gives the best high values and shadow areas. It is much easier to achieve this with the larger test strip.

What should the time separation be? A good starting point for prints around the ten by eight size is five seconds. These intervals will give you a rough idea of what the exposure should be. This can be refined with further test strips of two and/or one second if needed.

On what grade of paper should you make the test print? Grade one is standard practice. If the method you use places your negatives at a particular grade In my case it is grade three then you should do your test print at that grade unless you are using the split grade method.

Related posts:

Evaluating your test strips

Monday 2 January 2012

Photographys. Bigger again?


To make enlargements over 50 x 60 centimeters requires a different working practice and a large darkroom.

If your negatives allow you to print them at 50 x 60 centimeters this is not the end of the story, you can go bigger with roll sized paper of 65, 100 and even 130 centimeters wide. But to go larger you will need a different method to produce them and a larger negative to start with which will increase the quality of the image projected by the enlarger. Your darkroom will need to be big enough to cope with the increased size of equipment. You will need an area of clear space that the enlarger can project the image onto whether it is the floor or a wall. Of the former the latter is the better way of doing things as you are less likely to get dust on the paper, it also makes it easier to dodge and burn if you need to.

Tuesday 27 December 2011

Contact printing.


Now that you have your negatives safely stored and indexed, you need to sort out which negatives you are going to print. Trying to judge this by holding them up to the light or by laying them on a light box can be difficult. The best way is to produce a contact print showing all the frames on one sheet of photographic paper.

There are special frames that allow you to do this. You can buy contact print frames which consist of a glass top with film holders attached and a solid base with foam on that clips shut. For 35mm or 6x6 (medium format) which hold seven rows of six for 35mm or four row of three for medium format negatives. The frame holds the negatives so you can see the frame numbers on the print, you place them with the shine side up and put a soft grade light-sensitive paper on the base. Then shut the frame to bring the negatives in contact with the photographic paper, hence contact print.
Another method of contact printing is if you use clear plastic negative holders, you can place these directly onto the photographic paper. The problem with this method is it does not hold the negative completely flat to the paper which means that some of the pictures may be distorted. A way round it is a clean sheet of glass that is big enough to place over the negatives.

Tuesday 20 December 2011

Darkroom fog!? Safe light.


No I'm not talking about the weather but about the lighting in your darkroom. Is it safe? Is it the right colour? Is it to close to the enlarger or developing dishes? How do you find out?

There is a simple test, you will need to cut some photographic paper into about 6x6 (150 x150mm) and lay them flat in various places with the lights off around the darkroom with a small object like a coin on the top. Don't forget to mark each piece with the location you have placed it in. Switch on the safe light(s) and leave them for five minutes.

Then develop all the pieces as you would normally, if they all come out blank then there is not a problem. However if you can see the image of the object/coin on any of them you know that the light is too strong in that place and will fog any paper you leave out. You could move the light further away. Now if all the bits of paper show signs of an image it means that the safe light is the wrong colour and will need to be changed or your darkroom is not light tight.

Thursday 8 December 2011

How to keep Fiber base photographs flat


This must be one of the most frustrating things about fiber base paper. It comes out of the wash tank like a limp rag and when it is drying it curls up like corrugated plastic but there is no getting away from the fact that photographs on fiber base paper have that something extra and it is worth the trouble in making sure they are flat.

Over the years I have used the cartridge paper and heavy books route to keeping my prints flat. I could use a special machine that dry's the prints using heat but I prefer the slower air dried method.

It wasn't until Dave Miller the founder of the film and darkroom users forum posted an article on his method for ensuring they dry flat, that life with FB paper has become so much easier. A big thank you to Dave for that article, without it I would still be using heavy books and would not be writing this post with my own refinement to his excellent method. My adaptation allows you to print right up to the edge with out trimming.

Equipment needed:

  1. Stick gummed tape to back of print
    A pane of glass large enough to cope with your largest print size.
  2. Adhesive brown paper tap that is made sticky by water. Available from most art suppliers.
  3. Craft knife.
  4. Scissors.
  5. Metal rule/ straight edge.
  6. Cartridge/ blotting paper.
  7. Sponge.
  8. Print squeege or leather.

My adaptation:

First of all you will need to remove any excess water from the print by hanging it for a short while and/or use a leather to dab it away.

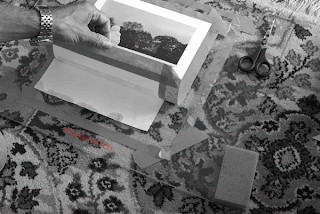
  • Place pint on blotting paper before sticking to glass
    Cut a piece of cartridge/blotting paper slightly smaller than the print size.
  • Place on the glass.
  • Then place the photograph picture side down on the blotting paper.
  • Cut to length a strip of gummed brown adhesive tap.
  • Pull the tape tight and stick half the width on to the back of the print and smooth out. Remember that the print will still be damp so the tape will not need to be wetted.
  • Do the same for the other three sides. Once done turn the print over so it is picture side up.
  • sticking third strip of tape to glass
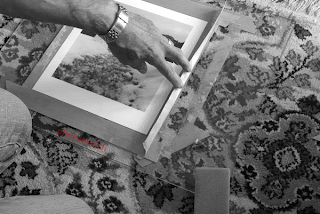
    Again cut a length of tape this time dampen it do not make it wet as it will not stick on contact but slide and fail to stick.
  • Pull the tape tight and stick to the tape at the top of the print half on and half off.
  • Wipe the damp sponge across the glass (again do not make wet as the tape will slide across the glass) and stick down.
  • Lift the print and place the blotting paper under the print and smooth down.
  • Next cut another length of tape for the bottom and do as before but once the tape is stuck to the tape and the glass is damp pull the print tight and stick down. This slight tension will keep the print flat.
  • Do the same for the sides.
  • Leaving to dry over night
    Leave to dry overnight.
  • To remove the prints once they are dry place a metal rule/straight edge along the side of the print and cut along all the sides with a craft knife. This will release the print perfectly flat.

Notes:


Used craft knife to free picture from glass
When moistening the tape to stick to the backing tape you only need to make it damp enough for it to contact stick - it is important that the whole length has been dampened. Then press it down firmly to the back of the print along its lengths and do the same when sticking tape to tape, otherwise it will allow the print to curl as it dry's, leaving a wavy edge. You can re-wet the print and lay it up again but it is better to get it right first time if you can.


To remove the tape from the glass it can be re-wetted and scraped off or place the glass in a dish of water to soak for about five to ten minutes.It will lift off with ease.

Friday 11 November 2011

Dry side of the darkroom.


Typical layout for dry side of darkroom
This is the area where you will have your enlarger set up. The table will need to be large enough to allow for timer, puffer (like a rocket air) and magnifying glass. There will also need to be space for you to lay out your negatives, printing paper, scissors and or guillotine/rotary trimmer and holding back and burning in tools. It is a good idea if this area also has cupboards and draws for keeping your paper and equipment in.