Pages

Showing posts with label emulsion. Show all posts

Saturday, 11 August 2012

Stop not buffer.


One of the most popular over the counter acid stops.
Made from citric acid with colour indicator.
Stop is the second part of the development process, but how many of us give it a second thought. Most of us when we come to developing our first film tend to do what the manufacturers, friends and teachers suggest without delving into what the relationship is between these elements in the process. There is nothing wrong with this approach we are all eager to get on and see those all important first images. With success, we continue settling in to a way of doing things that produce good results. It's not until we start printing that some faults with the negatives rear their heads. Dust and hair marks being the most common but then there are those odd black spots appearing in the skies here and there. This is when the controversy about how we stop the development process comes to the fore.


There are two main categories. The more aggressive with chemicals and the gentler water stop. The later is not a stop and it is misleading to call it such.   It dilutes the developer to the point where it no longer has an affect on the emulsion this can and does lead to unevenly developed negatives and I cannot understand why it is recommended (for film only) other than to increase the longevity of the fix, a buffer or as a way of creating a certain style to the negative. 

Have been processed using a citric acid stop.
I personally prefer the more aggressive chemical route, when the stop go's in, the developer is stopped in its tracks producing a clean crisp negative but you need to be careful.

A popular choice in the make up of developers is Sodium carbonate, an alkali. When this comes into contact with an acid based stop it produces carbon dioxide gas that leads to blistering of the more sensitive film emulsion,( not the case with enlarging papers). It manifests its self as a pinhole in the denser areas of the negative. There are ways around this by using developers that are formulated from mild alkalis either balanced or borax which do not produce the damaging over heating or gas when used with acid stops.


A reflection of St Pauls in London.
Processed and printed using all Ilford products
Stops are made from several different acids the most popular is acetic with a pH dye indicator. The others are citric and boric. You can also use a simple solution of sodium bisulfite. Be careful which stop you choose as some produce green staining with some enlarging papers. Another precaution is to use the stop bath at a lower working temperature to the developer; I know this is a controversial move but I have used this method for years without any of the problems suggested by others.

Saturday, 25 February 2012

Focusing. Soft prints why!


Ilford FP4+, Iso 125, developed in ID11
Printed on Ilford paper
There are reasons for your photographs to be out of focus. If we assume that the negative was sharp when it was exposed, it could be if you are using a glassless negative carrier that the negative may have popped and requires refocusing. Another cause is vibration, you need to make sure that you are not knocking the enlarger when you are exposing. If the enlarger is mounted on an uneven surface or rickety table this will not help nor will living near a main road with lots of heavy traffic.
If when looking at the photograph it looks  blurred, it has not been focused properly. You can cure this by using a focusing negative. To make one you need a negative of no value as you will have to scratch the emulsion in several places. It is simply a case of placing this negative in the enlarger and focusing until the scratches are razor sharp. Alternatively you can use a special focuser.

Sunday, 5 February 2012

Mirror -image reversal


This is where the film is placed in the negative carrier with the emulsion side upper most obtaining a left right inversion, a mirror image. Negatives suited to this treatment cannot have any writing in them otherwise it gives the game away.

Which one of these images has been reversed?


Sunday, 18 December 2011

What next for PMK Pyro?


This year I decided to push the boundaries of my black and white film photography with a bit of dangerous living; well, flamboyant then!!. By using three makes of film I have not tried before: Agfa's relaunched APX 100 35mm, Adox CHS 100 35mm and 120, Fuji neopane 400 35mm. All of whom are going to be finessed with PMK Pyro staining developer in to reveling their latent images.
The first of these to receive Pyro's tender kiss is Agfa's APX. I have had a quick look at Digital truth massive dev chart ( thanks guys) and have discovered that the data they hold could be out dated as it is for the original film emulsion. A quick film test (quick! just joking) as described in another post, to check the time and if needed adjust it. I'll be using the suggested dilution formula of 1+2+100 and the 13 minutes as the normal process time for comparison.
It is a fine bright warm day just right to choose a subject and take pictures for the test. Wow! that's the fastest 22 frames I've taken in a long time! So as not to waste the rest of the film I took a walk round the local area to use up the other frames. Film is becoming expensive. Now all I have to do is find the time to process the film.

Thursday, 8 December 2011

How to keep Fiber base photographs flat


This must be one of the most frustrating things about fiber base paper. It comes out of the wash tank like a limp rag and when it is drying it curls up like corrugated plastic but there is no getting away from the fact that photographs on fiber base paper have that something extra and it is worth the trouble in making sure they are flat.

Over the years I have used the cartridge paper and heavy books route to keeping my prints flat. I could use a special machine that dry's the prints using heat but I prefer the slower air dried method.

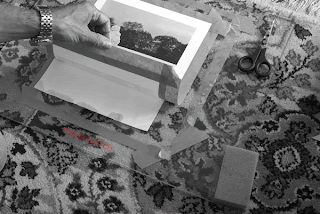
It wasn't until Dave Miller the founder of the film and darkroom users forum posted an article on his method for ensuring they dry flat, that life with FB paper has become so much easier. A big thank you to Dave for that article, without it I would still be using heavy books and would not be writing this post with my own refinement to his excellent method. My adaptation allows you to print right up to the edge with out trimming.

Equipment needed:

  1. Stick gummed tape to back of print
    A pane of glass large enough to cope with your largest print size.
  2. Adhesive brown paper tap that is made sticky by water. Available from most art suppliers.
  3. Craft knife.
  4. Scissors.
  5. Metal rule/ straight edge.
  6. Cartridge/ blotting paper.
  7. Sponge.
  8. Print squeege or leather.

My adaptation:

First of all you will need to remove any excess water from the print by hanging it for a short while and/or use a leather to dab it away.

  • Place pint on blotting paper before sticking to glass
    Cut a piece of cartridge/blotting paper slightly smaller than the print size.
  • Place on the glass.
  • Then place the photograph picture side down on the blotting paper.
  • Cut to length a strip of gummed brown adhesive tap.
  • Pull the tape tight and stick half the width on to the back of the print and smooth out. Remember that the print will still be damp so the tape will not need to be wetted.
  • Do the same for the other three sides. Once done turn the print over so it is picture side up.
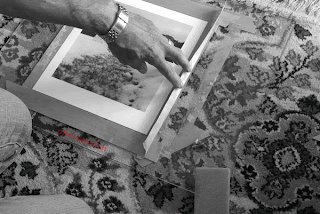
  • sticking third strip of tape to glass
    Again cut a length of tape this time dampen it do not make it wet as it will not stick on contact but slide and fail to stick.
  • Pull the tape tight and stick to the tape at the top of the print half on and half off.
  • Wipe the damp sponge across the glass (again do not make wet as the tape will slide across the glass) and stick down.
  • Lift the print and place the blotting paper under the print and smooth down.
  • Next cut another length of tape for the bottom and do as before but once the tape is stuck to the tape and the glass is damp pull the print tight and stick down. This slight tension will keep the print flat.
  • Do the same for the sides.
  • Leaving to dry over night
    Leave to dry overnight.
  • To remove the prints once they are dry place a metal rule/straight edge along the side of the print and cut along all the sides with a craft knife. This will release the print perfectly flat.

Notes:


Used craft knife to free picture from glass
When moistening the tape to stick to the backing tape you only need to make it damp enough for it to contact stick - it is important that the whole length has been dampened. Then press it down firmly to the back of the print along its lengths and do the same when sticking tape to tape, otherwise it will allow the print to curl as it dry's, leaving a wavy edge. You can re-wet the print and lay it up again but it is better to get it right first time if you can.


To remove the tape from the glass it can be re-wetted and scraped off or place the glass in a dish of water to soak for about five to ten minutes.It will lift off with ease.

Tuesday, 6 December 2011

Fine grain developers


The production of fine grain in a negative is dependent on, in the first place, speed of the film and the choice of developer. The object is to keep the structure of the grain in the emulsion as small as possible so that it does not show up in the enlargments. Fine grain developers are best suited to films of medium speed about 125 ISO and above.

Some of the best known fine grain developers: Ilfords Microphen and ID11, Tetenal Ultrafin, Kodak D76, PMK Pyro is a staining developer that produces a fine grain and for the new grain techologies: Kodak HC110 and T max, Ilford LC29 and Tetenal Ultrafin plus, just to name a few.

Friday, 2 December 2011

What does developer do?


The function of the developer is to bring out the latent image held in the emulsion. This is achieved by a chemical reaction, acting on the silver, producing dark areas where it is light and bright areas where there is shadow. The negative is reversed later with the print. The two most important things to keep at the front of your mind are: the development time and the temperature. It is these two factors that ensure the ultimate image quality you later produce in the print. Too short a development time will produce too thin a negative, like wise too long a process time will make the negative too dence, leading to very short and very long print times.