Pages

Showing posts with label photography. Show all posts

Wednesday 17 September 2014

My new print washer at last.


When I started looking for a new print washer I did not think it would take the best part of two years for it to arrive. Basically I was looking for a new way to wash multiple prints at once without having to stand there and agitate them. Giving me more time to print. It would have been quite easy to go down the road and buy one off the shelf, but I wanted to put some of the knowledge I had gained into building my own.


I was not expecting it to take so long to arrive at a design I was happy with. It was always going to be a slot style washer which meant it would be a little more complicated to build. I was up for the challenge. The easy part was choosing the materiel it would be made from one of two plastics I had in mind. The next was settling on the size, it had to be the same as my slot processor 18” (460 mm) by 14” (360 mm). When starting a project like this you do not realise how many questions need to be answered before the project get off the page. For example: How many prints did I want to wash at once? How far apart should the slots be? What style of slot divider? For each set of questions I solved so another set would take their place. The most difficult ones to answer were what tooling would be needed.


Making sketches of what the washer should look like helps no end in solving some question quite quickly. By doing this it gives an insight as to what will be the difficult parts to put together. One of the difficulties turned out to be the design of the dividers and how they would be put together. This question remained a sticking point right up to the point of having to make the divides. In the end I settled for ones that could be removed, just as well I did because I'm not happy with the design. Having said that they work really well.


Since it's completion it has been in regular use and now I would not be without it. It has done what I wanted it to do - free me up from having to stand and wash each print by hand.


This post looks into Print washing

Tuesday 9 September 2014

Loading a Bronica film back

college still life
On one particular trip I made into college I was met by my tutor who placed in my hand a Bronica 6x45 camera and a roll of film in the other. Then told me to go into the studio and make pictures of the still life he had set up. Wow! I had wanted to try out one of these cameras for ages, part of this enthusiasm was when I found out that the lenses were made by Nikon. Sadly later models used seiko lenses. This is not to say the quality is any less. At one time I was very keen on all things Nikon.


I placed the camera on the tripod and released the film door to load the film. Which stopped me in my tracks. “How the hell do you make this work” I was expecting it to load the same way as other 120 format cameras that I had used. A short time later the tutor came in to see how thing were going. As he approached he smiled and said “It does not matter how many students I give this camera to you are all stumped by the film loading”. He took the film back and reversed the backing paper over the pressure plate round and onto the other reel. It was that simple.

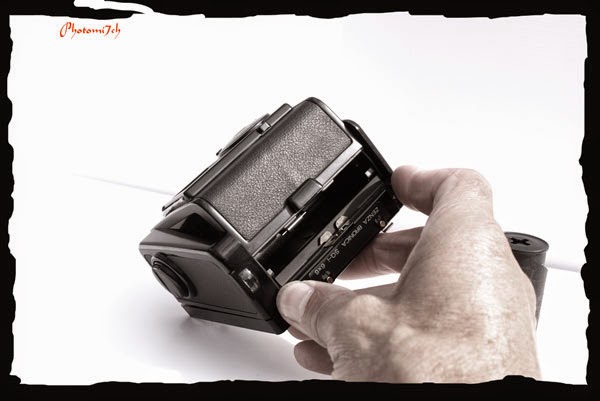
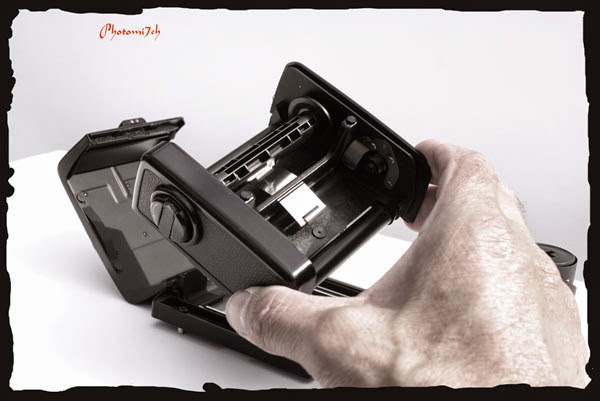
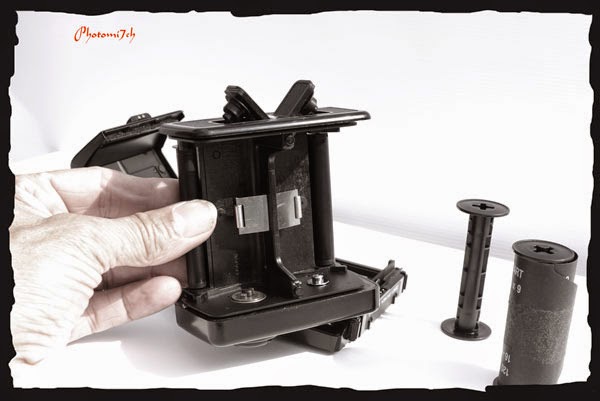
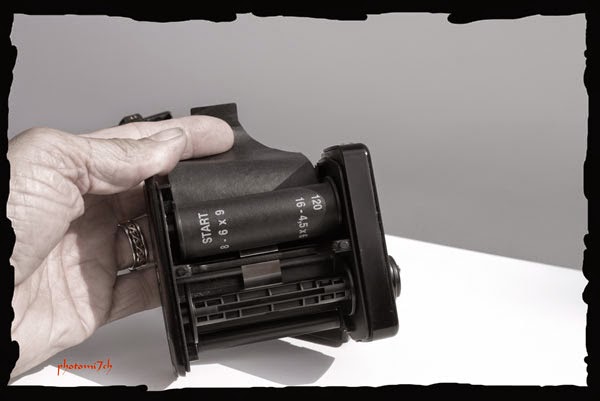
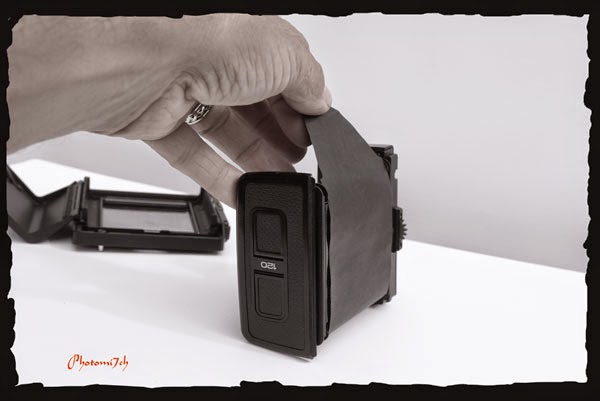
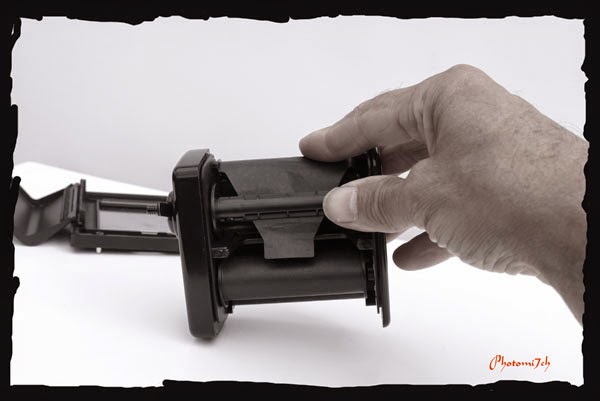
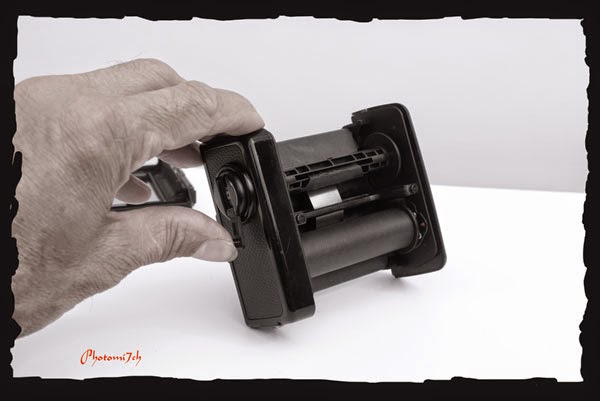
For those who are not familiar with the way you load film into the Bronica here are a few pictures to point the way.

Film backs can be loaded on or off the camera body.

To open the film back compress the two clips on the top. The door will spring open

Remove the film holder from the case.

Push open the film spool holders.

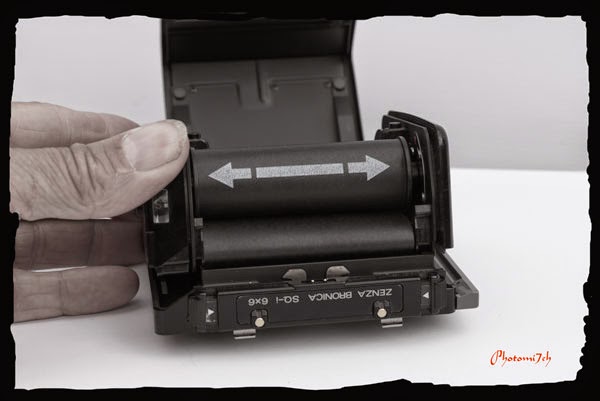
Place the empty spool in the lower holder this is the one with the winder on the side. With the fresh film in the top as shown pull the paper backing over the top.

Pull the paper backing all the way up and over the top

Thread the paper backing into the empty spool as shown

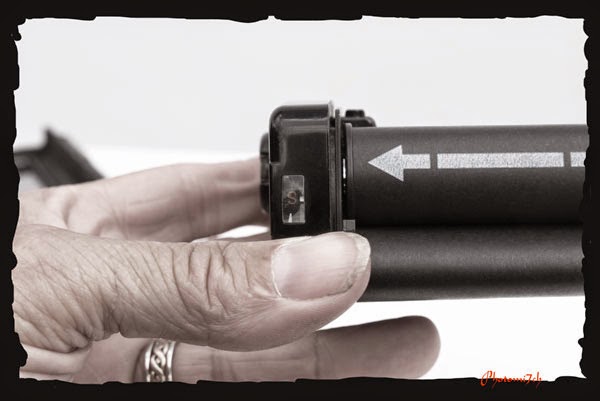
Using the winder on the side of the film holder wind the paper on

Keep winding the paper backing until the arrow shows and stop 

Place the film holder back in its casing and close.

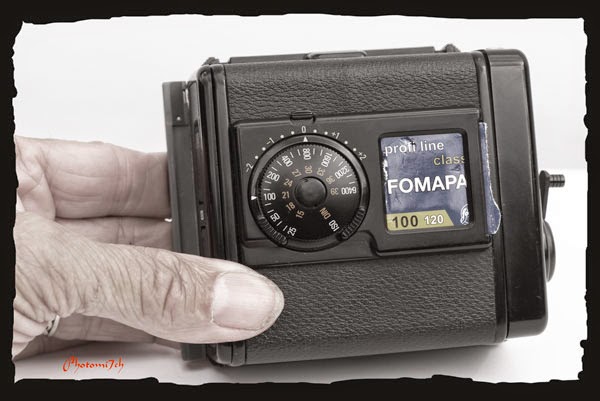
Do not forget to set the ISO. If you use a number of different film tear off the top of the film box and slide it in to the window.

Saturday 19 July 2014

RO9 Rodinal film Develper


Having used up all the ID11 on the four film project and a backlog of exposed film building up, I thought it was about time I break out 'my something for the weekend' developer. I have always kept a backup developer for those occasions when I get caught out. This time I reached for a small bottle of RO9/ Rodinal. This little bottle has been on the shelf for years and in that time it has slowly turned to a rich red brown colour. This single shot developers keeping qualities are legendary. Silverprint has a forty year old bottle that they use from time to time! It still produces good quality negatives, so my 'youngster' should have no problems.

RO9/ Rodinal is not classed as a fine grain developer. It is famous for it's contrast control and flexibility. It's high acutance produces very sharp looking negatives a bit like sharpening a digital file in Photoshop.
It's character to a certain extent is governed by it's dilution.
For example:
  • 1+10 will develop ortho film.
  • 1+25 produces high contrast negatives and the most obvious grain.
  • 1+50 Is the standard dilution producing crisp, normal contrast negatives, with slightly more grain than a fine grain developer.
  • 1+75 and 1+100 will render high contrast negatives as normal.
  • 1+300 can be used with document type films.


This is another developer I have not really used before so when I picked a Fomapan 100 ISO 100 to try it out on there is a little first use nerves! - How will the negatives look? How much is a little more grain than a fine grain developer? Is the time suggested going to produce well toned negatives? All questions that cannot be properly answered until the film has been fixed. My mantra is “keep it simple” and chose the standard dilution 1+50 as this comes close to the development time I use for ID11, which means I can compare these neg's against the ID11 negatives.

I used my long standing agitation method, although on the bottle it gives a different one. Agitate for the first thirty seconds and then tilt the tank at thirty second intervals.


I have used this developer with FP4+,Fomapan 100 and the Rollei 400s and again I'm having trouble with the latter. The other two have presented nicely toned negatives that have been easy to print. They are slightly more grainy than the ID11 negatives I am use to. But you would not think so when you look at the prints, I'm hard pressed to see a difference when comparing them side by side.

The pictures that appear with this article have been scanned from 9 x 12 prints produced on Kentmere variable contrast paper RC. I have found that grade two works better with these negatives than my usual grade three. This maybe down to its contrast controlling attributes. I have also used a couple of negative with the split grade method and again no appreciable difference. I do all my test prints on RC papers and then do my final prints on FB papers. Here again there has been no sign’s of increased grain.

All the pictures were developed in a mature Ilford multigrade developer - by mature I mean at least a month old, that has been replenished once or twice. I find that the prints take on a warmer tone than those first produced in the developer when fresh. It also takes longer for the first signs of the print to appear when fresh, about ten or so seconds and as it matures twenty seconds or so. This is not a method for the faint hearted as it can deplete very quickly in a matter of one print to the next. I have been caught out and ended up with a print that does not fully develop.


Overall I am very pleased with the negatives RO 9 presents. Yes they are more grainy but that does not translate to the final print. While I was looking into the use of RO9 Rodinal I came across a gentleman that has indicated that the original Rodinal could be used as a print developer and it was the exception to the rule in this respect. Does anyone know differently? 

Saturday 22 March 2014

Dogs Dinner.

Well not quite, a dogs water bowl! There is no chance of it falling in his dinner because his head is in the bowl before it hits the floor. The film was more likely to become a chew.

I noticed that two film containers were sitting on the kitchen table. Thinking they were empty I picked them up to throw away, to discover that they were not. I opened one and out dropped a roll of exposed colour film. Butter fingers here managed to drop the roll of film! The consequence of these finger fumbling, was splash! straight into the dogs water bowl. My wife said that she had not seen me move that fast since my superman days. I need reminding, what superman days?

After a bit of dancing around to shake the water out, it was off to the local supermarket for development. An outlet we had not tried before. The film was also long out of date - nearly a decade. If it had not been for the fact I was on my way out I would have blacked out the darkroom and removed the film for drying. These things always happen when you're short of time.

As it turns out the water had destroyed nearly half the frames on a film of twenty four. The up shot of this was we only had to pay half the normal fee. There was also colour shift on some of the prints. This I put down to the water damage.


Am I disappointed? No! Not really, but I am with myself for the butter fingers, but not with the results we have, as neither of us could remember who, what, when or which camera was used in the first place. The big disappointment is with the quality of the processing and paper used. 

Saturday 15 February 2014

The most popular posts of 2013.

William Henry fox Talbot 

These are the ten most popular posts on this site for 2013. In some cases not the best written but then who sets out to write a bad article. I compare it to making pictures, I go out with the intention of producing my best work. I chose those pictures that meet that criterion and share them with you. Then the choice is yours and that means you may not agree.

Of the hundred and fifty or so posts on the blog the following are the most visited making them the most popular.


  1. Fox Talbot a short history.
  2. Darkroom layout.
  3. Preparing the pinhole camera for use.
  4. Basic split grade printing.
  5. Choosing an enlarger.
  6. Print washing.
  7. Test results for Agfa APX 100.
  8. Fuji GW 690111 overview/review.
  9. Dryside of the darkroom.
  10. Keeping your negatives safe.


Monday 10 February 2014

Easy Lith 200 Results.

This is my follow on post explaining what happened and how it was done. Not everything went according to plan, but more about that later.

Being in a fortunate position of owning a second slot processor I decided to set this at 26 degrees for the lith developer. I did not add stop or fix to the other slots but continued to use what was already available in the other slotty, keeping the temperature to 20 degrees. It is just as well I did as one of the papers emulsion became very soft.

I chose high contrast negatives that I had already printed. I looked back through my notes on how long each was exposed for and added one and half times more exposure to see how things worked. I chose to follow the instructions when it came to diluting part A and B at 2X 1+25+1000 mls water. (20 mls of each 40 mls in total in 1000 mls of water). The paper I chose to start with was Kentmere RC because it was the paper originally used with these negatives. All the prints were exposed to white light, no grades were set. I had no idea how they would turn out or what sort of tone would be produced. I used two other varitone RC papers to see which produced the best results with this mix of A and B.

Kentmere paper
This is the original Kentmere print exposed at grade zero and developed as normal.

Kentmere paper
This is the first print out of the easy lith on Kentmere paper. It took over three minutes for it to reach full development. A very faint out line of the picture started to show about 30-40 seconds in. It was difficult to see whether the print had toned or not with the red light on.

Foma 131 paper
Second print was on Foma 131 varitone. This took a full twelve minutes to develop fully and is what I had in mind as a lith look.

Ilford paper
Third print was on Ilford multigrade paper, I pulled the paper early because I thought it may go completely black.

Conclusions:

Not knowing what to expect from this process makes it difficult to be to critical with the results. One of my main mistakes was to treat this like a normal developer, I should have mixed the two parts separately so I could vary the strengths of each part to get a look that was in my opinion more lith like, this may have lead me to make changes to the amount of over exposure as well. The problem I think in these early stages of getting to grips with a new process such as this is there are a lot of variables to take into account. With more practice I suspect I will arrive at something more my taste.

A side affect of using the Lith process has shown up a weakness in what I considered a well vented darkroom. This is the first time I experienced a build up of fumes. Some updating needs to be carried out if I wish to continue printing using lith chemicals. After a bit of thought I feel it should be upgraded regardless!

Over all I am pleased with the outcome, for a first attempt. Others may not, but I would prefer to get as many of the mistakes out of the way now so I can concentrate on producing finer prints in the future.

Link back to first post easy lith 200

Saturday 11 January 2014

Paper flashing, Pre-flash examples.

I had not envisaged writing a second post on this subject so soon, but I thought I should have included some more examples with the first post.

Examples:

All the pictures that appear here have been printed on Kentmere VC RC at grade 0, developed in Ilford Multigrade and pre-flashed at one second increments with the enlarger light box at nearly full height and the lens shut down to F16.


Straight Grade Zero print


This picture is a straight grade zero print. When I took this picture I knew it would be a difficult scene to print.


Pre-flashed for one second

This picture has had a one second pre-flash the difference is quite subtle but you can just make out an increase in tone.


Two second flash

This picture has had a two second pre-flash and looks a bit washed out. The tonal range has increased in comparison to the last picture now making it necessary to add the grade five exposure to bring out the contrast and blacks.

Pre-flash test strip:


Exposure curve and Kentmere test strip
in second intervals


I have combined the pre-flash test strip for the Kentmere paper with the exposure curve to show how the test relates to the curve. Intervals 1 to 4 relate to the numbers on the curve.

Example two:

Grade zero print

This is also a grade zero print, when I took these shots I did not think the negatives would require pre-flashing.


Flashed for one second

This picture has had a one second pre-flash. If you compare the two carefully you can make out the subtle change in the sky which appears darker and the  additional tonal range in the details in the shadows.

Sunday 6 October 2013

A bit of a surprise.

There was a new kid on the block, a brash whipper snapper that goes by the name of Fisheye 2. This little fellow punches above his weight with the quality of pictures he produces. I'm not sure why I am surprised at this. I can only think that my view of the toy camera market has been tainted by the snobbery of professionalism! It is a brilliant piece of kit that allows a further string to the creative bow.

Let's be honest it is not my camera. My wife purchased it because she loves the fish bowl effect it produces when printed. She also thinks that the double, triple and many more exposures on a single frame are awesome. But the main thing is ease of use. 

This can lead to a bit of a dispute over who took what, especially when both of us are using it at the same venue! The only rule, once a film is finished we agree that colour or monochrome film is loaded. My wife prefers colour but more black and white film has been exposed.

Basically it is a point and shoot camera with a 170 degree field of view. With a couple of important buttons the most important as far as my wife in concerned is the little one on the back that allows the shutter to be re-primed for multi exposures and the other on the top right front by the shutter release ( which i think is the most important), this controls exposure the; L position locks the shutter so it is not tripped accidentally; N is the standard setting of 1/100 sec @ F8 and B a bulb setting that allows long exposures.
  

I must admit it's good to get away from all those decisions an SLR brings to the picture taking process. Just concentrating on the composition is  unexpectedly liberating knowing that if it all go's wrong it is a minds eye fault and not a technical one! when it comes to multiple exposures where serendipity influences the mix, some are far better than others.  Nevertheless  always interesting. I felt that I had been taken back in time to the excitement and wonder I experienced with my first camera.

It was a surprise when Elizabeth Roberts editor of  Black and White photography magazine got in touch asking if it would be OK to publish some of these pictures in the portfolio section. An unexpected boost to what has been a bad news year.

These pictures were taken in and around Baton upon Humber area, over a number of visits.  They are a mix of pictures  all made playfully exploiting the advantages of the lens. I had not intended to create a series. It just so happens to be an interesting part of the river Humber with its nature reserves, the bridge and foot path that extends to the estuary.


Three makes of film were used Agfa APX @100 ISO, out of date HP5 @400 ISO and out of date Fomapan 200 @200 ISO all developed in ID11. The pictures have been printed on a number of different photographic papers. The ones that appear in the magazine are printed on silverproof matt. Developed in a mix of Moersch SE6 blue and Ilford warmtone.

Friday 13 September 2013

Same picture different camera.

The recent airing of a documentary on Vivian Maier sparked a debate between my wife and myself not on the wonderful pictures taken but about her camera equipment and what it has added to her pictures.

Fg 1
Vivian used a twin lens reflex camera (TLR). As the name implies it has a viewing lens of the same focal length placed above the lens in front of the negative. They are coupled together so when the viewing image is sharp it is the same at the focal plane. There are several things to note when using this type of camera. One of the oddities is the image; it is reversed, left is right and vice versa. So if someone or object is moving towards the left of the screen the camera will need to be moved to the right.  It is something that is a bit disconcerting when using the camera, more so for the first few times. The view screen gives no indication of depth of field until the negative is printed as there is no aperture settings. This lens design also exhibits the parallax effect this    is where the juxtapositions between far and near objects are seen  differently between the two lenses. This can be compensated for by moving the picture taking lens up to where the viewing lens is positioned.

Fg 2
With the idiosyncrasy of the TLR explained, it makes the street pictures she took even more wonderful. But I digress, this post is really about - 'does the camera add something of it's self to the picture?' In other words would you have taken that picture no matter what camera you were using?


I have canvassed opinions from other photographers and it has been suggested that the different working methods needed for different camera types and formats would indicate that the camera adds something of it's self to the picture. Or is it just perception? I will admit that certain cameras like the Lomo fisheye 2 undoubtedly adds to the composition in a particular way with its fish bowl negatives and distorted edges, this is also true of the pinhole camera with it's long exposures and blurred movement. These camera are chosen because of these attributes but the same could be said for the main stream digital, 35mm, medium, large format multi lensed system cameras. Maybe the premise is wrong and it is the lens that leaves its mark so to speak.

Fg2
Lets be honest there are a multitude of factors that come into play when making a picture. With the camera lens combination playing the leading roll. I have not until the above question arose, made the same picture with different cameras and formats from the identical place. In my case it just does not happen.


Figure 1 Lomo fisheye 2 and figure 2 Nikon F5 with 28mm lens both 35mm Agfa APX 100 film @ ISO 100 are a couple of examples where I have made the same picture with a different camera in about the same place.


In conclusion the camera and lens you choose to use has an effect on the pictures you take therefore imparting something of is self on the end result.


Fg1

Saturday 6 July 2013

Using the Agfa Isolette camera


Carrying on from a previous post on the Agfa Isolette The opportunity to use the camera was provided by a break in the weather - it cleared enough not to be soaked as soon as you leave the house.


The flip out film holder makes it easy to load a new roll of film. There are in built springs that provide friction, so the film is kept tort, keeping it as flat as possible at the focal plane reducing distortion. The film back clicks shut with a reassuring clunk. It also has a little red window in the back with a sliding cover in which to view the film numbers as you wind on. The film is advanced with a knob on the top right hand side of the camera that has a built in reminder to wind on after each exposure otherwise the shutter will not set.

To reveal the lens you press a button on the top left hand side. In this case the lens followed by the bellows leaps forward from the front of the camera with an enthusiasm that can knock it out of your hands if you are not prepared for such athleticism. Once the front is open you are presented with the five main controls: lens focus, a full set of apertures from F4.5 all the way up to F32. A limited number of shutter speeds: B, 25th, 50th, 100th and 200th A self timer and most importantly a lever that primes the shutter for release. The only other thing present is a connection for flash.

On the top of the camera is the shutter release that allows a remote cable to be fitted, a cold shoe for a range finder or other accessories and another knob that has four settings marked Col NK, NT, K and T. (I do not have a clue as to what they represent.) As far as I can tell it has had no affect on my negatives. It has a viewer and a tripod mount.


After I got used to the idea of guessing what the distance should be set to and then remembering to alter it for different views, I found myself taking shots quickly almost like an automatic. I did take light readings to start with but it became clear that the light levels were stable enough not to need checking for each shot.

It became clear that there was a problem once the negatives had been developed. Some how light was getting into the camera. Having checked it carefully before hand I should have carried on and cut a piece of light sensitive paper to fit the camera and left it for a minute to make sure. Once the paper had been developed in the normal way it would have shown that light was leaking in from the bottom right corner of the exposure chamber indicating a problem with the bellows.


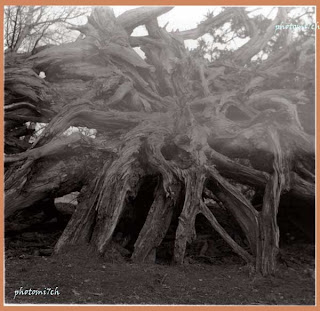
I'm a little disappointed with myself for not doing this check in the first place. If I had followed through with the test, I wouldn't have had a duff set of negs'!. It would have made an interesting set of prints as the gremlin's face in the tree roots shows.