Pages

Showing posts with label fp4. Show all posts

Monday, 20 December 2021

Preparing the Zero Pinhole Camera for use.


Using this camera is a real step back in time requiring you to put aside all those luxuries that the modern photographer has taken for granted. After all, it is just a box with a pinhole in it, the ultimate manual experience from loading the film and remembering to wind it on, to calculating the shutter speed.


Loading the film:
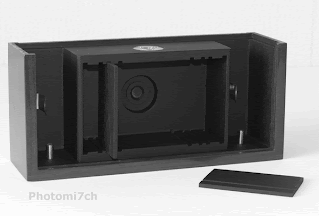
To start with you need to load a roll of film. That's obvious, most film cameras need film to work. If you are like me it has been a long time since you looked at the backing paper of a roll 120 film. I had forgotten that it is marked for the four different sizes in the 120 family and with the multi format camera it has three red coloured windows in which to view the film numbers. It also has a set of symbols that tell you when the number is about to appear in the window which also marks the middle of the frame. With this set up you cannot blame anyone else for winding it on to far, so it is a good idea to take it slow and gentle in the beginning. Before loading the film you need to set the format your going to use, once the back and top are in place, it is time to advance the film so the light-sensitive material is in front of the pinhole. When winding on you may notice that it becomes quite tight, this is where the celluloid attached to the backing paper is being drawn in front of the light box. Just continue gently on until the first frame number appears behind the little red window. Now the camera is primed for light capture.


Calculating exposure;

The Zero cameras aperture is set at F 235, it is important to remember this as this number is not written on the calculator attached to the back of the camera. The calculators outer ring shows shutter times from 8000 ths of a second too 15 hours, the inner ring shows F numbers from F 1.4 to F 500.


Please note that all the figures that follow are based on a film speed of 100 ISO.

Today, for example, my light meter is showing a light reading of F 5.6 @ 500 ths of a second. Now using the calculator move the dials so F5.6 is opposite 500 ths of a sec., then find F 235 on the outer ring and read off the time opposite which is about 3 second; you will need to make an adjustment for reciprocity effect by a factor of 2 making an exposure time of 6 seconds. I say 'about' because the next F number is 250 with an indicated shutter time of 4 seconds. To start with it is a bit hit and miss, that is why it is a good idea to make notes on shutter times so you can see where to make adjustments once the film has been developed.

You will need to make adjustments for the reciprocity effect as follows:

  • From 1 second and over compensate by multiplying by 2 giving an exposure of 2 seconds.
  • From 5 seconds and over compensate by multiplying by 5 giving an exposure of 25 seconds
  • From 50 seconds and over compensate by multiplying by 12 giving an exposure of 600 seconds/11 mins.


Friday, 28 October 2016

Picture Post Zero

It has been sometime since my last article reasons behind this absence will become clear in later posts.

To get things going here are some images I made with a Zero pinhole camera multi-format.  


Technical Data:

Zero multi format, Negative size 6x6, Film FP4+, Developed in ID11 (first five), Developed in RO9 (last three) Printed on Ilford multigrade RC gloss, Grade 3, Developed in Multigrade.


Sunday, 31 January 2016

Patterns of negative grain.

RO9 developed FP4+

Ever since I started writing this blog I have been looking for a way to show you what grain is produced by different developers. I have used a number of methods without success over the years. Until late last year when the need to show what the grain looked like raised it's head again. By chance I had my phone in my hand when the idea to use the enlarger and phone camera together came about. It is one thing to have a good idea it is another to put it into Practice.


PMK Pyro developed FP4+


A long time later I managed to get two good images from different rolls   of 120 FP4+ that I was happy with. They show a visible difference between the one developed in PMK Pyro and the other developed in R09.

 When I have more time I will make  images of other film developer    combinations if you are interested.   

Friday, 4 July 2014

Four Film Positive results

Printing

Figure 1
Before any of my negatives see the enlargers negative carrier they all get contact printed, for me this is the first indication of how they may print when enlarged and for some the only time they become a positive. It also serves as a reference.

The contact prints for the Adox and Rollei show under development, to what extent will only become clear when the test strips are produced. The Fomapan 100 and the FP4+ show as well toned. In the case of Ilfords FP4+ it may be over developed.

Once more I step into the the red world of the darkroom and the smell of chemicals. Only there are none! The developer, stop and fix need to be mixed a fresh. This is due to a problem with the fix turning the slot of the Nova processor black. Still not completely sure why!
   
Figure 2

 I set the light boxes height on the enlarger so it will  generate a print 9”x 12” in size. This means the the 6x6  negatives are going to be brutally cropped; maybe that  should be less dramatic and say 'creatively cropped' to  fit  a landscape format but also serves to increase the  magnification.

 I have set the enlarging lens to F8. All the negatives  will be exposed at this setting, it allows a comparison  to be made as to how over or under developed they  maybe with each other. In the past when F8 is set I  find that it gives me a time in the region of 30+  seconds exposure time. Which for me is about average.

Figure 3
I have set grade two and a half to start with, if this proves to be to hard I'll drop it to two. The paper being used is silverproof matt limited grade paper. Being limited does not mean it has not got a full range of tones. It also provides a certain look to the prints that I like.

The first negatives to be exposed are the Fomapan 100. Looking down the focus finder the film  has a regular fine grain making it quite easy to get it pin sharp. The test strips for these negatives are indicating an exposure of twenty one seconds. The picture of the  woods (Fg1) was to hard for the 2.5 grade I set, so reduced it to 2 for the second exposure. Figure 2  the shadow of the tree reflected in the  puddle. Printed straight, was a little flat, so I printed it a second time at grade 2 but burnt in (added exposure)  to the areas around the puddle to lift the puddle area.

Figure 4
Figure 5
The next negatives to be exposed were from the Adox film. Looking down the focus finder to sharpen these negatives brought a smile  as it looked like someone had gone mad and splattered the grain on by flicking a brush. This may have been the result of under development. The test strips were also saying that the negatives were thin, suggesting an exposure of ten seconds, half that of the Fomapan. The two negatives from the Adox film are the complete opposites to each other. The fence post picture (Fg 3) had no detail I could see in the shadow when held up to the light. So when it was being exposed  I dodged the shadow area for a couple of second to stop it blacking right out.  Once it had dried I was surprised to see lots of detail. The two tree picture (Fg 4) was always going to be a landscape crop as there was to much foreground in the negative. It also looked the best picture negative wise.
Figure 6

The Rollei 400s was up next I had trouble picking two negatives that I could see enough of to print. These negatives were thinner than the Adox with some of the frames not showing at all. When looking  through the focus finder at the grain it revealed it to be patchy and shows up on the prints as white blotches. Lack of  proper development is evident maybe?. The picture of the rain on the window (Fg5) was a difficult print to get right.  Keeping the detail, what there is of it, of the door handle and leaf on the left. It was down to six seconds of exposure. The cat (Fg6) picture was the same six seconds but shows up the blotchy grain more. If I had shut the enlarging lens down to F11 or F16 I would have had more time to manipulate how the pictures looked by dodging and burning.

The last negatives to be worked on were the FP4+. Looking down the focus
Figure 7
finder it displayed a fine regular pattern I have come to expect from this film when developed in ID11. I had been looking forward to printing them but was thrown when the test strip revealed that a thirty second exposure was no where near enough. A further two tests revealed a time in the region of fifty seconds. You could say they were the best developed or over developed depending how you look at things. I printed an number of negatives from this film. I was really taken by the smooth tones of the pictures and the intensity of the sky. It was a bright, warm cloud less day. The prints show what a great morning it was at the bridge.  Figure seven showing the superstructure of the bridge gives a good indication as how good the sky was and Figure eight gives a good idea of how strong the sun was. Both pictures were printed at grade two but could quite easily have taken a softer grade.


Figure 8


Conclusion:

I am disappointed that the Rollei 400 was not developed correctly, I know it can produce some very smooth well toned negatives which would have lead to some great prints. As for Adox film, I am coming to the conclusion that we do not mix as this is the second time it has failed to present a good set of neg's. The Fomapan 100 classic was a surprise, if you are looking for a substitute for FP4+ then you will not go far wrong with this emulsion in my opinion. I have noticed that it is slightly more grainy than the FP4+ if you have to burn in the high lights heavily. I use both these films regularly now in rotation as their characteristics are almost identical.

Links to others from series in case you missed them.


Wednesday, 4 June 2014

Four film how well did they develop.

Film development.

It has taken quite a time to reach this point. There have been numerous interruptions, not all of them good, but the results are in and there are some surprises.

The different makes side by side
All the films are 120 format and 6x6 negative size. They were exposed at box speed and developed in the same way with the same thirty month old batch of stock ID11. When I checked the date I was Shocked. It did explain the slightly wheat looking tone to the developer. To be honest I did not give a second thought as to whether it would work or not. The developer was diluted 1+1 and used only once at a temp 20c, No pre-soak was used. All inverted for the first thirty seconds this is equal to twelve inversions and then four inversions every minute this is equal to ten seconds. Then stopped, fixed and washed as normal.

FP4+ negs

I chose to develop the FP4+ first. This is the film all the others are going to be judged against, so there was no pressure to get the development spot on. The suggested time by the manufacturers is eleven minutes, but I find my negatives tend to be a bit thin so process for fourteen minutes. While the negatives were drying I looked over them to see how well they had turned out. I was surprised to find they are some of the best negatives I have produced. Let's hope I can keep this standard up for the rest.


Rollie 400s negs
The next film to be loaded into the developing tank was the Rollei 400s. This did not have a very auspicious start after loading the film into the back of the camera. I had mistaken the noise it was making for the film coming off the spool. I am so used to the sound FP4+makes when being wound on. I checked to see if it was OK in a blacked out darkroom and it was. This lead to four frames being lost. The suggested development time for this film in ID11 is eleven minutes. I must say I had my doubts but developed it for the said time anyway. Need I say they look thin; will have see how well they print!


Fomapan 100 negs
The five litre can of ID11 is getting very close to being used up and the developer is getting darker in colour each time I use it, could be a close run thing as to whether there is enough to do two more films. Next into the soup was the Fomapan classic exposed at 100 ISO. The suggested development time for this speed is eight to ten minutes. This is another film I have no previous knowledge of, so which is it 8,9 or 10 minutes?. With the thin looking Rollei negs at the front of my mind I've chosen ten minutes I feel it may produce better results and it did. My calculated gamble paid off this time. Producing the density of negative I like and very close to the FP4+ results.

Adox chs negs
The last one to meet the spiral was the Adox CHS exposed at 100 ISO. The suggested time for ID11 at this speed is 7.5 minutes. I took no notice of this time at all. Boyd by the results of the Fomapan I pushed the time to ten minutes. Where did this time come from? The previous results indicated that a longer development time would produce denser negatives so I decided to do the same for this. Was I right? NO! I should have gone longer. These are the thinnest negatives of the lot. Again, will have to see how they print.

Experience and knowledge has played it's part in the development of the Fomapan, 400s and Adox but even so the later two's results are 'off' by my standard. The times suggested for developing the films are from a trusted source. So I am a little disappointed that they did not turn out better than they did. Having said that it maybe the developer losing its potency as I start to scrape the bottom of the bottle. It is, to a certain extent, a gamble when using old material, combined with ones I have not used before. All is not lost, it just means that the thinner negatives will be a bit more of a challenge to print properly.

How are they going to print?


Finally the Id11 ran out before I had a chance to do another roll of the 400s. If I had, I would have extended the time by three minutes. With the Adox I would have increased the time by five minutes.

Monday, 26 May 2014

Four Film

The Plan.


This is the first time I have four different manufactures of black and white film in 120 format in stock. To mark the occasion I'm going to compare them to see if there is a noticeable difference between them. This comparison is not about which is the best film to use but to do with creativity and what each emulsion may bring to the party. Choosing a film in the first place is very subjective, you can ask as many questions as you like and look at loads of pictures that are the product of it's exposure but you will not truly know how it looks until you use it for yourself. FP4 was the first roll of film I chose to use and has remained my favorite ever since. At the time it was a close run thing with Kodak's offerings.


The protagonists are, of course Ilfords FP4+, Fomapan classic 100, Adox CHS 100 and Rollei retro 400s.


FP4+ has been the main stay of my median format work and therefore I know how to get the best out of it. The Rollei 400s and Fomapan classic are the two out of the four that are unknown quantities when it come to exposure and development. So to a certain extent the results will also have a first impressions flavour. Not always the best way to judge a product. I have used the Adox before in 35 mm format so I have an idea what to expect and in that case was not favourable but I will not let that taint the use of its bigger brother. I am also aware when loading Adox film it needs subdued lighting as it fogs easily in bright conditions. The Fomapan classic when processed with certain combinations of fix and developer can be susceptible to pinholes appearing in the emulsion but then I have had this with FP4+ in the past.


All the pictures will be made on a Bronica SQAi. I will not be replicating the same twelve views across all the films. I prefer to make pictures when the opportunity arises. They will all be exposed at box speed and developed in ID11 and processed as normal, then printed on an RC paper that will be chosen at the time of printing. I decided to keep things simple and use materials that I have a good understanding of, making it easier to tell how well the two unknown films have been exposed and developed.

All we need now are the exposed and developed film. The links below will take you to the follow up posts.


The links below are the follow ups to this post.
The developed film

The prints


Friday, 6 December 2013

Split grade printing with High contrast negatives.

Very high contrast grade 0
A recently developed set of negatives have shown themselves to be very contrasty even by my standards. During the summer I was on an early morning shoot, when I came across these scenes. They were not the easiest pictures to meter, there was a six stop difference between the light areas and the shadows in some cases. Two things drew me to them: the  way the shadows of the leaves danced on the walls in the gentle breeze and the other was a brief thought that they would be a challenge to split grade print.  


Soft grade 0
It has been suggested that split grade printing works better when the contrast stakes are raised. In these cases they maybe unprintable. The pictures were made using 120 format FP4+ developed in ID11 for 14 mins I know this is longer than what is recommended but I have found I have a tendency to under expose when using medium format cameras.

I used Ilford multigrade developer and RC paper. I tend to use RC papers in the initial stages or until I'm happy that the picture warrants printing on FB paper.


With grade 5 added
I started the grade zero test print for the Gate but it became clear while I was doing the timed segments that I may not need a grade five test because  the contrast was very high even for zero. I chose sixteen seconds for the gate picture to illustrate the degree of contrast this negative has. The window shutter picture also proved to be overly contrasty as well. I was quite happy with the results until I did a second print with the grade five added which now makes the first print look soft. It just goes to show how things change when you start to explore the subject at different settings. None of the prints have been manipulated by dodging or burning in which could class them as the perfect prints?

Saturday, 6 July 2013

Using the Agfa Isolette camera


Carrying on from a previous post on the Agfa Isolette The opportunity to use the camera was provided by a break in the weather - it cleared enough not to be soaked as soon as you leave the house.


The flip out film holder makes it easy to load a new roll of film. There are in built springs that provide friction, so the film is kept tort, keeping it as flat as possible at the focal plane reducing distortion. The film back clicks shut with a reassuring clunk. It also has a little red window in the back with a sliding cover in which to view the film numbers as you wind on. The film is advanced with a knob on the top right hand side of the camera that has a built in reminder to wind on after each exposure otherwise the shutter will not set.

To reveal the lens you press a button on the top left hand side. In this case the lens followed by the bellows leaps forward from the front of the camera with an enthusiasm that can knock it out of your hands if you are not prepared for such athleticism. Once the front is open you are presented with the five main controls: lens focus, a full set of apertures from F4.5 all the way up to F32. A limited number of shutter speeds: B, 25th, 50th, 100th and 200th A self timer and most importantly a lever that primes the shutter for release. The only other thing present is a connection for flash.

On the top of the camera is the shutter release that allows a remote cable to be fitted, a cold shoe for a range finder or other accessories and another knob that has four settings marked Col NK, NT, K and T. (I do not have a clue as to what they represent.) As far as I can tell it has had no affect on my negatives. It has a viewer and a tripod mount.


After I got used to the idea of guessing what the distance should be set to and then remembering to alter it for different views, I found myself taking shots quickly almost like an automatic. I did take light readings to start with but it became clear that the light levels were stable enough not to need checking for each shot.

It became clear that there was a problem once the negatives had been developed. Some how light was getting into the camera. Having checked it carefully before hand I should have carried on and cut a piece of light sensitive paper to fit the camera and left it for a minute to make sure. Once the paper had been developed in the normal way it would have shown that light was leaking in from the bottom right corner of the exposure chamber indicating a problem with the bellows.


I'm a little disappointed with myself for not doing this check in the first place. If I had followed through with the test, I wouldn't have had a duff set of negs'!. It would have made an interesting set of prints as the gremlin's face in the tree roots shows.


Sunday, 22 April 2012

Zero pinhole camera Project double take.


Camera Zero 6x9 delux
FP4+ 120 format, 6x6 neg,
 developed in PMK Pyro no afterbath,
Printed on silver proof paper gloss
Developed in Moersch 6 blue tone.
My attitude when using the Zero camera has become very relaxed. My approach is to look at the scene, roughly point the camera at the subject, take a light reading, calculate the exposure and open the shutter for about the right amount of time. Once taken move on to the next one. I'm not sure if this is such a good thing as I'm making a number of double exposures, which have turned out well more from luck than design.


Camera Zero 6x9 delux,
FP4+ 120 format, 6x6 neg,
developed in PMK Pyro with afterbath
printed on silver proof paper matt
 developed in Ilford warm tone
This has led to project double take but lets be honest basing an idea on a set of lucky mistakes does not bode well for the results. But then history is littered  with stumbled upon ideas that have gone well. With this in mind I'm going to carry on with the blindfold method of not winding on. I could be more controlled by making single shots and then combining the negatives in the enlarger to produce a double exposure but  this may take away the element of surprise and randomness to the results. With that said there needs to be some planning to the picture taking, so I'm going to use a location I know quite well in order to make the combination of double exposures easier to plan cutting down time looking for shots. It will be hit and miss anyway with this approach but hopefully not so many misses. The first roll is going to be a bit of an experiment so I'm not expecting many good printable photographs. But in this context what is going to be a good picture I think it will boil down to how well the combinations work together; once the first film is developed I'll be able to refine my method.


I'm setting the zero 6x9 deluxe to 6x6 neg size, loading FP4+ which will be developed in PMK Pyro using my revised method of inverting with an after-bath. I may not continue the bath for subsequent rolls if the photos look to soft. And so the project begins.

Friday, 6 January 2012

Film storage.


Out of date colour film.
Upto four years on some
boxes
The recent receipt of ten rolls of out of date colour negative film from a friend has prompted me to share my experience with issues around the storage and freshness of film.


How do you define fresh? A film that has a long expiry date, one that has been kept refrigerated most of its life or even in the deep freeze. It is true to say that film used before the manufactures expiry date, which by the way is a conservative indication of when it should be used by, will yield the best results provided that it has been kept properly. The manufacturers suggest that  normal conditions are temperatures of no greater than 24 degrees C (75 F) and a relative humidity of 40% to as much as 60% in some cases. At temperatures and humanities greater than this will cause the emulsions to age far quicker. Normal conditions also refer to the fact that the film should only be removed from, in the case of 35mm from its plastic container and roll film from its foil wrapper just prier to use. Once the film has been exposed the rate of deterioration increases so you should not leave it to long after the roll is finished, to develop the latent image. It is reasonable to say that  monochrome film is more robust relatively speaking to colour film which has a greater number of   delicate layers for the atmosphere to attack and if stored badly will increase the likely hood of a colour shift.
Fg 1
Film 35mm, FP4, developed in ID11.
Printed on Ilford MGr paper 

Freezing is an extreme method of slowing the ageing process and can cause  problems with condensation and ice particles. Refrigeration is the most popular with film photographers but should be treated with care and common sense. At one time I used this method but not any more as it is not suitable with the way I work. Instead I use a floor standing Cabernet that is out of direct sunlight and away from direct heat. I have used this method for years with no ill affects. I also pay little attention to expiry dates as experience has shown me that it has had little affect on my results thus far.

FG 2
Same as above.
A couple of years ago I was sorting out some boxes of darkroom kit when I came across some containers of FP4 that was about twenty years out of date. I say twenty but on thinking back it's probably closer to thirty years or longer. The pictures (fg1 & fg2) are the results from one of those rolls of FP4 which was mistakenly exposed at ISO 400. Half the film was developed in ID11 and timed for HP5 and the other was developed in Rolie R3 developer and timed  for 400 iso. With results like this it makes me wonder whether refrigeration is necessary for monochrome emulsion if stored with care.

 It would seem that all film users over estimate how quickly film deteriorates. Each person needs to look at the way they use film and what sort of climate they live in, then take the appropriate action to comply with normal conditions. 


Related Posts:

Colour film out of date

Tuesday, 3 January 2012

Enlarging a section of the negative.


Picture from a 120 FP4+ ISO125 6x6 negative
 developed in ID11 and printed on Ilford MG paper
 Processed with Ilford MG Developer.
Landscape format
There are no rules when it comes to enlarging your negatives. Cropping, re-formatting and partial enlargement are all part of the creative process. Changing horizontals to verticals and diagonal is also part of this rich tapestry of creativity. The only time I feel this looks odd is with waterscapes and their horizons.
Portrait format


As one of those people that works with 6x6 negatives, cropping and reframing is all part of making the picture fit the paper. I'm not complaining but the fact is all paper sizes are oblong. I think this has helped me in getting the best from my pictures. I do not waste time in trying to make the whole negative fit the page; this is heresy to some who believe that having carefully framed the view that you should print as you saw it! This is not always possible, especially when you have a certain size of print in mind. Sometimes this careful framing once projected on the enlargers baseboard may look better with horizontal or vertical framing. Do not be afraid to play.

Square Format
Which do you prefer?