Pages

Thursday, 23 December 2021

Cold tone paper by Ilford with a touch of blue tone developer


When I order new materials for the darkroom I always add something I have not tried before. It can be anything but this time it just so happens it was a box of Ilfords new cooltone FB paper. I was interested to know what their definition of cool was. In my mind it means rich blacks and blueish tones in a very subtle way.


It has taken I bit of time to choose a set of negatives that would give this paper a good workout. Sometime ago I was fortunate to visit the thirty meter high Clydesdale horses heads known as the Kelpies at Falkirk. They are a wondrous sight to see glistening in the landscape. Even more so on the bright cloudless day I visited. Their stainless steel 'coats' sparkled in the sun as you walk round them, making it difficult to look at them without sun glasses. Trying to make photographs that are different is impossible as hundreds of people walk and stand around them taking pictures from every possible angle. It's a snappers paradise! But then every ones experience of these equine giants is different and so are the pictures made.


I used my Bronica 120 6x6 camera to make the pictures I had in mind. Which turned out to be about a dozen frames across two rolls of film. I am not prolific at the best of times but even I was surprised by how few images I had captured.

Armed with two pages of negatives I picked three frames to try this paper out on. I would start by developing the first picture in Ilfords own multigrade print developer this would be the standard to judge the others against. I will also be using my favourite cooltone developer as well.


It is not until you have the photograph in the day light that you can see what the tint of the paper is. It has a very bright white tint to the paper, making the blacks very crisp, but it still has a very subtle warmth to it when compared to Moersch 6 blue tone developer. I know I favour the cold working developer but I also like Ilford rendition of the horses nose, they each have there own character. 

Overall I am very pleased with the way the images have turned out. This paper appears to have a grade more contrast, I think this is due to the very white base colour of the paper compared to the neutral tone paper I am used to. It works well with my favourite blue tone developer. I will have to see if the blue is richer with this paper than others.


Technical data:

Top photograph of the horses head developed in Ilford multigade.

The next one in  Moersch 6 blue.


Wednesday, 22 December 2021

Finding the edges of Eukobrom AC will hurt your pocket.

One open ,One untouched.
I have some good and bad news concerning Tetenal's Eukobrom AC. I have been pushing the developer to find it's limits. Without knowing where the edges are you cannot be sure that you are getting the optimum usage.


The good news is that two litres of diluted developer at 1 to 9 stored in a slot processor will remain usable for up to six weeks. Obviously this will vary depending on your circumstances. Also as the developer gets older the solution becomes more brown. Along with this it imparts some of this colour to the photograph by producing a subtle chocolate brown warmth in this case with Kentmere select RC gloss. A paper I have been using alot.


Used and depleted
The bad news is, while I have been involved in seeing how long a working solution will last, I forgot to mark the stock bottle with an 'opened on date'!. As a result 800 mls of unused developer has been thrown away. The first time I have had to do this ever! 

    
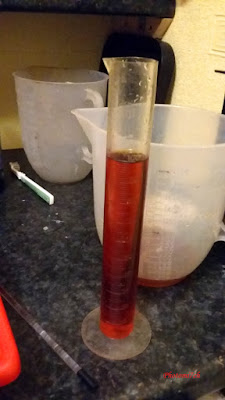
 I discovered this 'error' at the start of a printing   session. The existing developer was tested for   usability and found to be no longer viable. So I   made up a new batch to find that this was also   depleted. I was suspicious that the open bottle   was off by the colour but made up a new batch   anyway. In the past with other traditional   developers the colour does not always indicate   that it is exhausted. It took time to find out for   sure as the new developer was producing a very   soft test image without any contrast. I was using Kentmere paper, not known for being on the soft side and very quick to produce an image when placed in the developer, seconds in fact. In this case it still was not right after two minutes. After several attempts it was dumped. Not impressed to say the least.


Continence from open
bottle


Test Prints from open bottle of Eukobrom AC 


Not to worry I had a new unopened bottle. However on pouring the new bottle into the measuring jug this was brown in colour as well. Not the slight orange colour I was expecting. Now I was angry. I made up a batch anyway and to my surprise I was met with a well developed test image. Fully toned, great!

It took over an hour to get to this point what with one thing and another. My temper mellowed as each successive photograph left the developer fully toned.


Developer from fresh
bottle
Developer from
fresh bottle.


Test print in fresh developer..


Will I use the developer again? I still have the best part of a litre left from a dodgy opened bottle that has an 'opened on date'. As long as the contents are viable I will use it again. As to re stocking it? Not sure? It is just as well I keep some of my old friends in stock.

I did email Tetenal a long time ago to find out if they had any suggestions as to why this should be the case but have had no answer, I can share with you at the point of writing there is still no answer on posting.  


Printed on Kentmere RC gloss paper developed in Tetenal Eukobrom AC

This post was first published in 2017 there has not been any response from Tetenal on my concerns to this date.

Tuesday, 21 December 2021

Trouble in the darkroom


My darkroom is a very personal space, the only acknowledgement to it being standard is the separation of wet and dry working areas. It is just big enough for one person to work in comfortable. A bit of a glorified closet really! which has meant I have had to find ways of making the space work hard to meet the needs of both wet-and dry sides working areas.


One of the things I have had to do is to put the 12 x16 paper processor under the work top on a pull out shelf. It was done originally to save space but has proved to be inspired in a way I had not foreseen. Being able to look down on the print process has made it a more relaxed way to work. Keeping the work top clear for other wet side needs has not worked so well, the top is being dominated by the tray I use to put the tube covers that keep the chemicals fresh in the slot processor. It was a large tray so that the tops could be spaced far enough apart to stop cross contamination. 


However, it all came to a head when I wanted to try a new print developer and use it with a tray so I could monitor when the first signs of the image appeared, then transfer it to the processor for stop and fix. I should explain that the darkroom does not have running water. I usually part fill a tray with water to put the fixed photographs in then wash them at the end of the session in the bathroom. Anyway I had the water tray precariously balanced on top of the slot covers in their tray as the rest of the top was taken up with the developing tray. It must have been a good day as I did not manage to tip the whole lot over myself. 

I now seriously considered ways of storing the slot tops that would keep the worktop clear. It came to me that the best way was to stand them on end. My first thought was to use a number of metal clips attached to the wall. I cannot understand why I had not come to this conclusion sooner. Once I had thought about it. It was not such a good idea as fix attacks metal. I decided it would be better to use plastic, so took some measurements, sat down and did a number of drawings of a tray that would hold the tubes upright. Then thought about how to stop cross contamination, so added sections to the base. Once I had refined the basic look and measurements I showed the idea to my mate at Plasweld, he helped to simplify the design and added a splash back to stop chemicals running all over the place when loading the tops into the stand. 


A few weeks later the stand is finished. It works very well and has freed up lots of space on the worktop allowing me to work more safely. Such a simple idea that has made a big difference.


A typical layout for a darkroom

Monday, 20 December 2021

Preparing the Zero Pinhole Camera for use.


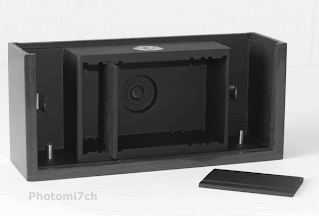
Using this camera is a real step back in time requiring you to put aside all those luxuries that the modern photographer has taken for granted. After all, it is just a box with a pinhole in it, the ultimate manual experience from loading the film and remembering to wind it on, to calculating the shutter speed.


Loading the film:

To start with you need to load a roll of film. That's obvious, most film cameras need film to work. If you are like me it has been a long time since you looked at the backing paper of a roll 120 film. I had forgotten that it is marked for the four different sizes in the 120 family and with the multi format camera it has three red coloured windows in which to view the film numbers. It also has a set of symbols that tell you when the number is about to appear in the window which also marks the middle of the frame. With this set up you cannot blame anyone else for winding it on to far, so it is a good idea to take it slow and gentle in the beginning. Before loading the film you need to set the format your going to use, once the back and top are in place, it is time to advance the film so the light-sensitive material is in front of the pinhole. When winding on you may notice that it becomes quite tight, this is where the celluloid attached to the backing paper is being drawn in front of the light box. Just continue gently on until the first frame number appears behind the little red window. Now the camera is primed for light capture.


Calculating exposure;

The Zero cameras aperture is set at F 235, it is important to remember this as this number is not written on the calculator attached to the back of the camera. The calculators outer ring shows shutter times from 8000 ths of a second too 15 hours, the inner ring shows F numbers from F 1.4 to F 500.


Please note that all the figures that follow are based on a film speed of 100 ISO.

Today, for example, my light meter is showing a light reading of F 5.6 @ 500 ths of a second. Now using the calculator move the dials so F5.6 is opposite 500 ths of a sec., then find F 235 on the outer ring and read off the time opposite which is about 3 second; you will need to make an adjustment for reciprocity effect by a factor of 2 making an exposure time of 6 seconds. I say 'about' because the next F number is 250 with an indicated shutter time of 4 seconds. To start with it is a bit hit and miss, that is why it is a good idea to make notes on shutter times so you can see where to make adjustments once the film has been developed.

You will need to make adjustments for the reciprocity effect as follows:

  • From 1 second and over compensate by multiplying by 2 giving an exposure of 2 seconds.
  • From 5 seconds and over compensate by multiplying by 5 giving an exposure of 25 seconds
  • From 50 seconds and over compensate by multiplying by 12 giving an exposure of 600 seconds/11 mins.


Sunday, 19 December 2021

Zero pinhole camera


Pinhole cameras have been with us for a long time in all sorts of shapes and sizes. Aristotle wrote about this naturally occurring in the fourth century. It was not until the 1850 s when the Scottish scientist Sir David Brewster used a pinhole camera to produce the first photograph. It has taken on many forms ever since!

Over recent years the pinhole camera has come to the fore as a desired method of producing a different style of photograph. This popularity has been helped by the zero image company, making some wonderfully crafted boxes for the pinhole photographer. They are not just great looking collectibles but are fully working cameras that take some excellent photographs. They come in the three main formats of 35 millimetres, 120 medium format and 5 x 4 large format.

This camera has not been an easy acquisition for me, with several false starts I have had to compromise to get a deluxe model but it is in my format of choice if not the camera I really wanted for the project. Having said that I am not disappointed with the multi format camera. On hindsight this could be a good thing, as it allows me to play with the different sizes that make up the 120 family at a later date.

So whats in the box apart from a well crafted wooden camera that some quarters think would make a good jewelry box. Thinking about it, I can see what they mean with the multi format version!

  • A plastic view finder marked out in the different 120 formats.
  • A very nicely presented instruction manual that needs to be read if you are serious about getting the most from your camera.
  • A grey cord? Not sure why this in the box.
  • A certificate telling you who hand crafted your camera.

There are some other bits of kit you need to gather before you stroll down the road with your camera.

  • You will not get far without a spare spool to wind the film on to.
  • A light meter unless you are going to use sun rule 16.
  • A cable release is a good idea if you have the deluxe version as it removes any chance of camera shake.
  • Tripod.
  • A note-book and pencil is a good idea for recording frame numbers and exposure times. That then can be checked against the negatives once they have been developed. Giving you an indication as to whether you are over or under exposing.

Wednesday, 15 December 2021

20 x 24 photographic paper out of date challenge

I have been having a clear out in the darkroom. More like seeing what printing paper I have in stock and how close to date they were getting. While checking I came across a pack of Ilford multigrade 4 peal RC 20 x 24 to large to miss but I have managed not to notice it for a long time.

It has been over looked all this time partly because it is pearl paper and that I am unable to use paper this size. I know why, then why have you not cut it down to size? Without trying to make excuses it is difficult to cut any size papers when you only have enough space on the dry side of the darkroom for your enlarger and I did not want to waste it if I could help it. A sort of unintended waiting game for the right project only I did not think it would take about 15 years.


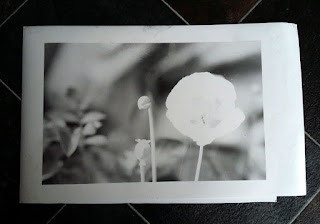
A few days ago I was setting up the enlarger to make some 9.5 x 12 prints from Kentmere 100 35mm film. That had some images of poppies made in the garden. All though they all turned out well. I had noticed, I was loosing about an inch or so off the side of the negative.

I started to speculate wouldn't it be nice to include that missing edge at the same ratio of enlargement without having to down size it to make it fit. This idea was going to be difficult to fulfill as my main sizes are 8 x 10 and 9.5 x 12. This left the 20 x 24 this maybe it's finest hour. 

After a certain point in time old paper starts to increase their latency. This means you need to start adding more exposure time (light ) to the paper to receive the same results you would get with the fresh stuff.

With paper this old you may as well chuck it in the bin. Yes! it is coming, if it was this article would be at an end. But! while I am processing anyway I may as well see if I can get any sort of image.


Where to start? a Segmented test print. Where you increase the amount of exposure at set times. The problem with this is you have no idea how many increments of light will be needed to arrive at the exposure. I short cut it by using the exposure time from the negative already set up using that exposure time as a starting point.

Fortunately the developer was fresh in that it had only half a dozen prints through it. To allow for the sluggish latency I would develop the print for two minutes. Twice normal for RC papers to give it a chance to produce tones.

Before we go any further we need to look at the negative I was using. It had been exposed to Foma 311 RC paper. It took 27 seconds at grade 3 with the lens set to F5.6. This would be the starting point then with one change the enlarger had to have the filter setting changed for multigrade 4.

After a little bit of contortionist cutting, the paper was in two bits of equal size well almost and the easel adjusted to allow for the new size, the paper was exposed. 

Surprisingly when I remove the paper from the processor after 2 mins there was a soft image, emboldened I increased the exposure to 30 secs. A slight increase but not enough. Time to get radical and doubled the light by opening the enlarging lens to F4.

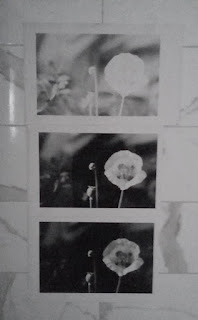
The print was darker again but not enough to get a good black, so I opened the lens to f 2.8 at 30 secs. Effectively four time the light from when I started. When the print came off of the processor this time it was nearly perfect. I did another print adding 15 sec burn to the highlighted poppy. Done.

I did consider pre-flashing the paper this is where you add light to the point just before recording a tone to overcome the latency. I explain how it is done in a previous article link at the bottom of the page. You will properly have to make time changes from part seconds to seconds in the case of old papers. A case of testing to see what works to get the right result. There is also double grade printing a link at the bottom of the page explains this method as well.

A note of caution what works well for one pack of paper may not for another keeping your grey matter on its toes. It will be the case that no matter what is done you will not get the result you are looking for it is at that point a decision needs to be made to bin it.

I am pleased that I had a go with this paper. It has introduced me to a new format size for 35mm printing. I feel it is more pleasurable to look at with that bit of extra width. A sort of shortened panoramic feel.

When the same image is compared with the Foma 311 version it has a slight warmth to it which could be down to its age, if anything this adds to it. Making the Foma composition a little clinical looking. It is a unintended consequence of mixing different papers and throws up a question about creative choice. Which I'm go to leave you with to ponder.


All the photographs were reproduced using a phone camera and edited in Photoshop.

The first four pictures were made using Ilford multigrade 4 pearl RC.

The fifth is on Foma 311 gloss RC.

Links 

Paper flashing

Paper flashing more examples

Double grade printing


Wednesday, 8 December 2021

The Camera from Dresden part one.


This camera was almost an impulse buy, when I saw it in the window of a camera shop at a giveaway price. However, I did not have the cash on me. As I carried on walking down the street I thought it would be snapped up by some lucky individual embarking on a film camera odyssey.


At the time, I did not realize it would be me six weeks later. On inspecting the MTL 3, the body was in mint condition - not a single mark on it that I could see. However it did have some issues, the most obvious one being that it had no lens, the light meter did not work and the foam on the film door had perished. Shouldn’t be too difficult to put right, I thought.


When I got the Praktica home, I tried to remove the battery cover, but it was locked solid. I did not have time to go any further with it at that point and thought that I could always use a hand held meter. With that, I put the camera in the cupboard. 


Some weeks later I found myself going to the camera cupboard and picking up the Praktica. I had it in mind to get to the bottom of the stuck battery cover. I found a set of micro screwdrivers and undid the four screws that held the base plate on. I had no idea what I would find once the cover was removed. Fortunately, there were no springs that pinged out across the room when the base plate was lifted. I picked the battery housing off the base of the camera, only to be presented with a leaking battery - mystery solved.

Removing the aluminium battery cover from the metal insert was going to be a challenge. The battery had leaked into the threads, sticking the two parts together like super glue would. I don’t know what I was thinking when I squirted freeing oil on the thread and left it to sink in. I tried and failed to shift it using a fifty pence piece and a large adjustable spanner. There was no other course of action left to me but the brutality of fire and heat in a blow torch. I wondered if just heat would work?

As I walked across the room to the log stove, it was like walking into the sun. I left the battery housing on top of the log stove for five minutes or so and returned to the tropical room suitably dressed in shorts and, with heat resistant gloves, picked the battery cover off the stove. I placed the housing in the spanner and used the fifty pence piece in the cover and applied increasing amounts of pressure. With the sweat running down my face, it gave all of a sudden flicking the coin out of my fingers across the room. After I found the coin I placed it back in the slot and undid it as normal.

One issue down, three to go. The hunt was on to find a lens, battery and foam. I had forgotten what a waste of time looking for stuff on the net is. Some hours later, I had found a lens and battery (the modern number for it is LR9XP625G - the last three numbers are the most important). From the same place, I bought a Sigma 80-200 zoom lens. Thanks go to Bristol Cameras for their prompt and friendly service. The lens when it arrived was brand new and was the same price as the camera body.

I tracked down the foam to eBay and what a pain the seller was, to put it mildly. In the end I went down to a craft shop and picked up a sheet of foam for a pound - four times cheaper than the eBay seller!

With the light meter now working, the lens attached and the foam in place, it was time to load the camera with some film. I had an out of date roll of Fomapan 200, which is of a similar age to the camera, so that would do nicely.

Let the escapade begin.......It took a bit of time to get the film to wind on properly as I could now work out how the film lead picked up the wind on the cylinder. The sound and vibration from firing the shutter almost shocked it out of my hands. Must remember to grip it more firmly and use ear defenders.

To be fair, I had forgotten how basic the manufacture of this camera is and the sound of the shutter is quite reassuring. I don’t think I will be using it for candid street shots, but then again... It will take me a little time to get used to the way the camera is set up. It is a little chunky when making adjustments, but I will not let that put me off.

In case you missed part two here is the link part two


Tuesday, 23 November 2021

Using the camera from Dresden part 2

The camera from Dresden has been a joy to use. A little quirky at first as my fingers got used to the placement of the controls. But, once mastered, it became intuitive when using the light meter and shutter. It is obvious that the controls lack the finesse of its Western counterparts, but that is part of its character.


CLICK! As the last frame on the Fomapan 200 is exposed - with this camera more than others I have used, you need to hold it correctly with your left hand supporting the body and lens, while the right grips the body and actuates the meter and shutter. With the camera turned upside down, I press the button that releases the wind on and slowly rewind the film back into the canister.

Now, to develop the film, it was always going to be HC 110 as it is the new kid in the darkroom. The more I use it, the better my understanding of what to expect from it with different film manufacturers.

The technical bit: Dilution 1:31 in 300 mls which equates to 9.7 mls of developer. The film was exposed at 200 ISO box speed, which means a time of 3 1/2 mins, but I extended it to 4. I also prolonged the fix time to 10 minutes after checking the film halfway through, as it still showed signs of fog. 


At first glance, the negatives appear to be on the thin side (under exposed). I think this is due to the built-in light meter. I noticed that if you held the meter on for more than a few seconds, the needle started to fall. I did, on occasion, allow for this - whether I should have or not, I’m not sure.

At the time of writing this, I still have not had the chance to contact print the negatives in the darkroom. This is the real test of how good your negatives are - this point being borne out by a new member of the FADU forum who has switched from scanning his negatives to processing them analogously and is having trouble getting his prints right. This illustrates just how much the scanning process compensates for the differences between the highlights and shadows.


I use the hybrid system myself (analogue to digital) and know it is far easier to get the results you want than in the darkroom, especially if there is a problem with density. But I prefer the wizardry of chemicals on paper to the click of a button on a screen.

Even though I’m not happy with the way these negatives look, I will still print some of them. As I print them, I consider the sense of disappointment I feel. Why should I be disappointed? The negatives are less than technically perfect, but what about creatively? In our pursuit of knowledge on the best way to produce our images, our minds become polluted with other people’s expectations of what constitutes a properly produced picture. Photography is, by its nature, technically based, but should we be sacrificing creativity for technical excellence? That’s my personal view, even though I am not for one minute suggesting sloppy workmanship.


My disappointment with these negatives is because they do not resemble what I have come to recognize as well exposed, but this should not be the whole story. When I started out with the MTL3, it was to be an adventure - some fun with out-of-date film. I, however, ignored the golden rule of not using old film that has been opened and partially used, which is asking for trouble. 

Taking into account all that has gone before, this film is a triumph in that there are images to be printed. In the old days I would have just filed these negatives, never to be seen again. Nowadays, I keep an open mind as to what may be possible. I am pleased that I did.


Technical data: 

All the black and white images were scanned from the contact print.


Wednesday, 17 November 2021

Passion for 35mm film reignited


 It was the suggestion by an acquaintance on Twitter that had me reaching for my Nikon F.5 and macro zoom. It has been a very long time since I hefted this brick of a camera and lens combination to my eye to make images. In that time, my 35mm film stock has gone from fresh to very out of date. Where have the fresh years gone?

The thought of looking at large subjects and small detail had my imagination in a spin with ideas. I needed to slow down and think - but I didn’t! I ran with all the ideas, poking my lens here and there in a scatter gun approach, in the hope that it would provide me with some interesting pictures.


Even with a very itchy shutter finger, it was time to take a deep breath, slow the heart rate and enter the creative zone. Macro photography can be quite tricky with its very narrow depth of field. Getting the point of focus right can, in some cases, mean just a knife edge’s worth of refinement. Small aperture (large F number) settings play an important part in increasing the area of sharpness, along with hyperfocal distance. The good thing about film cameras is you can check what is in focus by pressing the shut down button on the camera body, or, in the case of my Bronica, the lens.

Macro photography is not just about what is in focus. Undoubtedly, this is where the eye will be drawn to first, so it is important to get it right. However, you should also give consideration to what is in soft focus and the patterns of those areas. It is the combination of all these focus points which combine to make a good photograph.

I surprised myself with the number of frames that looked interesting as the wet negatives were hung up to dry. What is more extraordinary, and something I have taken for granted, is that this is the first time I have used HC 110 with Agfaphoto APX 100 @ISO 100. I chose to use a dilution of 1+31 for 6 mins at 22 C. I had no choice really - it had been swelteringly hot for days, making it difficult to reduce the temperature of the water and it was too hot to argue. It has provided me with a toned set of negatives that look very fine grained. All I need now is a break in the weather so I can print them in the darkroom. 

A few days later, the heavens opened, the clouds banged together as the rain fell from the sky and the ground sighed with relief, producing that delightful aroma of damp that pervades the air after a hot spell.

The darkroom was scented with the smell of freshly diluted chemicals after its summer clean. Which negatives should I print first? Six of the thirty six took my eye straight away, so I made them the focus of this printing session. I chose Fotospeeds RCVC paper. The contact print I had made earlier with this paper showed that the negatives had normal contrast, which in my case is in the region of grade three. The segmented test prints were where I had expected them to be at around twenty seconds. Things were moving along really well and time and several cups of tea slipped along.


When I am having a good printing session I do not normally like to change makes of paper or size as it upsets the rhythm of the process. This time, however, I did because I was so taken by the photographs of the peaches in the dappled light. I increased the paper size to 9.5 x 12 and pulled out some FB warmtone by Ilford. When using these papers, time slows down and everything takes longer. The only thing that stayed the same was the grade set at three.

Thanks to Jason’s suggestion, it has reignited my interest in 35mm again.


Technical data:

Nikon F.5 with Tamron 80-210 zoom macro lens, Film Agfa APX 100 at box,developed in Kodak HC 110, Scanned from prints made on Fotospeed RCVC and Ilford warmtone Mk 4 FB gloss, both developed in Ilford multigrade.


Monday, 1 November 2021

Fast film for macro will Bergger cut it?

I'm writing this from the darkroom as I process the second roll of Bergger Pancro 400. It is being developed in Kodak HC 110 for 9 minutes. I am not sure how it’s going to turn out as I forgot to soak it for a minute in clean water. I knew something was amiss. It is becoming a joke - nearly every film I have processed this year has had a fault in one way or another. I will be pleased to get back to the mundane predictability of old, in more ways than one. 


Now, with the film hanging up to dry, I can get back to what I wanted to write. I’m pleased to say that the initial look over the negatives is good, but I will only know for sure once I start printing.


Lock down has allowed me to slow down and consider what I should do. While I mulled things over, I did a bit of online research into macro photography with a bellows. It became clear that it would be best to use a fast film because of the drop off in light reaching the film plane. The problem is that I have no 400 ISO film in 120. During my research I came across references to a film called Bergger. It did not take long, the screen was swamped with opinions on this film. I scratched the surface to see what was said and the pictures it produced, but was disappointed to find that most of it was scanned negative. One video I watched stated the negatives were flat. I am pleased to say I carried on regardless and the results I have hanging up to dry, show otherwise.


As you may have already gathered, the film needs to be soaked for a minute before the developer goes in. When you pour the water out, it has a very slight colour to it. Stop bath is as normal for those who use it, but you must fix the film for six minutes or longer, depending on how old your fix is. Agitation for the developer is for the first 30 seconds (twelve inversions) and then for 10 seconds every minute (four inversions). If you tumble your tank instead of twiddling, when you open the top to pour away the developer there will be bubbles in the top, but so far no adverse effects on the look of the negatives.


I have long held the view that one favourite film developer at a certain dilution should not be a catch all for all makes of film. This approach is the enemy of creativity and creates missed opportunities. Manufacturers go to great lengths to produce developers which bring out the best qualities of their film. As I discovered, Bergger is no different - only in this case, their film has a twin layer of emulsion, giving it full light sensitivity - hence the name Pancro, which would suggest a look all of its own. A comparison of their developer could be on the cards?


I chose to use HC 110 to develop the film. It could easily have been Rodinal or one of the half dozen others I have on the shelf, but had in mind the fine grain qualities of HC 110. Fast films are not known for their fine grain, unless it is a T grain. I should add that the developer you choose has a big influence on size of grain and the character of the negative and should, therefore, be given due consideration.

 When doing something like this for the first time, it is a leap of faith that all information about the development is correct. I have found that the time suggested for HC 110 produces a negative that looks a little on the thin side for me. It has shown itself in the darkroom with shorter than my usual exposure times. I may, therefore, increase the development time, but for now I’m going to let it stand until I have processed a few more rolls.

I have exposed a number of rolls of Pancro 400 at box speed. Most of it in high contrast conditions. In some cases, with the lens closed down to F.32 at 500 th of a second, it has managed to capture a wide range of detail from darkest to brightest. All waiting for you to utilize when exposing it to your chosen paper. I have found that printing these negatives to be some of the easiest. The whites are brilliant and detailed to a degree I have not noticed before with other film. The blacks are rich and pure, but can also be very detailed. 

 One note of caution is that it is quite easy to overexpose the paper due to the extra tone and crisp detail. I have discovered that I am trying to have it all - resulting in overly dark, and sometimes muddy, photos. Less is more, as they say, which has led to some wonderful photographs which are a joy to behold.


You should give Bergger Pancro 400 a go, if you have not already done so, and print in the darkroom - scanning does not do it justice.


Technical data:

Bronica SQAi with TTLM, bellows fitted and extension tube, lens 150 mm.

Film Bergger Pancro 400 at box speed

Photographs exposed to Kentmere 9.5 x 12 VC select paper. Developed in ilford multigrade.

Images were made using a digital camera.