Pages

Showing posts with label 35mm. Show all posts

Sunday, 19 December 2021

Zero pinhole camera


Pinhole cameras have been with us for a long time in all sorts of shapes and sizes. Aristotle wrote about this naturally occurring in the fourth century. It was not until the 1850 s when the Scottish scientist Sir David Brewster used a pinhole camera to produce the first photograph. It has taken on many forms ever since!

Over recent years the pinhole camera has come to the fore as a desired method of producing a different style of photograph. This popularity has been helped by the zero image company, making some wonderfully crafted boxes for the pinhole photographer. They are not just great looking collectibles but are fully working cameras that take some excellent photographs. They come in the three main formats of 35 millimetres, 120 medium format and 5 x 4 large format.

This camera has not been an easy acquisition for me, with several false starts I have had to compromise to get a deluxe model but it is in my format of choice if not the camera I really wanted for the project. Having said that I am not disappointed with the multi format camera. On hindsight this could be a good thing, as it allows me to play with the different sizes that make up the 120 family at a later date.

So whats in the box apart from a well crafted wooden camera that some quarters think would make a good jewelry box. Thinking about it, I can see what they mean with the multi format version!

  • A plastic view finder marked out in the different 120 formats.
  • A very nicely presented instruction manual that needs to be read if you are serious about getting the most from your camera.
  • A grey cord? Not sure why this in the box.
  • A certificate telling you who hand crafted your camera.

There are some other bits of kit you need to gather before you stroll down the road with your camera.

  • You will not get far without a spare spool to wind the film on to.
  • A light meter unless you are going to use sun rule 16.
  • A cable release is a good idea if you have the deluxe version as it removes any chance of camera shake.
  • Tripod.
  • A note-book and pencil is a good idea for recording frame numbers and exposure times. That then can be checked against the negatives once they have been developed. Giving you an indication as to whether you are over or under exposing.

Saturday, 3 December 2016

Freestyle printing session


I don't know about you but sometimes I find the constraint of having to make a segmented test print to determine the right exposure for each negative tiresome. I sometimes feel that it interferes with the creative process. On these occasion in the darkroom I put myself to the test with what I call free printing. I can see some of you shaking your heads at such a notion. It is a way of pushing your instincts creatively. 

Let me lay out the rules of this creative freedom. I pick a random sleeve of negatives, run my eye over them to see what catches my attention. Load that negative into the enlarger and then make a half sheet test strip at five second intervals. This will be the only test strip of the session providing the starting point for each subsequent negative I opt to print. I give myself two attempts at getting the exposure right using my experience and knowledge (best guess) to refine it with dodging and burning. This is where your print technique is put to the test and your ability to choose negatives of the same density.
First print.
 

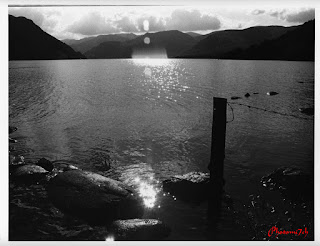
Into the darkroom. I have chosen a set of 35mm negatives that have a selection of landscapes I made while I was in the lake district and the one that took my eye was looking across the lake into the sun. As gooder place as any to start the printing session.


After adjustments

With this negative loaded I set up the enlarger as follows: the lens to F8 and the paper grade to three. These are the most common settings I use when printing. The paper used is silverproof matt. With the test strip made I look carefully at it to work out the overall exposure and how much more light may or may not be needed for a balanced print. 


The mountain into the sun image is the one I made the test strip for. Even so it proved difficult to get right. I chose to print overall at 32 seconds adding an extra 15 secs for the sky. This did not allow for the mountain slops on the left of the picture which needed less light to stop them completely blocking out. The burning in of the sky did not take into account the brighter area to the center right leaving it a bit blown out. So for the second print the mountain slops to the left were held back for -7 secs and the off center sky received a further +15 secs.

Before adjustments

After adjustments


The second negative chosen was the fence post into the sun. I already knew that overall this would require less light to print, the trick here would be by how much, after a bit of consideration I opted for 27 secs. Which worked well but I felt it needed even less. Overall the second print was exposed for 24.5 secs with an added 5 secs for the sky. Not much of a change, but the affect on the foreground was positive.


Before

After

Right first time no adjustments


The third negative is of the dog in the lake. I chose 25 seconds for this because the negative looked a bit dark indicating some over exposure. I was too bold with my exposure time as the print is a bit washed out with no sky. So I up it to 28 secs and added +28 for the sky. In cases where the sky is whited out I double the amount of light when burning in. Overall a much better picture.


The final image looking through the trees is a straight print, the overall time is 27 seconds. I'm happy with the print, yes I could adjust a couple of bits, but they would not add much to the overall look.

Free flow printing sessions are not always successful but it does free my mind especially if I'm having a bad time getting a picture the way I want it. 

Monday, 7 March 2016

Picture Post Introduction The Forgotten.

This is the first in a new series. This is where the image has center stage and the writing takes a bit of a back seat. I may include some thoughts on the pictures but will be kept to a minimum.

  To give you an idea of what I mean:

This series of images were made in a church grave yard in a small village not far from me. A place I have visited a number of times over the years. It has a quiet air that encourages you to sit and contemplate for a moment or two. On this occasion I could not resist making a few images, it was the way the light was streaked across the ground catching the frost making it sparkle that set the camera to my eye.


After I had processed the negatives I scanned them to the computer to sort out the levels and tone of the pictures, a feeling of sadness came over me. As I studied each image that was worked on I had a strong sense that these were now the forgotten.


Technical data:

Nikon FM, lens 80-210 zoom with macro, film HP5, ISO 400, developed in ID11 for 14 mins.


Saturday, 17 October 2015

Black developer!?

I have gone back to using 35mm film, in so doing I have resurrected an old and long running project of portraits. I have never been backward in coming forward to ask people I meet if I can take their picture. When asking my chosen subject I'm polite and friendly with a little charm. It is not often that I receive a straight rejection. I've noticed that it tends to stop people for a moment, at which point I tell them it's a film camera. It appears that this is a reason for them to say yes when chatting with them.

This new interest in lugging my Nikon F5 around with me has also reunited me with a long time favorite film Agfa APX 100. I cannot remember exactly the last time I used this film but I do know it was back in the days when I regularly used ether ID11 or PMK Pyro. I still have both these developers on the shelf in powder form. Which led to a bit of a  dilemma once the new roll of
APX was ready for developing. Should I make up a new batch of these old friends to keep the look of the negatives the same or go with the current ones???.
                                                        

I chose to go with RO9 partly because I wanted to see what sort of negative it would produce with the APX.                                                                      
Agfa APX  negatives developed with
RO9 special.
Before starting I made up a litre of fresh stop, fix and 300 mls of developer. I processed the film for the suggested thirteen minutes. The time counted down, as I poured out the developer, I was shocked to see this black liquid fill the measuring cylinder what the Hell! My first thought was that all the emulsion had come off, stupid I know but it always interests me what thoughts come into your head when things take you unaware. Needless to say that when I looked at the negs after they were fixed, all was OK. The negatives are nicely toned. I am not sure yet how grainy they are as Ro9 tend to be more grain than ID11.


It's just another colour to add to an increasing list of used developers.


Sunday, 9 September 2012

To be sharp or not, how is the question.

Fg 1.
Film FP4+ developed in ID11 printed
on Ilford MG RC gloss.
A subject that is talked about by all photographers. No matter how you like to label it DOF or boken I am surprised that depth of field can be expressed by some in the terms of good and bad. Surely it is subjective and down to the person who has composed the picture.


So what is depth of field and how does it work?

Depth of field relates to the area of the image that is sharp. So the subject  you focus on in the view finder will be in the middle of the sharpness. How much this extends in front of or behind it, is dictated by the aperture you use. Small F number (large opening) very shallow, large F number (small opening) very wide. The other factor to have a bearing is the focal length of the lens used.  For example, with a wide angle 28 mm lens you would not require the focus to be exact because the depth of field would be quite considerable in front of and behind the point of focus even at small f numbers (large apertures). But with a Telephoto lens of 200 mm the point of focus needs to be precise as the depth of field is quite narrow even at large f numbers (small apertures).


Fg 2.
Kodak colour plus negative. scanned
 from print.
In understanding the way depth of field works you need to know that when you focus on the subject it is at that point the reflected light arrives at the focal plan as fine points of light (sharp). The subjects closer to the lens do not resolve as sharp until they are beyond this point and those further away reach pin sharp before they arrive, because of this they arrive as discs known as circles  of confusion. The larger the circles the softer the images appearance. By making the aperture smaller (large F number) you reduce the circles of confusion giving the picture the appearance of full depth of field. (sharp from front to back). The eye considers points of light as large as 0.25 mm diameter as sharp. The same applies to the dot pitch of a computer screen. When it come to the manufacturer of lenses for 35mm format cameras this figure is much smaller 0.08, this is because the maker has worked out  that on average a 35 mm negative will be enlarged by twenty times (a print size of 10 x 8.)


The good thing about using a film camera is that  you can check on how heavy the points of confusion will be by pressing the depth of field preview button. The advantage I have is I know what to expect from my lenses at particular apertures. This allows me to compose the picture with the amount of soft focus  I think will enhance it.

For example the three pictures included with this post.

         Fg. 1 The main reason for the cats paw being out of focus is to add depth and a sense of being very close.

Fg 3.
FP4+ developed in ID11 printed on
Iford MG RC gloss
         Fg. 2 The main reason for blurring the background is to exclude a large group of people walking towards me. They did not add anything to the picture I had in mind. By adjusting the aperture to a lager one (small F number) they have been removed making for a much better shot.

         Fg. 3 The depth of field in this picture is very narrow. It took a bit of time in making sure that the whole of the ball was sharp and nothing else.


When taking a picture I consider the 'out of focus' as important as the area to be sharp.


Tuesday, 17 January 2012

Colour film well out of date.


The friend that gave me the out of date colour film did so in part for the removal of a partly exposed roll of film from her Dads camera a week or so earlier. She was not sure if it had become stuck or not.
The camera was an Olympus OM707. The battery carrier lid was broken and held in place with sticky tape and not working. The batteries were flat, so I tried some new ones but there was still no life which is a shame as it was in good order otherwise and had been in regular use up until eight years earlier. I had not come across this camera before so was not sure if I would be able to unwind the film manually. I found a re-wind button on the base plate, pressed it and went into the darkroom and opened the back. I took the cassette out first then gently pulled on the film and to my surprise it started to unwind. Once the film was fully removed I wound it back into the cassette.
A couple of weeks later I found out that the film had been developed and to her surprise it had produced some excellent results. It just goes to show even with a partly exposed colour film that has been sitting in a camera for eight years and extremely out of date, it can still produce some unexpectedly good results!
Yes I will admit that it is a risk when using film well outside the bbd; even more so with colour but I do not believe, like some, that you should only use this film with a so called toy camera as it suggests that if it goes wrong then it's “OK!” You just have to look at the lomograph site to see some excellent photographs. Personally you should have the courage of your conviction, use the best camera you can lay your hands on and embrace the results no matter what!
The colour pictures attached to this post were taken on my F5 on Agfa vista neg film that could have been out of date by fifteen years or so and kept in “iffy” conditions. So I walked into Lincoln on a warm sunny day with this film     and an open mind.  If I had listened to the doom and gloom merchants it was likely a waste of time! As it happens it was a good result even though I would have liked some colour shift to the pictures.


Related Posts:


Sunday, 1 January 2012

Enlarging the negative. How big?


Depends on how crisp the negative is! If it is razor sharp there is no reason why you cannot enlarge it to its maximum. A thirty-five millimeter negative should be able to produce a 24 x 30 centimeter print with ease and in exceptional cases 50 x 60 cm. To check if the negative is of a good enough quality, enlarge part of the frame to 18 x 24 centimeters, if it looks a bit grainy the chances are that when the whole negative is enlarged to 50 x 60 cm and viewed from a meter away it will look good.

When enlarging to larger sizes you need to take into account the distance that people will see the picture from. Large photos are rarely viewed up close.

Saturday, 31 December 2011

Magnification on your enlarger


This is going to get a bit technical, so bear with me! This is the ratio between the print and the negative. It is calculated using the linear rule. To make things easy, lets say we are going to enlarge a thirty-five mm negative (24 x 36 mm) by a factor of ten this will give us a print size of 240 x 360 millimeters ( about 9" x 14") in size.
Magnification is related to the distance the negative is from the enlarging lens and the lens from the baseboard. So as the latter distance increases the former decreases. In other words the higher the enlarging head is from the baseboard the closer the lens gets to the negative when it is being focused and vice versa. It stands to reason that the larger the print the longer the exposure time will need to be. There will also need to be a change in paper grade to a harder one as there is a softening in the contrast.

Tuesday, 27 December 2011

Contact printing.


Now that you have your negatives safely stored and indexed, you need to sort out which negatives you are going to print. Trying to judge this by holding them up to the light or by laying them on a light box can be difficult. The best way is to produce a contact print showing all the frames on one sheet of photographic paper.

There are special frames that allow you to do this. You can buy contact print frames which consist of a glass top with film holders attached and a solid base with foam on that clips shut. For 35mm or 6x6 (medium format) which hold seven rows of six for 35mm or four row of three for medium format negatives. The frame holds the negatives so you can see the frame numbers on the print, you place them with the shine side up and put a soft grade light-sensitive paper on the base. Then shut the frame to bring the negatives in contact with the photographic paper, hence contact print.
Another method of contact printing is if you use clear plastic negative holders, you can place these directly onto the photographic paper. The problem with this method is it does not hold the negative completely flat to the paper which means that some of the pictures may be distorted. A way round it is a clean sheet of glass that is big enough to place over the negatives.

Tuesday, 6 December 2011

How to load a plastic film sprial


This is an outline on how to load a film spiral ready for processing.

The only way to learn is to practice feeding a film onto a spiral in day light. I suggest purchasing a cheap roll of 35mm film, probably colour. It is also a good idea to have a brand new spiral to practice with. This should make the learning curve less steep as older spirals get temperamental the more they have been used.

Prepare the film: You can use a cassette opener or film retriever for 35mm. Once you have the leader/tongue of the film in view use a pair of scissors to cut it square. Then snip the corner off each side, the film is now ready for loading.
Now lay out everything you need on a table in daylight for a complete dummy run. Set the developing tank, lid, spiral with center in place and scissors out in the same order each time to get a picture in your mind's eye, this way you will know where everything is in the dark. Keep the film in your hand. With your eyes closed load the film on the spiral, place it in the developing tank, put the lid on and turn till it clicks shut. Some tanks have a screw top so be careful not to cross thread it. After a few practices you maybe ready to do it for real.

Note: Make sure your hands are clean and dry. Damp or sweaty fingers can cause problems with the loading of the film and leave marks on the processed negatives. It is a good idea to wear soft cotton gloves for protection.

Tip: If you wash your hands in cold water before you start it closes the pores reducing the need for gloves. It is also a good idea to earth yourself on a radiator to stop charging the film with static electricity therefore attracting dust. 

It is a lot easier to do than it sounds, so don't be put off. Everyone has their own way of doing this so if you have a tip to add please do.

This video gives a straight forward no-nonsense look at how it is done.