The film has been processed for longer than it needed. The following can cause this:
- Too long a development time.
- Too high a temperture. ( thermometers can go wrong.)
- Too much agitation.
 Prepare
the film: You can
use a cassette opener or film retriever for 35mm. Once you have the
leader/tongue of the film in view use a pair of scissors to cut it
square. Then snip the corner off each side, the film is now ready for
loading.
Prepare
the film: You can
use a cassette opener or film retriever for 35mm. Once you have the
leader/tongue of the film in view use a pair of scissors to cut it
square. Then snip the corner off each side, the film is now ready for
loading. |
 Note:
Make sure your hands are clean and dry. Damp or sweaty fingers can
cause problems with the loading of the film and leave marks on the
processed negatives. It is a good idea to wear soft cotton gloves for
protection.
Note:
Make sure your hands are clean and dry. Damp or sweaty fingers can
cause problems with the loading of the film and leave marks on the
processed negatives. It is a good idea to wear soft cotton gloves for
protection. The
production of fine grain
in a negative is dependent on, in the first place, speed of the film
and the choice of developer. The object is to keep the structure of
the grain in the emulsion as small as possible so that it does not
show up in the enlargments. Fine grain developers are best suited to
films of medium speed about 125 ISO and above.
The
production of fine grain
in a negative is dependent on, in the first place, speed of the film
and the choice of developer. The object is to keep the structure of
the grain in the emulsion as small as possible so that it does not
show up in the enlargments. Fine grain developers are best suited to
films of medium speed about 125 ISO and above. One shot
developers do what they say on the box! They are for single use
and have a quality advantage over reusable ones, also removing the
worries about usability. I know this may sound wasteful in these
times of rising prices, but what cost do you apply for peace of mind
when developing those precious negatives.
One shot
developers do what they say on the box! They are for single use
and have a quality advantage over reusable ones, also removing the
worries about usability. I know this may sound wasteful in these
times of rising prices, but what cost do you apply for peace of mind
when developing those precious negatives.
 The plastic
Paterson type of spool can be difficult to load. A common problem
is the little metal balls that grip the film get stuck. Dont try to
force the film through, if you do it will kink the negative leaving a
half-moon shape. It can make the frame(s) useless. You will need to
part the spiral and start again. A pain I know! Be gentle when
removing the film, there is a chance of damage.
The plastic
Paterson type of spool can be difficult to load. A common problem
is the little metal balls that grip the film get stuck. Dont try to
force the film through, if you do it will kink the negative leaving a
half-moon shape. It can make the frame(s) useless. You will need to
part the spiral and start again. A pain I know! Be gentle when
removing the film, there is a chance of damage.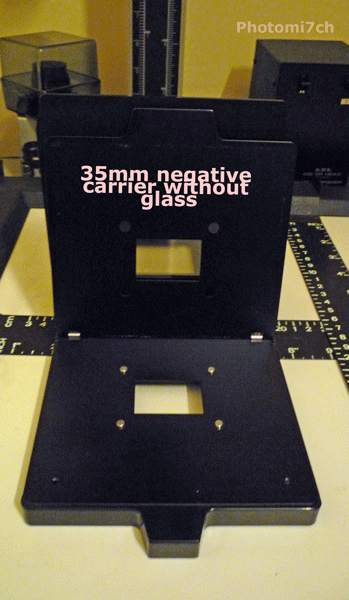 Glass-less
carriers avoid the Newton rings effect (a post for a later date) but
also have the disadvantage of allowing the negative to buckle when
they warm up, this is more pronounced with 6x6 negatives. To minimize this you should be very careful when focusing and use a smaller
aperture to increase the sharpness across the negative.
Glass-less
carriers avoid the Newton rings effect (a post for a later date) but
also have the disadvantage of allowing the negative to buckle when
they warm up, this is more pronounced with 6x6 negatives. To minimize this you should be very careful when focusing and use a smaller
aperture to increase the sharpness across the negative. Another
disadvantage of a glass carrier is dust; to be honest it is not the
big deal that everyone makes it out to be. It is just a case of being
methodical in your approach. The main advantage of glass carriers is
that they keep the negative flat. Another plus is that you can
experiment with unusual effects by using various materials such as
flower petals, salt crystals and soap suds etc in the carrier.
Another
disadvantage of a glass carrier is dust; to be honest it is not the
big deal that everyone makes it out to be. It is just a case of being
methodical in your approach. The main advantage of glass carriers is
that they keep the negative flat. Another plus is that you can
experiment with unusual effects by using various materials such as
flower petals, salt crystals and soap suds etc in the carrier. |
| Enlarging lens mounted in lens saver. |
 |
| Enlarger for 35mmm negs only. with out multigrade head. Condenser type. |
 |
| A multi format Enlarger with multi grade head. Diffuser type. |
 |
| Fox Talbot's sketch of Lake Como using camera obscura. |
 Fox Talbot used
many different types of camera to produce his pictures. There we a
couple of cameras or boxes that only measured two or three inches
which Fox Talbot left around the grounds of Laycock Abby in different
places with light-sensitive paper in for about an hour at a time.
They were nick named mouse traps by the family. His early cameras
would use telescope or microscope lenses.
Fox Talbot used
many different types of camera to produce his pictures. There we a
couple of cameras or boxes that only measured two or three inches
which Fox Talbot left around the grounds of Laycock Abby in different
places with light-sensitive paper in for about an hour at a time.
They were nick named mouse traps by the family. His early cameras
would use telescope or microscope lenses.
 By chance in 1840
Fox Talbot discovered when re-sensitizing some paper that the image
had appeared; this became known as the latent image. Before this time
he was having trouble with the sensitivity of the papers. Although he
had been able to fix the images by using a strong salt solution of
potassium iodine of hypo to stop the images fading. This new
discovery was a major break through that meant exposures could be
achieved in one to three minutes instead of half hour or more. The
year after Fox Talbot discovered how to make his photogenic drawing
process more sensitive to light by adding Gallic acid to the process.
He also found that a further treatment of Gallic acid and silver
nitrate would bring the latent image out. It was time he changed the
name of the process to Calotype (from the Greek "Kalos"
meaning beautiful) the Calotype was a negative/positive
process introduced in 1841. Strictly speaking Calotype should
have referred to the Positive part of the process.
By chance in 1840
Fox Talbot discovered when re-sensitizing some paper that the image
had appeared; this became known as the latent image. Before this time
he was having trouble with the sensitivity of the papers. Although he
had been able to fix the images by using a strong salt solution of
potassium iodine of hypo to stop the images fading. This new
discovery was a major break through that meant exposures could be
achieved in one to three minutes instead of half hour or more. The
year after Fox Talbot discovered how to make his photogenic drawing
process more sensitive to light by adding Gallic acid to the process.
He also found that a further treatment of Gallic acid and silver
nitrate would bring the latent image out. It was time he changed the
name of the process to Calotype (from the Greek "Kalos"
meaning beautiful) the Calotype was a negative/positive
process introduced in 1841. Strictly speaking Calotype should
have referred to the Positive part of the process.

 |
| Typical wet side layout |
 |
| Typical layout for dry side of darkroom |
 |
| A typical lay out |
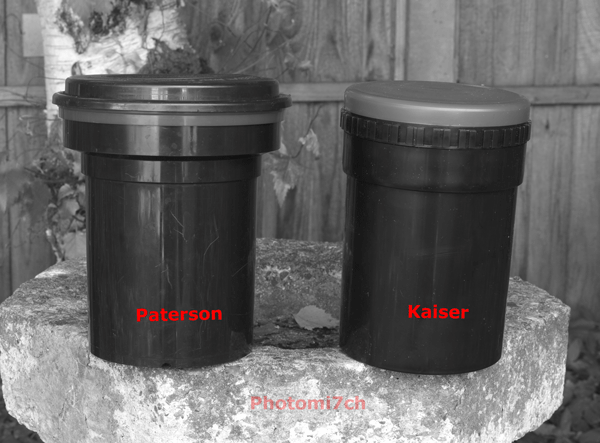 There
are a number of well-known makes to choose from. The most popular and widely used is the Patterson
system. Another and maybe not so well known is the German maker Kaiser no lesser a system. So what are
the differences? When buying a universal developing tank, if cost is one of
your main considerations the Kaiser system wins hands down as being very good
value for money. So much so its worth considering if you are thinking of buying
a Paterson second-hand.
There
are a number of well-known makes to choose from. The most popular and widely used is the Patterson
system. Another and maybe not so well known is the German maker Kaiser no lesser a system. So what are
the differences? When buying a universal developing tank, if cost is one of
your main considerations the Kaiser system wins hands down as being very good
value for money. So much so its worth considering if you are thinking of buying
a Paterson second-hand. Both systems
have good and bad points to consider. Starting at the top in both cases I have
found no matter how well the cap has been put in place it leaks slightly when
inverting the whole tank. It can be a messy annoyance when using PMK Pyro as it
stains whatever it drips on too. Yes I know that each system comes with an
agitator but the Paterson one is difficult to use because it is so thin, unlike
Kaisers which has a top to it you can grip and when turned also moves the
spiral up and down in the solution as well. Each company uses a different way
to fix their lids. Paterson's idea is a twist and click method which I prefer
but can be miss aligned if you are not careful. The Kaiser tank has a screw top
which I have managed to cross thread each time.
Both systems
have good and bad points to consider. Starting at the top in both cases I have
found no matter how well the cap has been put in place it leaks slightly when
inverting the whole tank. It can be a messy annoyance when using PMK Pyro as it
stains whatever it drips on too. Yes I know that each system comes with an
agitator but the Paterson one is difficult to use because it is so thin, unlike
Kaisers which has a top to it you can grip and when turned also moves the
spiral up and down in the solution as well. Each company uses a different way
to fix their lids. Paterson's idea is a twist and click method which I prefer
but can be miss aligned if you are not careful. The Kaiser tank has a screw top
which I have managed to cross thread each time. The Kaisers
spiral design is the main reason that I have one of their developing tanks. I'm
having trouble with kinking the film when loading 120 format onto Paterson
spirals and have used lots of different ideas to overcome it. The main
difference with the Kaiser reel is that it has two large feed in wings where
you load the film which makes loading a lot easier and faster with no kinking.
Because of the trouble I've been having with the Kaiser screw top tank I now
use a Paterson tank with the Kaiser reel, it is a little loose on the centre
tube but the C clip stops it moving up and down when inverting. So for now I
have the best of both worlds.
The Kaisers
spiral design is the main reason that I have one of their developing tanks. I'm
having trouble with kinking the film when loading 120 format onto Paterson
spirals and have used lots of different ideas to overcome it. The main
difference with the Kaiser reel is that it has two large feed in wings where
you load the film which makes loading a lot easier and faster with no kinking.
Because of the trouble I've been having with the Kaiser screw top tank I now
use a Paterson tank with the Kaiser reel, it is a little loose on the centre
tube but the C clip stops it moving up and down when inverting. So for now I
have the best of both worlds.