Pages

Showing posts with label exposure. Show all posts

Tuesday, 16 February 2021

Zero double take project first results.


Zero 6x9 pinhole camera.


As I sit here reviewing the first batch of photographs from double take, the wind and the rain is still lashing the property - something it has been doing for the last twenty four hours. I'm pleased to be inside in front of a warm fire with Tabatino who is stretched out in front of it like a rug. 


Zero 6x9 pinhole camera.


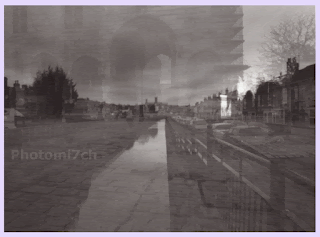
The contact print shows that the second exposures are quite weak and will require dodging and burning to make their presence felt. With this in mind I  have been using half page test strips  so I can see how much more exposure is needed to bring out the weaker parts of the negative. This has given me a better overall idea of how much extra time the weaker parts of the picture need so I can get as close as possible to what the final print will look like. Having  chosen to use 6x6 negatives I find myself cropping them to a landscape frame size giving me more choice over which parts of the negative make the final composition and partly to get the best use out of the paper size. I'm using Silverprint's gloss proof paper mainly because I believe it has added something to the overall expression of the photographs.


Zero 6 x 9 pinhole camera.


The results of this first film have been a pleasant surprise in that most of the negatives have produced picture combinations that work well. Whether this is down to luck or the pre-planning in the picture combinations only time will tell. The day I took the pictures was a challenge in that it was windy with a broken cloud sky that was fast moving making metering each shot difficult. By the time I had worked out the shutter speed and opened it the scene in some cases had gone from bright sunshine to dull and overcast or vice versa. It just goes to show how forgiving film is when it comes to exposing it in rapidly changing light conditions over extended periods. These were printed at grade 3 and not my more common split procedure.


Technical data: 

Film 120 FP4+ set to 6 x 6 negative size, developed in PMK Pyro, Printed on silverproof paper, developed in Ilford warmtone developer.

Saturday, 3 December 2016

Freestyle printing session


I don't know about you but sometimes I find the constraint of having to make a segmented test print to determine the right exposure for each negative tiresome. I sometimes feel that it interferes with the creative process. On these occasion in the darkroom I put myself to the test with what I call free printing. I can see some of you shaking your heads at such a notion. It is a way of pushing your instincts creatively. 

Let me lay out the rules of this creative freedom. I pick a random sleeve of negatives, run my eye over them to see what catches my attention. Load that negative into the enlarger and then make a half sheet test strip at five second intervals. This will be the only test strip of the session providing the starting point for each subsequent negative I opt to print. I give myself two attempts at getting the exposure right using my experience and knowledge (best guess) to refine it with dodging and burning. This is where your print technique is put to the test and your ability to choose negatives of the same density.
First print.
 

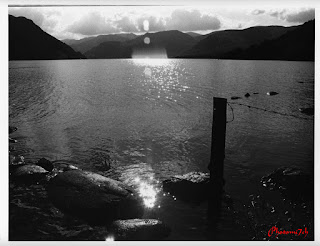
Into the darkroom. I have chosen a set of 35mm negatives that have a selection of landscapes I made while I was in the lake district and the one that took my eye was looking across the lake into the sun. As gooder place as any to start the printing session.


After adjustments

With this negative loaded I set up the enlarger as follows: the lens to F8 and the paper grade to three. These are the most common settings I use when printing. The paper used is silverproof matt. With the test strip made I look carefully at it to work out the overall exposure and how much more light may or may not be needed for a balanced print. 


The mountain into the sun image is the one I made the test strip for. Even so it proved difficult to get right. I chose to print overall at 32 seconds adding an extra 15 secs for the sky. This did not allow for the mountain slops on the left of the picture which needed less light to stop them completely blocking out. The burning in of the sky did not take into account the brighter area to the center right leaving it a bit blown out. So for the second print the mountain slops to the left were held back for -7 secs and the off center sky received a further +15 secs.

Before adjustments

After adjustments


The second negative chosen was the fence post into the sun. I already knew that overall this would require less light to print, the trick here would be by how much, after a bit of consideration I opted for 27 secs. Which worked well but I felt it needed even less. Overall the second print was exposed for 24.5 secs with an added 5 secs for the sky. Not much of a change, but the affect on the foreground was positive.


Before

After

Right first time no adjustments


The third negative is of the dog in the lake. I chose 25 seconds for this because the negative looked a bit dark indicating some over exposure. I was too bold with my exposure time as the print is a bit washed out with no sky. So I up it to 28 secs and added +28 for the sky. In cases where the sky is whited out I double the amount of light when burning in. Overall a much better picture.


The final image looking through the trees is a straight print, the overall time is 27 seconds. I'm happy with the print, yes I could adjust a couple of bits, but they would not add much to the overall look.

Free flow printing sessions are not always successful but it does free my mind especially if I'm having a bad time getting a picture the way I want it. 

Sunday, 25 January 2015

Light metering?

For years I wanted to obtain a Bronica and when I did it was a very happy day. The SQAi has done a lot of travelling over the years; in all sorts of weather and across many different terrains. It has let me down on a couple of occasions but I do not blame the camera, overall it has been a great bit of kit. It can be a pain literally on long treks as it is no light weight, even in its lightest configuration.

I have not always been happy with the camera. When I first had it I could not get used to the back to front image which was really frustrating at times. I was not happy with having to use a hand held light meter either. I know! why did I
purchase it in the first place? Boyhood dream of some day of owning one? It has taken sometime for its use to become second nature, but now that it has, my picture making has become more fluent.

Along the way, my light meter use has changed; with some experimenting, I have found that two readings is better than one over all, making white bland skies with monochrome film a thing of the past. I, like you, have tried to solve it by using black and white filters from yellow to red and graduated neutral density filters to name a few. All of which are now gathering dust some where. Really and truly all you need to do is take a second light reading. Of what? The brightest part of the scene which in most cases is the sky and the amount of time it takes to do this makes it a no brainer. In fact you could have taken several in the time it takes to read this.


An understanding of Ansel Adams zone system helps to produce better negatives.

The picture right give a rough idea on how it works.

I have metered skies that have been as much as six stops brighter. In these cases, would it mean shutting the lens down by three stops to allow for it? With a little bit of help from the zone system you may only need to allow one stop to improve the detail in the sky, this would lead to better detailed negatives. The extra information would lead to more easily produced photographs.

Yes you can bracket your exposures which is a good way of learning what works best for you but as a long term method it is a waste of film. The idea is to know what works so you can get it right first time.


On average I have found that the skies in my pictures are about two to three F numbers brighter, meaning a slight adjustment to the exposure before pressing the shutter will produce more detail in the sky on the processed negative, without making the main part of the image too dark. When it comes to printing, whether burning in or holding back, depends on which method you prefer to use in the darkroom. My working method leads me to add light (burn in) more often than take it away (hold back). The sky is not always the brightest part of the picture, I'm using it in this case because it is the most common complaint with developed negatives and to keep my explanation simple.

The following pictures show what happen when the sky is taken into account:


120 format Film FP4+, 6x6 negative,
 Developed in ID11 ,
Printed on Ilford multigrade RC gloss,
 Developed in Ilford multigrade.


This picture was metered for the piper. I did not take a second reading for the sky. I have been unable to burn the sky in hence the white out so to speak.


120 format film FP4+, 125 ISO, 6x6 negative
Developed in Ilford multigrade developer
printed on multigrade RC gloss.


With this picture I closed the aperture down by one F number to allow for the sky. For example from F.8 to F.11. As you can see the clouds have been picked out. With a bit of burning in (adding light) The sky would have more contrast therefore stand out.


120 format Fomapan 100 ISO, 6x6 negative,
Developed in RO9, Printed on Ilford multigrade RC
gloss, Developed in Moersch 6 Blue.


This is a badly scanned photograph but it does illustrate how well the clouds stand out.

It was a difficult scene to meter. The lighting was changing quickly. The light reading for the sky was indicating a difference of three F numbers in brightness more than the overall reading.  In the end I only shut the lens down by one F number. It is a straight print without any burning in.





Sunday, 22 April 2012

Zero pinhole camera Project double take.


Camera Zero 6x9 delux
FP4+ 120 format, 6x6 neg,
 developed in PMK Pyro no afterbath,
Printed on silver proof paper gloss
Developed in Moersch 6 blue tone.
My attitude when using the Zero camera has become very relaxed. My approach is to look at the scene, roughly point the camera at the subject, take a light reading, calculate the exposure and open the shutter for about the right amount of time. Once taken move on to the next one. I'm not sure if this is such a good thing as I'm making a number of double exposures, which have turned out well more from luck than design.


Camera Zero 6x9 delux,
FP4+ 120 format, 6x6 neg,
developed in PMK Pyro with afterbath
printed on silver proof paper matt
 developed in Ilford warm tone
This has led to project double take but lets be honest basing an idea on a set of lucky mistakes does not bode well for the results. But then history is littered  with stumbled upon ideas that have gone well. With this in mind I'm going to carry on with the blindfold method of not winding on. I could be more controlled by making single shots and then combining the negatives in the enlarger to produce a double exposure but  this may take away the element of surprise and randomness to the results. With that said there needs to be some planning to the picture taking, so I'm going to use a location I know quite well in order to make the combination of double exposures easier to plan cutting down time looking for shots. It will be hit and miss anyway with this approach but hopefully not so many misses. The first roll is going to be a bit of an experiment so I'm not expecting many good printable photographs. But in this context what is going to be a good picture I think it will boil down to how well the combinations work together; once the first film is developed I'll be able to refine my method.


I'm setting the zero 6x9 deluxe to 6x6 neg size, loading FP4+ which will be developed in PMK Pyro using my revised method of inverting with an after-bath. I may not continue the bath for subsequent rolls if the photos look to soft. And so the project begins.

Monday, 19 March 2012

Prints to hard or to soft.

High contrast

What are the signs that a print has been printed to hard? The shadow areas are jet black with no detail and the highlights are blank  (the contrast is to great). Assuming that the negative being printed shows none of these traits then it can be corrected by the following:

         Use a softer grade of paper.
         Make sure that the exposure time is correct.
         The paper is in the developer for the right amount of time.
         Don't use a high contrast developer.
Low contrast
What signs make a soft print? It looks grey and foggy with little punch. No contrast. In this case it is almost the opposite to the above.

         Use a harder grade of paper.
         Increase the developing time. If the development time is to short it may cause cloudy spots.
         Make sure the developer is not too diluted.
         Also check that it is not exhausted. 

There are other possibilities:

         Your darkroom may not be light tight fogging the paper creating an overall grey cast.
         The paper maybe to old or has not been stored properly. 

Once you establish what the problem is, the cure will speak for it's self.

Related posts:

Evaluating your test strips
Darkroom fog.

Thursday, 26 January 2012

Dodging and burning.


A selection of dodgers 
They are darkroom tools to help bring out all the detail from your negatives when printing. 


Holding back


No matter how well you expose and develop your negatives, when it comes to making a positive you will need to equalize the exposure by holding back and burning in to keep the detail in the highlights and shadow areas. In a lot of cases it is not possible to alter the overall exposure time to take these deficiency's in to account. In these cases dodgers as the name implies will help you get round this problem. You can use your hands, fingers, pieces of card, a length of wire with a cut out of  card stuck to it and cards with holes in them. 
Burnning in
Dodgers work by casting a shadow over the area that needs less exposure than the rest of the picture. Likewise dodgers with holes in them are used for burning in areas that require more light than the rest of the photograph. This is also a type of holding back as it stops the correctly exposed picture from becoming over exposed. When using a dodger you must keep it moving otherwise it will produce a hard outline to the area you are trying to correct. It can be moved from side to side or up and down to stop this happening. The amount of time you use your dodger for will depend on what your test strip shows.  If you have not got a test strip then it will be trial and error taking a number of prints before you get it right. With experience the amount of error will diminish. 
Dodgers are not just for correcting problems, they are there also for creative purposes for example to bring out some extra drama in the scene, add a shaft of light where there was none or to bring two pictures together where one maybe lacking any sky detail.