Pages

Showing posts with label 120 format. Show all posts

Saturday 31 January 2015

120 Film paper backing symbols.

When I started to use a zero multi format pinhole camera for the first time, I had a brief moment of panic because I could not remember what the symbols on the backing paper indicated before the frame number. I had also forgotten that the whole family of 120 formats were represented. I had not used the little red window on the back of a camera since my childhood. Fortunately for me it did not take long for it to come back.


Makes of film shown FP4+, Fomapan, Adox.
Beginning of film. (start)


Remember that the frame number also indicates the center of the film you are about to expose so it is important to get this in the middle of the red window. If you repeatedly over run this by the time you get to the end of the film you will only have part of a frame left.


End of film (Finish)

With this in mind the following pictures show you what to expect with different makes of 120 film - not just for winding on but for winding off before you remove the film from the camera. Not sure why you would need to know this when your coming to the end of the film? logic dictates that you just keep winding until you feel the backing freeing it's self from the spool.


The top line of symbols are for cameras that use 6 x 4.5 negatives. The middle is for 6x6 negatives. The bottom for 6 x 7  and 6 x 9 negatives.

Saturday 6 July 2013

Using the Agfa Isolette camera


Carrying on from a previous post on the Agfa Isolette The opportunity to use the camera was provided by a break in the weather - it cleared enough not to be soaked as soon as you leave the house.


The flip out film holder makes it easy to load a new roll of film. There are in built springs that provide friction, so the film is kept tort, keeping it as flat as possible at the focal plane reducing distortion. The film back clicks shut with a reassuring clunk. It also has a little red window in the back with a sliding cover in which to view the film numbers as you wind on. The film is advanced with a knob on the top right hand side of the camera that has a built in reminder to wind on after each exposure otherwise the shutter will not set.

To reveal the lens you press a button on the top left hand side. In this case the lens followed by the bellows leaps forward from the front of the camera with an enthusiasm that can knock it out of your hands if you are not prepared for such athleticism. Once the front is open you are presented with the five main controls: lens focus, a full set of apertures from F4.5 all the way up to F32. A limited number of shutter speeds: B, 25th, 50th, 100th and 200th A self timer and most importantly a lever that primes the shutter for release. The only other thing present is a connection for flash.

On the top of the camera is the shutter release that allows a remote cable to be fitted, a cold shoe for a range finder or other accessories and another knob that has four settings marked Col NK, NT, K and T. (I do not have a clue as to what they represent.) As far as I can tell it has had no affect on my negatives. It has a viewer and a tripod mount.


After I got used to the idea of guessing what the distance should be set to and then remembering to alter it for different views, I found myself taking shots quickly almost like an automatic. I did take light readings to start with but it became clear that the light levels were stable enough not to need checking for each shot.

It became clear that there was a problem once the negatives had been developed. Some how light was getting into the camera. Having checked it carefully before hand I should have carried on and cut a piece of light sensitive paper to fit the camera and left it for a minute to make sure. Once the paper had been developed in the normal way it would have shown that light was leaking in from the bottom right corner of the exposure chamber indicating a problem with the bellows.


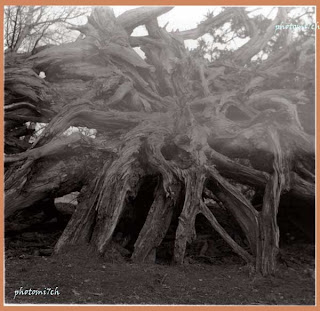
I'm a little disappointed with myself for not doing this check in the first place. If I had followed through with the test, I wouldn't have had a duff set of negs'!. It would have made an interesting set of prints as the gremlin's face in the tree roots shows.


Saturday 23 March 2013

An Agfa Isolette has laneded


Recently a package arrive from a friend that was giving away a number of Agfa  Isolette cameras. I put my name down for one, not quite expecting to have my name pulled out of the hat. As it turned out not that many people were interested. The cameras were advertised as not tried and tested so you could end up with one that may not be in proper working order. However they are easy to repair if there is a problem.

 As it turns out, the one I have does not have any faults that I can find apart from needing a major clean. It has the dustiest insides I have seen in a long time with the bellows being full of fluff.  I have carefully cleaned it out using compressed air and a damp cotton bud. Having first earthed myself to reduce the static in my body. The lens was slightly dirty which has been gently cleansed with lens fluid on a cotton bud.

 
The Agfa Isolette was introduced in the 1950. It produces a 6x6 negative making it a member of the 120 medium format family. The camera pictured is an Isolette 2 With the press of a button the front flips open to reveal an 85 mm Apotar 1.4,5 lens that shuts down to F22 and has a shutter speed range from B to 200 hundredths of a second.  For a completely manual camera it is well designed and sophisticated, even by today’s standards. It has a number of features that shows its quality, firstly with a film holder that flips out of the camera back to allow the easy installation of a new roll. A shutter lock on the winding mechanism that can only be removed by advancing the film, helping to prevent double exposures. Although the lens has a focus ring it is not a range finder and therefore distances have to be guestimated. A range finder device was produced as an extra that clipped into the shoe on the top. It's compact size makes it just right to slip into the pocket of a gentleman's jacket, although the all metal construction makes it a little bit heavy for comfort.


With all the cleaning and checking done, all that remains is some good weather so the camera can be put through its paces.

Sunday 30 December 2012

Fuji GW690III Overview-Review


These cameras were the last to bear the name Fujica. First released in November 1978 as a professional unit with interchangeable lenses that were subsequently updated to a fixed lens.  They came in several formats from 4.5x6, 6x7, 6x8 and 6x9. The GW 6x9 was first released in 1985 and came with a fixed lens. The video above gives a nice insight into a range of camera that became known as the Texas Leica.

 Like to thank Mike Thomas for his insight into this camera.

Saturday 28 July 2012

Sinkings in the Orkneys


German Fleet at Scapa flow
It is a grey day as a young lad stands near the cliff edge on Hay one of the Orkney islands. He looks out over Scapa flow that is crowded with ships. The German fleet has been interned. He has heard that the war is over and that is why they are all here at the Navy’s most northerly base and guard to the North Sea.


While the boy is sat a top the cliff eating a bread and dripping sandwich, his eyes are drawn to some flashing lights, it looks like all the ships are winking at each other, little does he know that this is the order from rear admiral Von Reuter to his commanders confirming orders to scuttle the fleet. He looks on day dreaming about what life may be like now that the war has ended. He suddenly notices that all the ships he can see are flying the Imperial German Ensign from their main masts. While he looks on there are lots of small boats moving between the ships, if only he had a telescope he would be able to see what is going on in more detail but he still hasn’t got enough pocket money saved.


Whaling boat stranded on Battle Cruiser Moltke
The German sailors had been preparing for the scuttling for some days by  drilling holes in the bulk heads to help the passage of water through the ships. Once the order was given sea cocks and flood valves were opened, internal water pipes were smashed and all water tight doors and portholes left open. It was not until midday that  the scuttling was noticed.  Friedrich der Grosse was seen listing heavily to starboard. What remained of British naval forces at Scapa flow navel base sprang into action, but they were limited in the force they could take since the leaving of the fleet the day before . It was not until twenty minuets after midday that Admiral Fremantle on manoeuvres with the fleet  received a message that the German fleet was sinking. He immediate turned round and steamed back at full speed to Orkney. He radioed ahead to order all available boats to try and stop as many ships sinking as possible. By the time Admiral Fremantle returned it was only the large battle ships that were still partly afloat. The last ship to sink was the battle-cruiser Hindenburg at five o'clock.
Battle cruiser Seydlitz


The young boy up on the cliff had lost all track of time it was getting late, he would be 'for it' by the time he got home, with a clip round the ear from his mum. He had resigned himself to it but had a great story to tell his friends when he got to school the next day. On his way home he wondered what those faint popping sounds were. The tragedy of those sounds were that nine Germans were killed and sixteen wounded when the British boarded their ships to stop the sinking's. 

Battleship Bayern listing heavily


I know you are probably thinking what has this got to do with photography. The funny thing is this was all sparked off by an article in Black and white Photography magazine about post cards. Which lead me to a box of  cards that was given to me by my Gran. In among them are a collection of twenty pictures of ships, of these fourteen show the sinking of the German fleet at scapa flow at the end of the Great War. The photographer who took these shots probably used 127 or 120 format film in a box Browne or fold out camera of the time.


For more information on the Sinking of the fleet.


Sunday 22 April 2012

Zero pinhole camera Project double take.


Camera Zero 6x9 delux
FP4+ 120 format, 6x6 neg,
 developed in PMK Pyro no afterbath,
Printed on silver proof paper gloss
Developed in Moersch 6 blue tone.
My attitude when using the Zero camera has become very relaxed. My approach is to look at the scene, roughly point the camera at the subject, take a light reading, calculate the exposure and open the shutter for about the right amount of time. Once taken move on to the next one. I'm not sure if this is such a good thing as I'm making a number of double exposures, which have turned out well more from luck than design.


Camera Zero 6x9 delux,
FP4+ 120 format, 6x6 neg,
developed in PMK Pyro with afterbath
printed on silver proof paper matt
 developed in Ilford warm tone
This has led to project double take but lets be honest basing an idea on a set of lucky mistakes does not bode well for the results. But then history is littered  with stumbled upon ideas that have gone well. With this in mind I'm going to carry on with the blindfold method of not winding on. I could be more controlled by making single shots and then combining the negatives in the enlarger to produce a double exposure but  this may take away the element of surprise and randomness to the results. With that said there needs to be some planning to the picture taking, so I'm going to use a location I know quite well in order to make the combination of double exposures easier to plan cutting down time looking for shots. It will be hit and miss anyway with this approach but hopefully not so many misses. The first roll is going to be a bit of an experiment so I'm not expecting many good printable photographs. But in this context what is going to be a good picture I think it will boil down to how well the combinations work together; once the first film is developed I'll be able to refine my method.


I'm setting the zero 6x9 deluxe to 6x6 neg size, loading FP4+ which will be developed in PMK Pyro using my revised method of inverting with an after-bath. I may not continue the bath for subsequent rolls if the photos look to soft. And so the project begins.

Friday 6 April 2012

Silverproof paper


This is the second run of budget priced paper marketed by Silverprint and has a matt finish. The first run was gloss. I have used the later and was impressed with the photographs it produced. With its grades being limited to two I was not put off.

Ilford FP4+,120 fromat 6x6 negative, Developed
in PMK Pyro and printed on
Silverproof paper Matt.
I originally purchased the gloss paper for contact prints and didn't really take much notice of how well they were being produced until I obtained a 12 x 16 slottie (Nova paper processor. which was the dirtiest bit of kit I have ever purchased second hand, a story for another post). The silver proof paper was the largest sized paper I had on the shelf and I was  impatient to see how well this new piece of kit worked. I was surprised by the tonality of the paper which lead me to make a series of photographs. It is a shame it was a limited retail run. It will missed.

Then a second batch was announced on Matt paper, which is a finish I'm not a fan of, but I'm always happy to try something new. This will also be a limited retail run, so if matt is your preference get some boxes in while you can.
Ilford FP4+ 120 Format 6x6 negative, Developed
in PMK Pyro and Printed on
Silverproof paper Matt.
The paper is completely different from what I'm used to. It is difficult to tell which is the emulsion side in the darkroom but with a little practice, the back has a slight  fibre feel to it which takes a time to get the hang of. First impressions are good, the photographs remind me of the cover page to Black and White Photography magazine in the way it looks and feels but has a depth to it that ink cannot replicate. It also does not have that richness of tone you get with gloss papers. Having said that, I like the difference and  expressiveness  it gives to the pictures it produces.   

Ilford FP4+ 120 format 6x6 negative, Developed
in PMK Pyro and printed on
Slverproof Paper Matt.
The pictures that complement this post were developed in a warm tone developer from Ilford with the enlarger set at grade two, initially it was set  at  grade three but I found that the pictures had to much contrast. On hindsight it may have been better to use an un-toned developer, but then I was not planing to use the proof paper for a full print session. I got carried away after the first test prints and I'm pleased I did.


Tuesday 3 January 2012

Enlarging a section of the negative.


Picture from a 120 FP4+ ISO125 6x6 negative
 developed in ID11 and printed on Ilford MG paper
 Processed with Ilford MG Developer.
Landscape format
There are no rules when it comes to enlarging your negatives. Cropping, re-formatting and partial enlargement are all part of the creative process. Changing horizontals to verticals and diagonal is also part of this rich tapestry of creativity. The only time I feel this looks odd is with waterscapes and their horizons.
Portrait format


As one of those people that works with 6x6 negatives, cropping and reframing is all part of making the picture fit the paper. I'm not complaining but the fact is all paper sizes are oblong. I think this has helped me in getting the best from my pictures. I do not waste time in trying to make the whole negative fit the page; this is heresy to some who believe that having carefully framed the view that you should print as you saw it! This is not always possible, especially when you have a certain size of print in mind. Sometimes this careful framing once projected on the enlargers baseboard may look better with horizontal or vertical framing. Do not be afraid to play.

Square Format
Which do you prefer?


Tuesday 27 December 2011

Contact printing.


Now that you have your negatives safely stored and indexed, you need to sort out which negatives you are going to print. Trying to judge this by holding them up to the light or by laying them on a light box can be difficult. The best way is to produce a contact print showing all the frames on one sheet of photographic paper.

There are special frames that allow you to do this. You can buy contact print frames which consist of a glass top with film holders attached and a solid base with foam on that clips shut. For 35mm or 6x6 (medium format) which hold seven rows of six for 35mm or four row of three for medium format negatives. The frame holds the negatives so you can see the frame numbers on the print, you place them with the shine side up and put a soft grade light-sensitive paper on the base. Then shut the frame to bring the negatives in contact with the photographic paper, hence contact print.
Another method of contact printing is if you use clear plastic negative holders, you can place these directly onto the photographic paper. The problem with this method is it does not hold the negative completely flat to the paper which means that some of the pictures may be distorted. A way round it is a clean sheet of glass that is big enough to place over the negatives.

Friday 16 December 2011

The results of my first use of PMK Pyro


The results are not faultless. I will come to that later, first I have forgotten to mention that the films being processed are Ilford FP4+, used at ISO 125. 120 format producing a 6x6 negative. Now I'll outline the procedure used.
  1. The working solution was made up using filtered tap water at 21 degrees C and poured in straight away.
  2. Once the developer was in the tank I agitated it continuously for the first minute.
  3. The tank was inverted twice every 20 seconds and tapped to dislodge any bubbles.
  4. stopped, fixed and washed as normal.
I did not re-dip the film in the developer after fixing to intensify the staining. This is up to you but I was advised it did not make a noticeable difference.

Whenever I process a film I find that I'm a bit apprehensive as to what the outcome will be, even more so with a new developer! so just before I wash the film I have a little look to see if there is a negative, so far I have not been disappointed.

First impression, once the film was dry I noticed there weren't any water staining marks, that's a bonus. The film base has a slight mauve colour to it which increased in strength slightly with longer development times. The negatives overall were evenly processed. The contact prints revealed that there are dark spots on the neg's which I think may have been caused by air bubbles. I have just processed another film this time I gave it a two-minute pre-soak and there are no black spots on the negs.

To re-cap: Two minute pre-soak, pour developer in and agitate for first minute, then invert tank twice every twenty-seconds, stop,fix and wash as normal. You should get some very very fine grain negs.

I have printed four pictures so far. The first two on Foma 113 variant gloss, F11 grades 2.5 and 3 and they have a cool tone to them. The next two on Ilford multi-grade gloss, F11 grade 2 and 2.5, these have a warmish tone to them. Both papers were developed in Ilford -multi-grade print dev.

The pictures that appear in this post have been scanned from prints and do not convey how well they have printed. These are straight prints with no dodging or burning in. I wanted to show how well the negatives have printed and how evenly they have developed. I will be producing a final print set on FB paper at a later date using a mix of ordinary and warm tone developers.


Will I use Pyro again? Yes! it is likely to become my default film developer. The grain produced by this developer is minut to the point of making it difficult to see when focusing the negative for enlargement. I feel that the twenty-second double inversions of the tank is a bit fraught but I think it will get better the more I get used to it. Without Trevor's advice it may have taken a few more films to get it right. Thanks Trevor!


Other articles from this blog on PMK Pyro

What next?

Agfa test strips.

Working solution

Solution B

After bath

FP4+ development

Adox art 

PMK Pyro raw

Making up PMK Pyro from raw

Adox results

Negative comparison with PMK Pyro

PMK Pyro grain comparison

Tuesday 6 December 2011

The story behind the Winter Picnic Photograph.


It was round about this time last year (November/December 2010) that the UK was in the grip of the worst cold spell for as it turns out a hundred years. The country may have just missed coming to a standstill but it stopped me in my tracks literally, as I couldn't get the truck off the drive. The ice was a solid two inches thick not allowing for any grip!

The snow brought a brand new look to the area that I had not seen before, so I thought I would go out and take some photographs of this fresh, clean new wonderland of soft edges. Armed with my Bronica SQAi 120 format camera loaded with FP4 film I trudged gingerly off into the countryside.

Picnic
I was quite surprised to find there we a lot of people out and about with the same idea, walking the dog, playing and enjoying their enforced day off work. As I strolled further afield the numbers thinned until I was alone enjoying the crisp white land the snow had laid out for me to photograph; so engrossed with the scenes before me I forgot how bitterly cold it was until my throbbing freezing fingers sent SOS messages to my brain and brought me back to reality -“Shhahhhoi!!! Its cold.!” Pulling my gloves on the best I could I made off in a hurry to warm up.

Briskly walking up a path by one of the lakes the path turns a corner at the top where there is a bench and from a distance it looks like someone is sitting there! As I got closer I could see it was two people! -”they must be mad!- and it looks like they are having a picnic!” As I got closer I could see steam from their cups as they ate their mince pies! An idea for this picture was forming as I approach them to ask if they would mind being in the photograph. They did not mind, so I walked back down the track a bit, set up the camera on the mono pod, took a light reading and pressed the shutter. You're right! I only used one frame, no back up or bracketing, the view that came to mind is the one I took. After the shot was taken I walked back and chatted for a while. Apparently they don't let a little bad weather get in the way of them coming to their favourite spot! I wish them the best of the season and moved on. Not so mad after all! I wish I had thought to bring a hot drink with me!

I am pleased to say that Picnic was one of the Pictures chosen for this years Film and darkroom users Year Book. Which can be obtained from Blurb.

FADU year books

How to load a plastic film sprial


This is an outline on how to load a film spiral ready for processing.

The only way to learn is to practice feeding a film onto a spiral in day light. I suggest purchasing a cheap roll of 35mm film, probably colour. It is also a good idea to have a brand new spiral to practice with. This should make the learning curve less steep as older spirals get temperamental the more they have been used.

Prepare the film: You can use a cassette opener or film retriever for 35mm. Once you have the leader/tongue of the film in view use a pair of scissors to cut it square. Then snip the corner off each side, the film is now ready for loading.
Now lay out everything you need on a table in daylight for a complete dummy run. Set the developing tank, lid, spiral with center in place and scissors out in the same order each time to get a picture in your mind's eye, this way you will know where everything is in the dark. Keep the film in your hand. With your eyes closed load the film on the spiral, place it in the developing tank, put the lid on and turn till it clicks shut. Some tanks have a screw top so be careful not to cross thread it. After a few practices you maybe ready to do it for real.

Note: Make sure your hands are clean and dry. Damp or sweaty fingers can cause problems with the loading of the film and leave marks on the processed negatives. It is a good idea to wear soft cotton gloves for protection.

Tip: If you wash your hands in cold water before you start it closes the pores reducing the need for gloves. It is also a good idea to earth yourself on a radiator to stop charging the film with static electricity therefore attracting dust. 

It is a lot easier to do than it sounds, so don't be put off. Everyone has their own way of doing this so if you have a tip to add please do.

This video gives a straight forward no-nonsense look at how it is done.