Showing posts with label negative. Show all posts
Showing posts with label negative. Show all posts
Sunday 30 December 2012
Fuji GW690III Overview-Review
These cameras were the last to bear the name Fujica. First released in November 1978 as a professional unit with interchangeable lenses that were subsequently updated to a fixed lens. They came in several formats from 4.5x6, 6x7, 6x8 and 6x9. The GW 6x9 was first released in 1985 and came with a fixed lens. The video above gives a nice insight into a range of camera that became known as the Texas Leica.
Like to thank Mike Thomas for his insight into this camera.
Saturday 23 June 2012
The Focus finder.
This is a
wonderfully simple piece of darkroom equipment. Basicly it is a magnifying glass
and mirror. It provides the user with the optimum sharpness for the enlargement
by focusing on the grain of the negative.
Also known
as a grain magnifier it rests on the masking frame where it diverts a small
amount of light from the projected negative to your eye as you look through the
small magnifying lens. With one hand on the focusing control of the enlarger
you gently turn the knob until the grain becomes sharp in the mirror. This
translates to a sharp image at easel level; to maintain this accuracy a piece
of waste photographic paper should be placed in the masking frame with the
magnifier on top. It is easiest to focus on the grain with the enlarging lens
set at its widest aperture and then re-checked at the working aperture. To make
sure that the focus has not changed.

Some focus finders can only be used in the central area of the projected image. This is because the angle of the light is more severe at the edges and corners. If you wish to check these areas to make sure that the whole negative is in focus you will need a magnifier that allows for this with a wider mirror and tilting aim.
Monday 18 June 2012
Post cards from the Humber!

Recently I teamed up with my wifefor a bit of an experiment and road trip. I loaded the Olympus mju compact with a roll of eight years out of date colour film. The idea was to share the camera between us taking pictures as we went along. Once the roll was finished I took it in to be developed at snappy snaps. No special instructions were given. The results speak for themselves. What if the film had been blank? Notch it up to experience and move on. Wouldn't it have been a waste of time and money? No! we still have the memories of an afternoon well spent, plus we had the 'mystery' to look forward too!


Monday 4 June 2012
Adox art series to be developed in PMK pyro.
 |
| Adox art series CHS 100. ISO 100 |
It has been a long time since I mentioned that I was going to do a test development using PMK Pyro on Adox CHS 100 art series. What with the weather being unseasonally wet and other things getting in the way I have not been able to do the test exposures. I prefer to take the pictures outside on a bright day without fast moving clouds. Something that has not been forthcoming. The light level needs to be constant for the eighteen frames it takes to produce three test strips of two F numbers over and two F numbers under the metered reading.
I'm pleased
to say that the other day, weather and time to expose the film coincided which
has resulted in a film waiting to be developed. Something that requires a spare
four hours to do whether all in one go or over several days. See Agfa test formethod.
Friday 6 April 2012
Silverproof paper
 This is
the second run of budget priced paper
marketed by Silverprint and has a matt finish. The first run was gloss. I have
used the later and was impressed with the photographs it produced. With its
grades being limited to two I was not put off.
This is
the second run of budget priced paper
marketed by Silverprint and has a matt finish. The first run was gloss. I have
used the later and was impressed with the photographs it produced. With its
grades being limited to two I was not put off. |
| Ilford FP4+,120 fromat 6x6 negative, Developed in PMK Pyro and printed on Silverproof paper Matt. |
Then a
second batch was announced on Matt paper, which is a finish I'm not a fan of,
but I'm always happy to try something new. This will also be a limited retail
run, so if matt is your preference get some boxes in while you can.
 |
| Ilford FP4+ 120 Format 6x6 negative, Developed in PMK Pyro and Printed on Silverproof paper Matt. |
The paper is
completely different from what I'm used to. It is difficult to tell which is
the emulsion side in the darkroom but with a little practice, the back has a
slight fibre feel to it which takes a
time to get the hang of. First impressions are good, the photographs remind me
of the cover page to Black and White Photography magazine in the way it looks
and feels but has a depth to it that ink cannot replicate. It also does not
have that richness of tone you get with gloss papers. Having said that, I like
the difference and expressiveness it gives to the pictures it produces.
 |
| Ilford FP4+ 120 format 6x6 negative, Developed in PMK Pyro and printed on Slverproof Paper Matt. |
Monday 19 March 2012
Prints to hard or to soft.
 |
| High contrast |
What are the signs that a print has been printed to hard? The shadow areas are jet black with no detail and the highlights are blank (the contrast is to great). Assuming that the negative being printed shows none of these traits then it can be corrected by the following:
●
Use
a softer grade of paper.
●
Make
sure that the exposure time is correct.
●
The
paper is in the developer for the right amount of time.
●
Don't
use a high contrast developer.
 |
| Low contrast |
●
Use
a harder grade of paper.
●
Increase
the developing time. If the development time is to short it may cause cloudy spots.
●
Make
sure the developer is not too diluted.
●
Also
check that it is not exhausted.
There are
other possibilities:
●
Your
darkroom may not be light tight fogging the paper creating an overall grey
cast.
●
The
paper maybe to old or has not been stored properly.
Once you
establish what the problem is, the cure will speak for it's self.
Related posts:
Evaluating your test strips
Darkroom fog.
Related posts:
Evaluating your test strips
Darkroom fog.
Sunday 29 January 2012
Choosing an enlarger.
This is
the most important tool in the darkroom after the enlarging lens. With this in mind you need to consider the following:
1. The number of negative sizes you may
wish to print. It is a good idea to get a multi format enlarger even if you are
only going to use 35mm.
2. The most appropriate lens size and
quality.
3. What type of negative illumination.
Diffuser or Condenser.
4. The maximum size of print you are
likely to make.
5. Whether you may want to do colour at
a later date. Colour headed enlargers can be used with multigrade papers.
As mentioned
in “3” the type of negative illumination you choose is worth a lot of consideration - there are positive and negative points to both.
Here are some of the pros and cons:
Diffuser
enlarger:
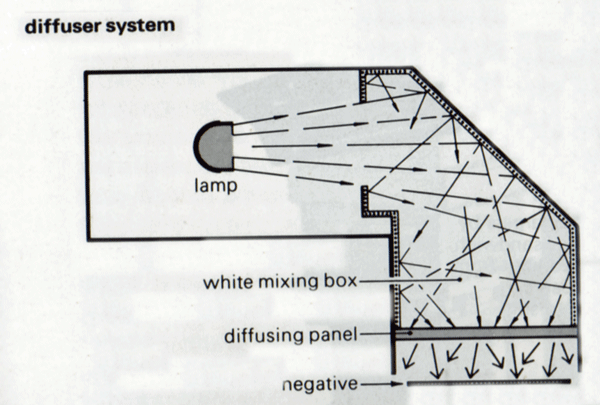 |
| Diffuser light box |
There are
tonal differences between diffuser and condenser produced photographs because
of the way light passes around the silver particle's. This is negated when
using Chromogenic monochrome and colour films as they rely on dyes to capture
the light.
Condenser
enlarger:
 |
| Condenser light box |
Tuesday 17 January 2012
Colour film well out of date.
The
friend that gave me the out of date colour film did so in part for the removal of a
partly exposed roll of film from her Dads camera a week or so earlier. She was
not sure if it had become stuck or not.
 The camera
was an Olympus OM707. The battery carrier lid was broken and held in place with
sticky tape and not working. The batteries were flat, so I tried some new ones
but there was still no life which is a shame as it was in good order otherwise
and had been in regular use up until eight years earlier. I had not come across
this camera before so was not sure if I would be able to unwind the film
manually. I found a re-wind button on the base plate, pressed it and went into
the darkroom and opened the back. I took the cassette out first then gently
pulled on the film and to my surprise it started to unwind. Once the film was
fully removed I wound it back into the cassette.
The camera
was an Olympus OM707. The battery carrier lid was broken and held in place with
sticky tape and not working. The batteries were flat, so I tried some new ones
but there was still no life which is a shame as it was in good order otherwise
and had been in regular use up until eight years earlier. I had not come across
this camera before so was not sure if I would be able to unwind the film
manually. I found a re-wind button on the base plate, pressed it and went into
the darkroom and opened the back. I took the cassette out first then gently
pulled on the film and to my surprise it started to unwind. Once the film was
fully removed I wound it back into the cassette.

 A couple of
weeks later I found out that the film had been developed and to her surprise it
had produced some excellent results. It just goes to show even with a partly
exposed colour film that has been sitting in a camera for eight years and
extremely out of date, it can still produce some unexpectedly good results!
A couple of
weeks later I found out that the film had been developed and to her surprise it
had produced some excellent results. It just goes to show even with a partly
exposed colour film that has been sitting in a camera for eight years and
extremely out of date, it can still produce some unexpectedly good results! Yes I will
admit that it is a risk when using film well outside the bbd; even more so with
colour but I do not believe, like some, that you should only use this film with
a so called toy camera as it suggests that if it goes wrong then it's “OK!” You
just have to look at the lomograph site to see some excellent photographs.
Personally you should have the courage of your conviction, use the best camera
you can lay your hands on and embrace the results no matter what!
Yes I will
admit that it is a risk when using film well outside the bbd; even more so with
colour but I do not believe, like some, that you should only use this film with
a so called toy camera as it suggests that if it goes wrong then it's “OK!” You
just have to look at the lomograph site to see some excellent photographs.
Personally you should have the courage of your conviction, use the best camera
you can lay your hands on and embrace the results no matter what!
The colour
pictures attached to this post were taken on my F5 on Agfa vista neg film that
could have been out of date by fifteen years or so and kept in “iffy”
conditions. So I walked into Lincoln on a warm sunny day with this film and an open mind. If I had listened to the doom and gloom
merchants it was likely a waste of time! As it happens it was a good result
even though I would have liked some colour shift to the pictures.

Related Posts:
Saturday 14 January 2012
PMK Pyro after bath.
I have
been developing Ilford FP4+ 120 format in PMK Pyro for ten minutes for quite some time, without an afterbath.
With my latest use of this developer I decided to change part of the
process, instead of inverting the tank every twenty seconds I changed
it to every fifteen seconds to see if this increased the density of
the negatives. My reasoning is that previous negatives have looked a
bit on the thin side. Yes you are right! I could have increased the
developing time but wanted to find out how much influence agitation
has on the process.
 |
| FG 1 Film FP4+ |
When changing or
adapting a method that works well, it is better to change one aspect
of it at a time so that it makes it easier to judge whether it is an
improvement or not. So what did I do introduce a re-bath of the film
in the developer after the fix. The after bath is part of the full
process when using PMK pyro that completes the staining. Up to now I
have not felt the need to do this but was curious to see how much
stain would be added and if it improves the print quality. I did this
for the two minutes suggested which I agitated for thirty-seconds at
the beginning and ten seconds one minute later.
 |
| FG 2 Film FP4+ |
There has been a marked difference
in the density and the colour of the staining on the negatives. The
picture marked Fg 1 shows the negatives developed with the afterbath,
they have a yellow-brown look to them. Fg 2 shows negatives
without the bath and they have a purplish look to them.
These results
would suggest that an increase in agitation has just as much effect
if not more on the density of the negative than an increase in the
process time. The afterbath also produces a significant change in how
much stain is deposited which is supposed to help in making these
negatives easier to print. I have found that even without the extra
staining I have been producing some wonderfully toned photographs. I
have not printed this latest set of negatives yet but hope to do so
soon.
Related Posts:
FP4+ PMK pyro method update.
PMK Pyro developer part B
PMK Pyro working solution
Related Posts:
FP4+ PMK pyro method update.
PMK Pyro developer part B
PMK Pyro working solution
Friday 6 January 2012
Film storage.
 |
| Out of date colour film. Upto four years on some boxes |
How do you define
fresh? A film that has a long expiry date, one that has been kept refrigerated
most of its life or even in the deep freeze. It is true to say that film used
before the manufactures expiry date, which by the way is a conservative
indication of when it should be used by, will yield the best results provided
that it has been kept properly. The manufacturers suggest that normal conditions are temperatures of no
greater than 24 degrees C (75 F) and a relative humidity of 40% to as much as
60% in some cases. At temperatures and humanities greater than this will cause
the emulsions to age far quicker. Normal conditions also refer to the fact that
the film should only be removed from, in the case of 35mm from its plastic
container and roll film from its foil wrapper just prier to use. Once the film
has been exposed the rate of deterioration increases so you should not leave it
to long after the roll is finished, to develop the latent image. It is
reasonable to say that monochrome film
is more robust relatively speaking to colour film which has a greater number
of delicate layers for the atmosphere
to attack and if stored badly will increase the likely hood of a colour shift.
 |
| Fg 1 Film 35mm, FP4, developed in ID11. Printed on Ilford MGr paper |
Freezing is
an extreme method of slowing the ageing process and can cause problems with condensation and ice particles.
Refrigeration is the most popular with film photographers but should be treated
with care and common sense. At one time I used this method but not any more as
it is not suitable with the way I work. Instead I use a floor standing Cabernet
that is out of direct sunlight and away from direct heat. I have used this
method for years with no ill affects. I also pay little attention to expiry
dates as experience has shown me that it has had little affect on my results
thus far.
 |
| FG 2 Same as above. |
A couple of
years ago I was sorting out some boxes of darkroom kit when I came across some
containers of FP4 that was about twenty years out of date. I say twenty but on
thinking back it's probably closer to thirty years or longer. The pictures (fg1
& fg2) are the results from one of those rolls of FP4 which was mistakenly
exposed at ISO 400. Half the film was developed in ID11 and timed for HP5 and
the other was developed in Rolie R3 developer and timed for 400 iso. With results like this it makes
me wonder whether refrigeration is necessary for monochrome emulsion if stored
with care.
Related Posts:
Colour film out of date
Wednesday 4 January 2012
Test strips before printing.
The
test strip is the foundation to obtaining a good final print. Unless you have one of RH designs excellent Analsyser Pro enlarging meters. If not the most common way of
producing a test strip is with a sheet of card moved at timed intervals across
light-sensitive paper. There are several things you need to set before doing
the test: the size of the print, the aperture of the enlarging lens and making
sure you have sharp focus.
 |
| 10 x 8 test strip. |
What
should the time separation be?
A good starting point for prints around the ten by eight size is five seconds.
These intervals will give you a rough idea of what the exposure should be. This
can be refined with further test strips of two and/or one second if needed.
On
what grade of paper should you make the test print? Grade one is standard practice. If the method you use places your negatives at a particular grade In my case it is grade three then you should do your test print at that grade unless you are using the split grade method.
Related posts:
Evaluating your test strips
Related posts:
Evaluating your test strips
Tuesday 3 January 2012
Enlarging a section of the negative.
 |
| Picture from a 120 FP4+ ISO125 6x6 negative developed in ID11 and printed on Ilford MG paper Processed with Ilford MG Developer. Landscape format |
 |
| Portrait format |
As one of those people that works with 6x6 negatives, cropping and reframing is all part of making the picture fit the paper. I'm not complaining but the fact is all paper sizes are oblong. I think this has helped me in getting the best from my pictures. I do not waste time in trying to make the whole negative fit the page; this is heresy to some who believe that having carefully framed the view that you should print as you saw it! This is not always possible, especially when you have a certain size of print in mind. Sometimes this careful framing once projected on the enlargers baseboard may look better with horizontal or vertical framing. Do not be afraid to play.
 |
| Square Format |
Sunday 1 January 2012
Enlarging the negative. How big?
 Depends
on how crisp the negative is!
If it is razor sharp there is no reason why you cannot enlarge it to its
maximum. A thirty-five millimeter negative should be able to produce a 24 x 30
centimeter print with ease and in exceptional cases 50 x 60 cm. To check if the
negative is of a good enough quality, enlarge part of the frame to 18 x 24
centimeters, if it looks a bit grainy the chances are that when the whole
negative is enlarged to 50 x 60 cm and viewed from a meter away it will look
good.
Depends
on how crisp the negative is!
If it is razor sharp there is no reason why you cannot enlarge it to its
maximum. A thirty-five millimeter negative should be able to produce a 24 x 30
centimeter print with ease and in exceptional cases 50 x 60 cm. To check if the
negative is of a good enough quality, enlarge part of the frame to 18 x 24
centimeters, if it looks a bit grainy the chances are that when the whole
negative is enlarged to 50 x 60 cm and viewed from a meter away it will look
good.
When
enlarging to larger sizes you need to take into account the distance that
people will see the picture from. Large photos are rarely viewed up close.
Saturday 31 December 2011
Magnification on your enlarger
This
is going to get a bit technical, so
bear with me! This is the ratio between the print and the negative. It is
calculated using the linear rule. To make things easy, lets say we are going to
enlarge a thirty-five mm negative (24 x 36 mm) by a factor of ten this will
give us a print size of 240 x 360 millimeters ( about 9" x 14") in
size.

Magnification
is related to the distance the negative is from the enlarging lens and the lens
from the baseboard. So as the latter distance increases the former decreases.
In other words the higher the enlarging head is from the baseboard the closer
the lens gets to the negative when it is being focused and vice versa. It
stands to reason that the larger the print the longer the exposure time will
need to be. There will also need to be a change in paper grade to a harder one
as there is a softening in the contrast.
Saturday 24 December 2011
Keeping your negatives safe.
Is important!
You need to make sure that the method you choose will keep your
negatives flat and safe from damage. The cheapest way may not be the
best course to take in the long run.
 You can buy loose
leaf pages in plastic or paper divided into six for 35mm film which
will hold thirty-six frames cut into lengths of six. They have a
white edge with ring binder holes that allow you to store the pages
in albums/ folders or box folders. (I think the latter is the better
solution from experience.) The white edge also means that you can
write details on it like the method of development and/or a serial
number, this will help you together with a contents list at the front
of the album/folder to give you access to your negatives instantly.
You can buy loose
leaf pages in plastic or paper divided into six for 35mm film which
will hold thirty-six frames cut into lengths of six. They have a
white edge with ring binder holes that allow you to store the pages
in albums/ folders or box folders. (I think the latter is the better
solution from experience.) The white edge also means that you can
write details on it like the method of development and/or a serial
number, this will help you together with a contents list at the front
of the album/folder to give you access to your negatives instantly.
The same type of
leaves are used for medium format negatives 6x4.5 and 6x6. They are
divided into four and the negatives are cut into lengths of four and
three respectively.
It is important
that the negatives are completely dry, before you load them into the
storage leaf otherwise they will stick making it impossible to slide
them in. If you still have trouble inserting them when they are dry
you can snip off the corners of the leading frame of each strip.
Friday 23 December 2011
Filing systerm.
This
is down to personal choice as to what record keeping you attach to your
processed films.
You can write it in a notebook, a file on your computer or as I do along the
top of the film sheet. What data should you record:
1. Date it was developed.

2. Make and type of film.
3. Reference number of the film for
your files. I use format size and date of development as a reference number.
4. Developer used.
5. Dilution.
6. Development time.
7. Results.
The more
comprehensive your records are the more you will use it, to refine the
processing of your film. Ansel Adams believed in keeping meticulous records,
this maybe part of the reason his pictures are so well printed.
Thursday 22 December 2011
Spun dry?
 This
is the fastest way you can dry your negatives. I had forgotten about this method
until recently. Why? because it is the first time I have had access to a
spinner. I recollect that there was/is opposition from other photographers in
the use of the centrifuge method but cannot recall for what reasons.
This
is the fastest way you can dry your negatives. I had forgotten about this method
until recently. Why? because it is the first time I have had access to a
spinner. I recollect that there was/is opposition from other photographers in
the use of the centrifuge method but cannot recall for what reasons.
The process
is quite simple, you leave the film in the spiral attach a long hook to the
side of the drum so you can hange the spool from it, close the lid and run for
one minute. When removed the film is completely dry. That's quick! and no
drying marks!
Saturday 17 December 2011
Drying cabinet.
 The
safest and one of the quickest ways of drying your film.
The cabinet has a built in heater that gently blows warm air over the
negatives lessening the amount of time that particles in the
atmosphere can attach to your valuable film. They can be dry in
fifteen minutes.
The
safest and one of the quickest ways of drying your film.
The cabinet has a built in heater that gently blows warm air over the
negatives lessening the amount of time that particles in the
atmosphere can attach to your valuable film. They can be dry in
fifteen minutes.
If, like me, you
only have a small darkroom then a cabinet may not be practical within
the room itself. You could place it outside but the problem I have
with that is it looks like a gym locker, making it a blot on the
landscape wherever you put it! Oh! and they're not cheap! Make your
own mind up!!
Friday 16 December 2011
The results of my first use of PMK Pyro
The
results are not faultless.
I will come to that later, first I have forgotten to mention that the
films being processed are Ilford FP4+, used at ISO 125. 120 format
producing a 6x6 negative. Now I'll outline the procedure used.
- The working solution was made up using filtered tap water at 21 degrees C and poured in straight away.
- Once the developer was in the tank I agitated it continuously for the first minute.
- The tank was inverted twice every 20 seconds and tapped to dislodge any bubbles.
- stopped, fixed and washed as normal.
I did not re-dip
the film in the developer after fixing to intensify the staining.
This is up to you but I was advised it did not make a noticeable
difference.
Whenever I
process a film I find that I'm a bit apprehensive as to what the
outcome will be, even more so with a new developer! so just before I
wash the film I have a little look to see if there is a negative, so
far I have not been disappointed.
 First
impression, once the
film was dry I noticed there weren't any water staining marks, that's
a bonus. The film base has a slight mauve colour to it which
increased in strength slightly with longer development times. The
negatives overall were evenly processed. The contact prints revealed
that there are dark spots on the neg's which I think may have been
caused by air bubbles. I have just processed another film this time I
gave it a two-minute pre-soak and there are no black spots on the
negs.
First
impression, once the
film was dry I noticed there weren't any water staining marks, that's
a bonus. The film base has a slight mauve colour to it which
increased in strength slightly with longer development times. The
negatives overall were evenly processed. The contact prints revealed
that there are dark spots on the neg's which I think may have been
caused by air bubbles. I have just processed another film this time I
gave it a two-minute pre-soak and there are no black spots on the
negs.
To
re-cap: Two minute
pre-soak, pour developer in and agitate for first minute, then invert
tank twice every twenty-seconds, stop,fix and wash as normal. You
should get some very very fine grain negs.
I have printed
four pictures so far. The first two on Foma 113 variant gloss, F11
grades 2.5 and 3 and they have a cool tone to them. The next two on
Ilford multi-grade gloss, F11 grade 2 and 2.5, these have a warmish
tone to them. Both papers were developed in Ilford -multi-grade print
dev.

The pictures that
appear in this post have been scanned from prints and do not convey
how well they have printed. These are straight prints with no dodging
or burning in. I wanted to show how well the negatives have printed
and how evenly they have developed. I will be producing a final print
set on FB paper at a later date using a mix of ordinary and warm tone
developers.
Will I
use Pyro again? Yes!
it is likely to become my default film developer. The grain produced
by this developer is minut to the point of making it difficult to see
when focusing the negative for enlargement. I feel that the
twenty-second double inversions of the tank is a bit fraught but I
think it will get better the more I get used to it. Without Trevor's
advice it may have taken a few more films to get it right. Thanks
Trevor!
Other articles from this blog on PMK Pyro
What next?
Agfa test strips.
Working solution
Solution B
After bath
FP4+ development
Adox art
PMK Pyro raw
Making up PMK Pyro from raw
Adox results
Negative comparison with PMK Pyro
PMK Pyro grain comparison
Other articles from this blog on PMK Pyro
What next?
Agfa test strips.
Working solution
Solution B
After bath
FP4+ development
Adox art
PMK Pyro raw
Making up PMK Pyro from raw
Adox results
Negative comparison with PMK Pyro
PMK Pyro grain comparison
Drying the negatives.
 Where
to dry your film once they have been washed and you do not have a
drying cabinet. It is not good practice to hang them near a vent or
radiator. The turbulent air that these areas create can force hair,
dust specs etc to land and stick to your damp film. One of the best
places is in the bathroom where in most cases the room is at constant
temperature and the level of dust is less because of the higher
humidity.
Where
to dry your film once they have been washed and you do not have a
drying cabinet. It is not good practice to hang them near a vent or
radiator. The turbulent air that these areas create can force hair,
dust specs etc to land and stick to your damp film. One of the best
places is in the bathroom where in most cases the room is at constant
temperature and the level of dust is less because of the higher
humidity.
You should attach
a special film clip to the top end of the film and one to the bottom
to add weight. This will also reduce curl once it has dried. The film
is best hung wet and any excess water is removed with wiping tongs
(double-sided squeegee). This also helps with the elimination of
drying spots. I can tell you from experience that if these tongs are
not spotlessly clean they will scratch your negatives. It is better
to leave the film to air dry and remove the water with a well washed
soft leather cloth, you keep especially for the job. You can wait
till it is dry, use a film cleaner and soft lens cloth to remove the
water marks. In both cases only wipe the shiney side of the film.
Subscribe to:
Posts (Atom)