Pages

Showing posts with label paper. Show all posts

Sunday 30 September 2012

Alternative way to check your fix is still fresh.


Here are two simple and easy ways of checking that the fix is not exhausted. The bottom line is if in doubt, throw it out.

  1. Take a drop of fix and place it on some blue litmus paper, if it turns red the fix is still active, if the paper remains blue it is exhausted. Rapid acting fixes by their nature will get exhausted more quickly than an ordinary one. When fixing paper you may expect to get thirty to forty 18 x 24 cm ( 8”x 10”) sheets per litre.
  2. Take ten ml of fix and add ten drops of potassium iodide solution to the measuring jar and stir. If the milky solution does not clear after it has been shaken then the fix is exhausted and a new batch should be made up. If it clears the fix is OK to use. Make up your Potassium iodide solution from two point five grams of powder and add a thousand ml of water and mix. This method does not apply to rapid fixes.

These methods will work for your film fixes as well. But the milk test you do for film will not work with paper as you cannot see this stage with paper.

Saturday 7 July 2012

The masking frame


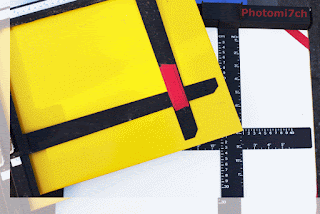
Also called an easel they come in different sizes. It is a good idea to pick one that is larger than your current needs therefore not limiting the proportions of your enlargements. The main reasons for using a masking frame are to hold the paper flat, to reconfigure the composition, allow the margins to be adjusted to the various format sizes you wish to use and to crop out some of those bits that creep in at edges, that you didn't see before you pressed the shutter. 

The frames come with two or four independently adjustable blades on a yellow or white base. I have noticed that some blades are not set at right angles to each other so it is a good idea to check them at various settings with a set square to make sure they are true. Also make sure that the edges of the blades are not bevelled under. This will reflect the light and produce a thin black line around the edge of the picture. It can be a nice affect but one you should have control over. The light colour of the baseboard is so you can see the projected negative, enabling you to frame the image before you put the photo paper in place.

When using single weight papers on a white baseboard, it is possible for the light to pass through the paper and be reflected back, changing the value of the exposure. You can stop this by laying a dark coloured card on the baseboard with the light sensitive paper on top.

The most versatile of the masking frames is the four blade, it allows you to mask the image by only having to move the blades of the frame without having to re-a line the whole easel each time. It also gives better control over how big or small you make the margins and in some cases gives you the ability to produce borderless prints. The versatility of these frames makes them quite expensive to purchase.

Saturday 5 May 2012

Light striped prints


Another printing fault is light pollution known as fog. This is assuming it hasn't happened in the camera.


The dark line you see running up this picture
 it the result of light
getting to the light sensitive material. Fogging .

         It Could be where stray light from a darkroom not properly blacked out has found its way to the light sensitive side of the the paper you're using.

         Your safe light is too close to the enlarger and or the wrong colour.

         It can also happen if your enlarger leaks light when being used.

         Badly stored and out of date paper can also be fogged.

The causes of these faults, also point to ways of curing them. This post suggests a way of detecting light induced fog.

Friday 6 April 2012

Silverproof paper


This is the second run of budget priced paper marketed by Silverprint and has a matt finish. The first run was gloss. I have used the later and was impressed with the photographs it produced. With its grades being limited to two I was not put off.

Ilford FP4+,120 fromat 6x6 negative, Developed
in PMK Pyro and printed on
Silverproof paper Matt.
I originally purchased the gloss paper for contact prints and didn't really take much notice of how well they were being produced until I obtained a 12 x 16 slottie (Nova paper processor. which was the dirtiest bit of kit I have ever purchased second hand, a story for another post). The silver proof paper was the largest sized paper I had on the shelf and I was  impatient to see how well this new piece of kit worked. I was surprised by the tonality of the paper which lead me to make a series of photographs. It is a shame it was a limited retail run. It will missed.

Then a second batch was announced on Matt paper, which is a finish I'm not a fan of, but I'm always happy to try something new. This will also be a limited retail run, so if matt is your preference get some boxes in while you can.
Ilford FP4+ 120 Format 6x6 negative, Developed
in PMK Pyro and Printed on
Silverproof paper Matt.
The paper is completely different from what I'm used to. It is difficult to tell which is the emulsion side in the darkroom but with a little practice, the back has a slight  fibre feel to it which takes a time to get the hang of. First impressions are good, the photographs remind me of the cover page to Black and White Photography magazine in the way it looks and feels but has a depth to it that ink cannot replicate. It also does not have that richness of tone you get with gloss papers. Having said that, I like the difference and  expressiveness  it gives to the pictures it produces.   

Ilford FP4+ 120 format 6x6 negative, Developed
in PMK Pyro and printed on
Slverproof Paper Matt.
The pictures that complement this post were developed in a warm tone developer from Ilford with the enlarger set at grade two, initially it was set  at  grade three but I found that the pictures had to much contrast. On hindsight it may have been better to use an un-toned developer, but then I was not planing to use the proof paper for a full print session. I got carried away after the first test prints and I'm pleased I did.


Friday 6 January 2012

Film storage.


Out of date colour film.
Upto four years on some
boxes
The recent receipt of ten rolls of out of date colour negative film from a friend has prompted me to share my experience with issues around the storage and freshness of film.


How do you define fresh? A film that has a long expiry date, one that has been kept refrigerated most of its life or even in the deep freeze. It is true to say that film used before the manufactures expiry date, which by the way is a conservative indication of when it should be used by, will yield the best results provided that it has been kept properly. The manufacturers suggest that  normal conditions are temperatures of no greater than 24 degrees C (75 F) and a relative humidity of 40% to as much as 60% in some cases. At temperatures and humanities greater than this will cause the emulsions to age far quicker. Normal conditions also refer to the fact that the film should only be removed from, in the case of 35mm from its plastic container and roll film from its foil wrapper just prier to use. Once the film has been exposed the rate of deterioration increases so you should not leave it to long after the roll is finished, to develop the latent image. It is reasonable to say that  monochrome film is more robust relatively speaking to colour film which has a greater number of   delicate layers for the atmosphere to attack and if stored badly will increase the likely hood of a colour shift.
Fg 1
Film 35mm, FP4, developed in ID11.
Printed on Ilford MGr paper 

Freezing is an extreme method of slowing the ageing process and can cause  problems with condensation and ice particles. Refrigeration is the most popular with film photographers but should be treated with care and common sense. At one time I used this method but not any more as it is not suitable with the way I work. Instead I use a floor standing Cabernet that is out of direct sunlight and away from direct heat. I have used this method for years with no ill affects. I also pay little attention to expiry dates as experience has shown me that it has had little affect on my results thus far.

FG 2
Same as above.
A couple of years ago I was sorting out some boxes of darkroom kit when I came across some containers of FP4 that was about twenty years out of date. I say twenty but on thinking back it's probably closer to thirty years or longer. The pictures (fg1 & fg2) are the results from one of those rolls of FP4 which was mistakenly exposed at ISO 400. Half the film was developed in ID11 and timed for HP5 and the other was developed in Rolie R3 developer and timed  for 400 iso. With results like this it makes me wonder whether refrigeration is necessary for monochrome emulsion if stored with care.

 It would seem that all film users over estimate how quickly film deteriorates. Each person needs to look at the way they use film and what sort of climate they live in, then take the appropriate action to comply with normal conditions. 


Related Posts:

Colour film out of date
Wednesday 4 January 2012

Test strips before printing.


The test strip is the foundation to obtaining a good final print. Unless you have one of RH designs excellent Analsyser Pro enlarging meters. If not the most common way of producing a test strip is with a sheet of card moved at timed intervals across light-sensitive paper. There are several things you need to set before doing the test: the size of the print, the aperture of the enlarging lens and making sure you have sharp focus.

10 x 8 test strip.
Once all this is done how big should the test print be? This is down to personal choice but you should consider whether the use of whole sheet, half, third or strips give the best test results. If using a test strip of about two inches (50 mm) you need to make sure that each segment includes a full range of tones from the lightest to darkest so you can see at which timed interval gives the best high values and shadow areas. It is much easier to achieve this with the larger test strip.

What should the time separation be? A good starting point for prints around the ten by eight size is five seconds. These intervals will give you a rough idea of what the exposure should be. This can be refined with further test strips of two and/or one second if needed.

On what grade of paper should you make the test print? Grade one is standard practice. If the method you use places your negatives at a particular grade In my case it is grade three then you should do your test print at that grade unless you are using the split grade method.

Related posts:

Evaluating your test strips

Tuesday 27 December 2011

Contact printing.


Now that you have your negatives safely stored and indexed, you need to sort out which negatives you are going to print. Trying to judge this by holding them up to the light or by laying them on a light box can be difficult. The best way is to produce a contact print showing all the frames on one sheet of photographic paper.

There are special frames that allow you to do this. You can buy contact print frames which consist of a glass top with film holders attached and a solid base with foam on that clips shut. For 35mm or 6x6 (medium format) which hold seven rows of six for 35mm or four row of three for medium format negatives. The frame holds the negatives so you can see the frame numbers on the print, you place them with the shine side up and put a soft grade light-sensitive paper on the base. Then shut the frame to bring the negatives in contact with the photographic paper, hence contact print.
Another method of contact printing is if you use clear plastic negative holders, you can place these directly onto the photographic paper. The problem with this method is it does not hold the negative completely flat to the paper which means that some of the pictures may be distorted. A way round it is a clean sheet of glass that is big enough to place over the negatives.

Wednesday 14 December 2011

Washing your negatives


This is just as important as the developing, stop bath and fixer. The temperature of the water needs to be close to that of the previous process of 20 degree C.

The purpose of washing is to remove the last of the fixer from the emulsion and needs to be done thoroughly to ensure the longevity of the negatives.

Which method to use? One way is to empty the tank and refill with fresh water and agitate for a few seconds, this should be repeated several times. Another way is to use a wash hose that is specially made to fit into the top of the developing tank and attached to the tap. I personally favor this approach with my own refinements: after fitting the hose in place I open the tap till it is nearly fully open and leave for thirty seconds, this vigorusly removes the last of the fix that remains. Then slow the flow right down for the next ten to fifteen minutes. It is a simple straight forward procedure that has served me well over the years.

Fixing negatives and papers


It is important to fix your negatives fully, this will ensure their longevity.

Fixing removes the last of any light-sensitive material from the negatives stabilising and securing the images so they can be viewed in day light. The temperature of the fix should be the same as the developer and stop bath, 20 degrees C.
Most fixers nowadays are rapid fixers supplied in liquid concentrate form and will complete the fixing process in about two to five minutes. (always check the instructions on the bottle) over fixing will start to bleach the negative. These fixers are usually suitable for film and paper. There is a chance in the case of warm tone papers that they may suffer from bleaching of their warmth with rapid fixers, it would therefore be better to use a more traditional fixer made up from a powder to ensure no loss of tone.


Thursday 8 December 2011

How to keep Fiber base photographs flat


This must be one of the most frustrating things about fiber base paper. It comes out of the wash tank like a limp rag and when it is drying it curls up like corrugated plastic but there is no getting away from the fact that photographs on fiber base paper have that something extra and it is worth the trouble in making sure they are flat.

Over the years I have used the cartridge paper and heavy books route to keeping my prints flat. I could use a special machine that dry's the prints using heat but I prefer the slower air dried method.

It wasn't until Dave Miller the founder of the film and darkroom users forum posted an article on his method for ensuring they dry flat, that life with FB paper has become so much easier. A big thank you to Dave for that article, without it I would still be using heavy books and would not be writing this post with my own refinement to his excellent method. My adaptation allows you to print right up to the edge with out trimming.

Equipment needed:

  1. Stick gummed tape to back of print
    A pane of glass large enough to cope with your largest print size.
  2. Adhesive brown paper tap that is made sticky by water. Available from most art suppliers.
  3. Craft knife.
  4. Scissors.
  5. Metal rule/ straight edge.
  6. Cartridge/ blotting paper.
  7. Sponge.
  8. Print squeege or leather.

My adaptation:

First of all you will need to remove any excess water from the print by hanging it for a short while and/or use a leather to dab it away.

  • Place pint on blotting paper before sticking to glass
    Cut a piece of cartridge/blotting paper slightly smaller than the print size.
  • Place on the glass.
  • Then place the photograph picture side down on the blotting paper.
  • Cut to length a strip of gummed brown adhesive tap.
  • Pull the tape tight and stick half the width on to the back of the print and smooth out. Remember that the print will still be damp so the tape will not need to be wetted.
  • Do the same for the other three sides. Once done turn the print over so it is picture side up.
  • sticking third strip of tape to glass
    Again cut a length of tape this time dampen it do not make it wet as it will not stick on contact but slide and fail to stick.
  • Pull the tape tight and stick to the tape at the top of the print half on and half off.
  • Wipe the damp sponge across the glass (again do not make wet as the tape will slide across the glass) and stick down.
  • Lift the print and place the blotting paper under the print and smooth down.
  • Next cut another length of tape for the bottom and do as before but once the tape is stuck to the tape and the glass is damp pull the print tight and stick down. This slight tension will keep the print flat.
  • Do the same for the sides.
  • Leaving to dry over night
    Leave to dry overnight.
  • To remove the prints once they are dry place a metal rule/straight edge along the side of the print and cut along all the sides with a craft knife. This will release the print perfectly flat.

Notes:


Used craft knife to free picture from glass
When moistening the tape to stick to the backing tape you only need to make it damp enough for it to contact stick - it is important that the whole length has been dampened. Then press it down firmly to the back of the print along its lengths and do the same when sticking tape to tape, otherwise it will allow the print to curl as it dry's, leaving a wavy edge. You can re-wet the print and lay it up again but it is better to get it right first time if you can.


To remove the tape from the glass it can be re-wetted and scraped off or place the glass in a dish of water to soak for about five to ten minutes.It will lift off with ease.

Saturday 19 November 2011

Fox Talbot a short history to his discovery


William Henry Fox Talbot born 1800 died 1877.

Fox Talbot was considered a polymath some of his interests and qualifications included Philosophy, Mathematics, Physics, Egyptology, Philology, Syrian, Chaldean cuneiform text and photography. Fox Talbot carried out his experiments at the family home which was Laycock Abbey Wiltshire.

Fox Talbot's sketch of Lake Como
using camera obscura.
 

The idea of photography came to Fox Talbot while he was on a family holiday at lake Como Italy. He was using a camera obscura and Lucida to aid his fruitless attempts to sketch the lake ( Pictured right is a sketch drawn by Fox Talbot of lake Como using a camera obscura in October 1833) He put these devices to one side and thought back to a procedure he had used with a camera obscura that put an object on to a piece of paper attached to the back plate; this image did not last long it disappeared like a ghost in to the night. It was at this time that he thought it would be nice to fix the image permanently to the paper.

Fox Talbot started looking in earnest for a way to fix an image to paper in 1834; he would first have to find a paper that could be submerged in a solution of salt and silver nitrate without it disintegrating. The result of combining these two chemicals would make silver nitrate a light-sensitive salt that was not affected by the moisture in the paper. He now had a paper that could be used for photogenic drawing. The first pictures he produced were of leaves and lace. He placed these on a sheet of light-sensitive paper and put a sheet of glass over them, then left them out in the sun.


Fox Talbot used many different types of camera to produce his pictures. There we a couple of cameras or boxes that only measured two or three inches which Fox Talbot left around the grounds of Laycock Abby in different places with light-sensitive paper in for about an hour at a time. They were nick named mouse traps by the family. His early cameras would use telescope or microscope lenses.

This is the picture of the famous Oriel window in the south gallery of Laycock Abby. It is the earliest surviving paper negative dated 1835. when originally taken you could count the two hundred tiny pieces of glass that made up the window with the help of a lens. This is a replica of the camera he used to take the Oriel window shot.

By chance in 1840 Fox Talbot discovered when re-sensitizing some paper that the image had appeared; this became known as the latent image. Before this time he was having trouble with the sensitivity of the papers. Although he had been able to fix the images by using a strong salt solution of potassium iodine of hypo to stop the images fading. This new discovery was a major break through that meant exposures could be achieved in one to three minutes instead of half hour or more. The year after Fox Talbot discovered how to make his photogenic drawing process more sensitive to light by adding Gallic acid to the process. He also found that a further treatment of Gallic acid and silver nitrate would bring the latent image out. It was time he changed the name of the process to Calotype (from the Greek "Kalos" meaning beautiful) the Calotype was a negative/positive process introduced in 1841. Strictly speaking Calotype should have referred to the Positive part of the process.


The advantages of the calotypes were unlimited prints from one negative, retouching could be done to the negative or print, the paper print was easier to see and could be handled with out damage and had warmer tones.


Some of the draw back of this process were that prints tended to fade; fibers in the paper reduced the quality of the print, making the focus soft but some people found this an advantage. Materials were less sensitive to light needing longer exposure.


For more information:

Friday 11 November 2011

Wet side of the darkroom.


On this side of the room you will have laid out your developing dishes in the following order: developer, stop-bath, fix, print washer and/or sink. These may have heaters under them or you can have a slotty laid out in the same way. Obviously this will take up less space.
Typical wet side layout


This is where you keep your chemicals, it is also the place that the solutions are poured out and back into their storage containers. The height of this table needs to be right so you can work comfortably in the standing position. It is a good idea to store these chemicals under the table if there is a leak it will go on the floor and not drip into your working dishes ruining your prints. For safety reasons it is not a good idea to lean over your dishes to retrieve items from shelves above while your working as you may knock the contents of the dishes over yourself.

Remember that these chemicals need to be treated with care and you should follow the safety advice recommended by the manufacturer.

Dry side of the darkroom.


Typical layout for dry side of darkroom
This is the area where you will have your enlarger set up. The table will need to be large enough to allow for timer, puffer (like a rocket air) and magnifying glass. There will also need to be space for you to lay out your negatives, printing paper, scissors and or guillotine/rotary trimmer and holding back and burning in tools. It is a good idea if this area also has cupboards and draws for keeping your paper and equipment in.