 You should
always base your process time on the latest information available
for your usual developer. Then be prepared to use these figures as a
guide or starting point. You should check each set of negatives
carefully, if they are starting to look dark/dense then you will need
to adjust the process time by say twenty per cent. If they are
looking thin/light then a slight increase in process time is needed.
It is a good idea to stick to one make of developer and film until
you understand what it is capable of. By doing so, you will be able
to extract every detail from the negative that was originally
captured. With experience comes knowledge.
You should
always base your process time on the latest information available
for your usual developer. Then be prepared to use these figures as a
guide or starting point. You should check each set of negatives
carefully, if they are starting to look dark/dense then you will need
to adjust the process time by say twenty per cent. If they are
looking thin/light then a slight increase in process time is needed.
It is a good idea to stick to one make of developer and film until
you understand what it is capable of. By doing so, you will be able
to extract every detail from the negative that was originally
captured. With experience comes knowledge.Monday 12 December 2011
Timing development
You should
always base your process time on the latest information available
for your usual developer. Then be prepared to use these figures as a
guide or starting point. You should check each set of negatives
carefully, if they are starting to look dark/dense then you will need
to adjust the process time by say twenty per cent. If they are
looking thin/light then a slight increase in process time is needed.
It is a good idea to stick to one make of developer and film until
you understand what it is capable of. By doing so, you will be able
to extract every detail from the negative that was originally
captured. With experience comes knowledge.Developer shelf life.
The keeping
qualities of photographic chemicals to a degree is dependent on
the dilution of the mix. In the first instance you should always
follow the manufactures recommendation when mixing stock solutions by
only adding the chemical to that quantity of water thus giving you a
known starting point. If you require a more dilute working developer
you should only make this up just before you are about to use it.
Once used it should be discarded.
 Reusable
developers are poured back into their containers when finished with.
Each time you pour it back a little bit is used up, it is a good idea
to keep these containers full to stop the developer going off. This
can be achieved in several ways if it is a plastic bottle you can
squeeze the air out just before you nip the cap up, add glass marbles
to the bottle so increasing its level, use a concertina bottle or the
plastic bag out of a wine box ( if using one of these make sure it
has been thoroughly cleaned.)
Reusable
developers are poured back into their containers when finished with.
Each time you pour it back a little bit is used up, it is a good idea
to keep these containers full to stop the developer going off. This
can be achieved in several ways if it is a plastic bottle you can
squeeze the air out just before you nip the cap up, add glass marbles
to the bottle so increasing its level, use a concertina bottle or the
plastic bag out of a wine box ( if using one of these make sure it
has been thoroughly cleaned.)
Remember that
developer that has been used is likely to go off more quickly. It is
a good idea to keep a record on each bottle of how many film or
prints and what format has been developed. When you think you have
reached the maximum usage discard it and make a fresh batch.
Sunday 11 December 2011
Agitating the developing tank.
The
main reason for inverting the developing tank
is to make sure that the film gets equal treatment in the
developer. One of the best ways of achieving this is to tumble the
tank by turning it from end to end.
 Why
do we agitate the tank?
The developer interacts with the emulsion
of the film. It vigorously attacks the silver it come into contact
with and becomes exhausted. By inverting the tank you refresh this
action, producing evenly developed negatives. It is
Why
do we agitate the tank?
The developer interacts with the emulsion
of the film. It vigorously attacks the silver it come into contact
with and becomes exhausted. By inverting the tank you refresh this
action, producing evenly developed negatives. It is
important
to get this right. To little agitation will allow by-products of the
process to build up, leaving pale-toned streamers as they slide to
the bottom of the tank. Likewise excessive inversions will produce
currents in the developer, creating uneven development. Most process
times allow for agitation.
Once the developer is added you
should agitate the tank for the first thirty seconds but before you
put the tank down give it a slight twist and tap it on a hard surface
( it is a good idea to lay a soft towel down so you do not damage the
tank) so you dislodge any air bells/bubbles that may have attached
themselves to the film. Then you need to agitate for ten seconds in
every minute of the process time about four inversion per ten seconds
or as the developer manufacturers instruction advise. For example PMK
Pyro recommend one inversion every fifteen seconds.
I have used this inversion method
from the start of my developing career ( no pun intended) and has
produced consistent results every time. Once you have found a method
that works for you; you should stick to it.
The Thermometer.
 This is one of
the most important pieces of kit in the darkroom. As already
mentioned temperature is one of the main controlling factors in the
processing of your films and prints. It is important that you have
good quality thermometers that are graduated to at least half a
degree but a quarter of a degree is better and one that has a thicker
line at the vital 20 degrees C. It is a good idea to have a
thermometer for each of the chemicals you use in the processing of
your films and prints as it will stop cross contamination.Also there
will be no hold ups if you break one. It is recommended that you keep
to one type, preferably alcohol as it is safer than mercury. If a
mercury thermometer breaks it will contaminate the chemicals it comes
into contact with and fog any prints that are being processed at the
time.
This is one of
the most important pieces of kit in the darkroom. As already
mentioned temperature is one of the main controlling factors in the
processing of your films and prints. It is important that you have
good quality thermometers that are graduated to at least half a
degree but a quarter of a degree is better and one that has a thicker
line at the vital 20 degrees C. It is a good idea to have a
thermometer for each of the chemicals you use in the processing of
your films and prints as it will stop cross contamination.Also there
will be no hold ups if you break one. It is recommended that you keep
to one type, preferably alcohol as it is safer than mercury. If a
mercury thermometer breaks it will contaminate the chemicals it comes
into contact with and fog any prints that are being processed at the
time.Saturday 10 December 2011
What temperature?
20
degrees centigrade is the standard temperature
that film development should be carried out at. It is also important
that this temperature be maintained throughout the process. You may
use a higher or lower temperature which will shorten or lengthen the
development time. There is a risk that the negatives may not be fully
developed; you should wherever possible follow the instructions as to
time and temperature unless an alternative has been suggested by
those instructions. With experience you will know what temperature
and time combinations give good results. I personally always develop
my film at 20 degrees C unless a higher or lower temperature is
recommended.
Friday 9 December 2011
Farmers reducer.
This is a
follow on from my last post on reduction.
Over developed or
over exposed negatives may need to be reduced to make them a better
printing prospect. This is achieved with chemicals that strip silver
from the final image. Like developing, reducing a negative requires
practice so you get an idea of how much to take away. It is best
carried out in a place that is well ventilated with diffused light so
you can see the process at work. It is a good idea to pre-soak the
film it will allow you more control by slowing the process down. With
experience you will get to know at what point to remove the negative.
The chemicals do not stop working instantaneously. Because you can
repeat this procedure it is better to reduce the negative in small
steps so as not to over do it.
Reducers can be
supplied ready mixed or you can mix your own. The formula that
follows is a proportional reducer for overdeveloped negatives:
Stock
Solution A
- Potassium Ferricyanide 7.5 grams.
- Water 1 litre.
Stock
Solution B
- Sodium thiosulphate (Hypo crystals) 200 grams.
- Water 1 litre.
Notes:
Ferricyanide has
good keeping qualitys if kept out of strong sun light. Once you have
mixed the chemicals you should use immediately. If you are using a
stepped method of reduction do not contaminate solution A with
Solution B as it will stop working. Working temperature of 20
degrees. You can place a dry negative in solution A but will need to
watch the process carefully for between 1-4 minutes then transfer to
solution B for about 5 minutes.
Potassium
ferricyanide is a poison.
Avoid contact with your skin and do not breathe the fumes.
Checking development times?
How do
you know that the negatives you are looking at are correctly developed and not
under or over exposed. The only way to be sure is to do a test. What follows is
a method to help you achieve this:
 •
Choose
a subject like a view or still life to take a series of photographs.
•
Choose
a subject like a view or still life to take a series of photographs.
•
First
you will need to determine what the correct exposure should be.
•
Then
set the camera settings to two stops under and take the picture.
•
Follow
this by setting it to one stop under and take another picture.
•
Now
enter the correct exposure settings and press the shutter.
•
Next,
one stop over and two stops over respectively.
•
Once
you have done this wind the film on two frames and repeat the procedure, once
done do the same again with a two frame separation so you now have three test
strips.
Once back in
the darkroom cut the film into three strips. Give the first section of film
half the recommended development time the second set twice the time and the
third group the suggested process time. Then compare the combined results of
exposure and development and you will be able to clearly see which was
developed correctly. It's worth the cost of a film to know that your films have
been correctly developed.
Thursday 8 December 2011
How to keep Fiber base photographs flat
This must
be one of the most frustrating things about fiber base paper. It
comes out of the wash tank like a limp rag and when it is drying it
curls up like corrugated plastic but there is no getting away from
the fact that photographs on fiber base paper have that something
extra and it is worth the trouble in making sure they are flat.
Over the years I
have used the cartridge paper and heavy books route to keeping my
prints flat. I could use a special machine that dry's the prints
using heat but I prefer the slower air dried method.
It wasn't until
Dave Miller the founder of the
film and darkroom users forum posted an article on his
method for ensuring they dry flat, that life with FB paper has
become so much easier. A big thank you to Dave for that article,
without it I would still be using heavy books and would not be
writing this post with my own refinement to his excellent method. My
adaptation allows you to print right up to the edge with out
trimming.
Equipment
needed:
A pane of glass large enough to cope with your largest print size.
Stick gummed tape to back of print - Adhesive brown paper tap that is made sticky by water. Available from most art suppliers.
- Craft knife.
- Scissors.
- Metal rule/ straight edge.
- Cartridge/ blotting paper.
- Sponge.
- Print squeege or leather.

My
adaptation:
First of all you
will need to remove any excess water from the print by hanging it for
a short while and/or use a leather to dab it away.
Cut a piece of cartridge/blotting paper slightly smaller than the print size.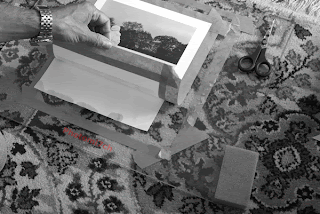
Place pint on blotting paper before sticking to glass - Place on the glass.
- Then place the photograph picture side down on the blotting paper.
- Cut to length a strip of gummed brown adhesive tap.
- Pull the tape tight and stick half the width on to the back of the print and smooth out. Remember that the print will still be damp so the tape will not need to be wetted.
- Do the same for the other three sides. Once done turn the print over so it is picture side up.
Again cut a length of tape this time dampen it do not make it wet as it will not stick on contact but slide and fail to stick.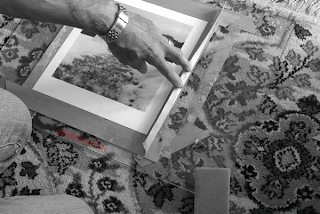
sticking third strip of tape to glass - Pull the tape tight and stick to the tape at the top of the print half on and half off.
- Wipe the damp sponge across the glass (again do not make wet as the tape will slide across the glass) and stick down.
- Lift the print and place the blotting paper under the print and smooth down.
- Next cut another length of tape for the bottom and do as before but once the tape is stuck to the tape and the glass is damp pull the print tight and stick down. This slight tension will keep the print flat.
- Do the same for the sides.
Leave to dry overnight.
Leaving to dry over night - To remove the prints once they are dry place a metal rule/straight edge along the side of the print and cut along all the sides with a craft knife. This will release the print perfectly flat.


Notes:
 |
| Used craft knife to free picture from glass |
To remove the
tape from the glass it can be re-wetted and scraped off or place the
glass in a dish of water to soak for about five to ten minutes.It
will lift off with ease.
Tuesday 6 December 2011
The story behind the Winter Picnic Photograph.
It
was round about this time last year (November/December 2010) that
the UK was in the grip of the worst cold spell for as it turns out a
hundred years. The country may have just missed coming to a
standstill but it stopped me in my tracks literally, as I couldn't
get the truck off the drive. The ice was a solid two inches thick not
allowing for any grip!
The
snow brought a brand new look to the area that I had not seen before,
so I thought I would go out and take some photographs of this fresh,
clean new wonderland of soft edges. Armed with my Bronica SQAi 120
format camera loaded with FP4 film I trudged gingerly off into the
countryside.
 |
| Picnic |
I
was quite surprised to find there we a lot of people out and about
with the same idea, walking the dog, playing and enjoying their
enforced day off work. As I strolled further afield the numbers
thinned until I was alone enjoying the crisp white land the snow had
laid out for me to photograph; so engrossed with the scenes before me
I forgot how bitterly cold it was until my throbbing freezing
fingers sent SOS messages to my brain and brought me back to reality
-“Shhahhhoi!!! Its cold.!” Pulling my gloves on the best I could
I made off in a hurry to warm up.
Briskly
walking up a path by one of the lakes the path turns a corner at the
top where there is a bench and from a distance it looks like someone
is sitting there! As I got closer I could see it was two people!
-”they must be mad!- and it looks like they are having a picnic!”
As I got closer I could see steam from their cups as they ate their
mince pies! An idea for this picture was forming as I approach them
to ask if they would mind being in the photograph. They did not mind,
so I walked back down the track a bit, set up the camera on the mono
pod, took a light reading and pressed the shutter. You're right! I
only used one frame, no back up or bracketing, the view that came to
mind is the one I took. After the shot was taken I walked back and
chatted for a while. Apparently they don't let a little bad weather
get in the way of them coming to their favourite spot! I wish them
the best of the season and moved on. Not so mad after all! I wish I
had thought to bring a hot drink with me!
I
am pleased to say that Picnic was one of the Pictures chosen for this
years Film and darkroom users Year Book. Which can be obtained from
Blurb.
 |
| FADU year books |
Film Developing faults.
The most common
faults that crop up
in the course of processing a film.
- Spots on the negative indicate two things: there was dust on the film at the time of exposure and/or fairly large round spots on the negative indicate that air bubbles were trapped against the film during the process and suggests insufficient agitation. This can be avoided by agitating for thirty seconds at the beginning of development and by tapping the tank on the bench. (some developers require longer agitation). It must be stressed that too vigious and lengthy agitation can induce the same problem. A way of helping to reduce air bubbles is to use a pre-soak. Some developers like PMK Pyro and Rollie's R3 require a pre soak as standard.
- Black crescent-shaped kinks and clear patches more common with roll film but can happen with 35 mm cassettes, this happens where the film has been forced into the spiral making the film kink and touching the film beside it.
- Lines are most commonly caused by the film running across a small piece of grit on the cassette opening. It can also happen by over tightening the film in the cassette and bad handling. One of the most common, which has happened to me, is the use of a squeegee to dry the film. I have not used one since.
- Finger marks on negatives are caused by handling the film with wet, dirty and contaminated fingers. This can be eliminated by using disposable gloves during the wet process and cloth cloves when handling dry negatives.
- White marks are caused by grease and fixer before development and dark marks by fingers covered in water or developer. Slight damage can be retouched.
- Reversal of negative image is due in part or total to solarization making the negative into a positive; this happens when light gets to the unprocessed film during development. Care must be taken with the processing tank that the lid is fully secure before inverting.
- Uneven image density is a sign that there is not enough developer in the tank or lack of agitation. A low-level of developer in the tank will show as a dark unprocessed line along the top edge of the film.
- Reticulation is a lot of fine cracks in the emulsion this is caused by washing in too high a temperature or solutions greatly different in temperature. This can be avoided by making sure that the solutions only have a few degrees difference between them.
- Deposits on the negative and discolouration. Hard water may cause a chalky deposit on the negative that cannot be washed away in water. It can be treated with a two percent solution of acetic acid, then washed in clean water. The same sort of problem may be due to the fix losing its acidity. A treatment would be to harden the negative in one percent solution of formalin, then wash in sodium carbonate followed by water. Yellow-white negatives may be due to deposits of sulphur from a decomposing fixer, it can be remedied by hardening in a one percent formalin solution and washing in a ten percent sulphite solution at thirty-eight degrees.
Over development
The film has been processed for longer than it needed. The following can cause this:
- Too long a development time.
- Too high a temperture. ( thermometers can go wrong.)
- Too much agitation.
Maximum-energy developer
With this type
of developer it is possible to double or treble the speed of a film.
These developers promote an extremely strong response in the
emulsion. They can increase the speed in a film that is too slow for
the job. It can reliably produce a speed increase of up to three
times with this pushed process. The big advantage with these
developers is being able to keeping the grain fine and a good degree
of sharpness. You need to be carefull when using them and follow the
instructions. There are a couple of makes that have these attributes:
Ilford Microphen and Promicrol.
How to load a plastic film sprial
This is
an outline on how to load a film spiral ready for processing.
The only way to
learn is to practice feeding a film onto a spiral in day light. I
suggest purchasing a cheap roll of 35mm film, probably colour. It is
also a good idea to have a brand new spiral to practice with. This
should make the learning curve less steep as older spirals get
temperamental the more they have been used.
 Prepare
the film: You can
use a cassette opener or film retriever for 35mm. Once you have the
leader/tongue of the film in view use a pair of scissors to cut it
square. Then snip the corner off each side, the film is now ready for
loading.
Prepare
the film: You can
use a cassette opener or film retriever for 35mm. Once you have the
leader/tongue of the film in view use a pair of scissors to cut it
square. Then snip the corner off each side, the film is now ready for
loading. |
Now lay out
everything you need on a table in daylight for a complete dummy run.
Set the developing
tank, lid, spiral with center in place and scissors out in the
same order each time to get a picture in your mind's eye, this way
you will know where everything is in the dark. Keep the film in your
hand. With your eyes closed load the film on the spiral, place it in
the developing tank, put the lid on and turn till it clicks shut.
Some tanks have a screw top so be careful not to cross thread it.
After a few practices you maybe ready to do it for real.
 Note:
Make sure your hands are clean and dry. Damp or sweaty fingers can
cause problems with the loading of the film and leave marks on the
processed negatives. It is a good idea to wear soft cotton gloves for
protection.
Note:
Make sure your hands are clean and dry. Damp or sweaty fingers can
cause problems with the loading of the film and leave marks on the
processed negatives. It is a good idea to wear soft cotton gloves for
protection.Tip: If you wash your hands in cold water before you start it closes the pores reducing the need for gloves. It is also a good idea to earth yourself on a radiator to stop charging the film with static electricity therefore attracting dust.
It is a lot
easier to do than it sounds, so don't be put off. Everyone has their
own way of doing this so if you have a tip to add please do.
This video
gives a straight forward no-nonsense look at how it is done.
Fine grain developers
 The
production of fine grain
in a negative is dependent on, in the first place, speed of the film
and the choice of developer. The object is to keep the structure of
the grain in the emulsion as small as possible so that it does not
show up in the enlargments. Fine grain developers are best suited to
films of medium speed about 125 ISO and above.
The
production of fine grain
in a negative is dependent on, in the first place, speed of the film
and the choice of developer. The object is to keep the structure of
the grain in the emulsion as small as possible so that it does not
show up in the enlargments. Fine grain developers are best suited to
films of medium speed about 125 ISO and above.
Some of
the best known fine grain developers:
Ilfords Microphen and ID11, Tetenal Ultrafin, Kodak D76, PMK Pyro is
a staining developer that produces a fine grain and for the new grain
techologies: Kodak HC110 and T max, Ilford LC29 and Tetenal Ultrafin
plus, just to name a few.
Friday 2 December 2011
Single shot developers.
 One shot
developers do what they say on the box! They are for single use
and have a quality advantage over reusable ones, also removing the
worries about usability. I know this may sound wasteful in these
times of rising prices, but what cost do you apply for peace of mind
when developing those precious negatives.
One shot
developers do what they say on the box! They are for single use
and have a quality advantage over reusable ones, also removing the
worries about usability. I know this may sound wasteful in these
times of rising prices, but what cost do you apply for peace of mind
when developing those precious negatives.
The advantages:
- Fresh developer each time.
- Ensures constant quality.
- Consistant developing times.
- No need to use replenisher.
In most cases
these days most developers can be used as single shot, in the case of
PMK Pyro and RO9 it is the only way.
What does developer do?

Trouble loading a plastic spiral.
 The plastic
Paterson type of spool can be difficult to load. A common problem
is the little metal balls that grip the film get stuck. Dont try to
force the film through, if you do it will kink the negative leaving a
half-moon shape. It can make the frame(s) useless. You will need to
part the spiral and start again. A pain I know! Be gentle when
removing the film, there is a chance of damage.
The plastic
Paterson type of spool can be difficult to load. A common problem
is the little metal balls that grip the film get stuck. Dont try to
force the film through, if you do it will kink the negative leaving a
half-moon shape. It can make the frame(s) useless. You will need to
part the spiral and start again. A pain I know! Be gentle when
removing the film, there is a chance of damage.
Damp or wet spool
will not load, so make sure it is completely dry before use. Sweaty,
damp or sticky fingers will make it difficult as well.
A too tightly
rolled up 35mm film in its cassette can take a set that makes it
tricky to load. So when rewinding the film back into the case dont
over wind it after you hear it has released itself from the camera
spool. With practice it is possible to leave a little bit of the
leader poking out.
Subscribe to:
Posts (Atom)