Pages

Saturday, 31 December 2011

Magnification on your enlarger


This is going to get a bit technical, so bear with me! This is the ratio between the print and the negative. It is calculated using the linear rule. To make things easy, lets say we are going to enlarge a thirty-five mm negative (24 x 36 mm) by a factor of ten this will give us a print size of 240 x 360 millimeters ( about 9" x 14") in size.
Magnification is related to the distance the negative is from the enlarging lens and the lens from the baseboard. So as the latter distance increases the former decreases. In other words the higher the enlarging head is from the baseboard the closer the lens gets to the negative when it is being focused and vice versa. It stands to reason that the larger the print the longer the exposure time will need to be. There will also need to be a change in paper grade to a harder one as there is a softening in the contrast.

Thursday, 29 December 2011

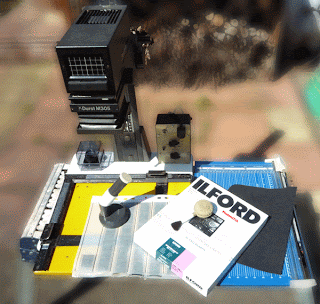
Printing. Basic amount of kit.


The minimum amount of kit you need to produce a photographic print.

  1. Enlarger with red filter and filter head (colour) or multi grade head. Without filter head separate multi grade filters. Enlarging lens.
  2. Enlarging frame 18 cm x 24 cm (7"x 9") two-blade.
  3. Orange/red safe light and ordinary light.
  4. Four dishes minimum size 18 cm x 24 (7"x 9").
  5. Three pairs of tongs, one each for developer,stop-bath and fix.
  6. Three funnels of different colours or marked dev'. stop and fix.
  7. A measuring jug of a 1000mls.
  8. At least three storage bottles for your chemicals.
  9. Timer with alarm or timer.
  10. Thermometer alcohol type times three but you can get away with one.
  11. Puffer brush.
  12. Multi grade paper.
  13. Paper cutter.
  14. Focusing device.


Wednesday, 28 December 2011

First Rule of printing


The first rule.

Printing stark black and white enlargements will not hide a lack of technical experience. You should develop your printing technics to such an extent that it improves the expressiveness of your photographs.

Tuesday, 27 December 2011

Contact printing.


Now that you have your negatives safely stored and indexed, you need to sort out which negatives you are going to print. Trying to judge this by holding them up to the light or by laying them on a light box can be difficult. The best way is to produce a contact print showing all the frames on one sheet of photographic paper.

There are special frames that allow you to do this. You can buy contact print frames which consist of a glass top with film holders attached and a solid base with foam on that clips shut. For 35mm or 6x6 (medium format) which hold seven rows of six for 35mm or four row of three for medium format negatives. The frame holds the negatives so you can see the frame numbers on the print, you place them with the shine side up and put a soft grade light-sensitive paper on the base. Then shut the frame to bring the negatives in contact with the photographic paper, hence contact print.
Another method of contact printing is if you use clear plastic negative holders, you can place these directly onto the photographic paper. The problem with this method is it does not hold the negative completely flat to the paper which means that some of the pictures may be distorted. A way round it is a clean sheet of glass that is big enough to place over the negatives.

Sunday, 25 December 2011

Test results for Agfa APX 100.


When taking pictures for the test it is best to choose a subject that is evenly lit. This will make the light reading more representative of the whole picture area. Unlike a high contrast view with deep shadows and strong highlights forcing you to take several light readings to find the average setting. It also makes it easer to evaluate the negatives once processed.
The processing of the film went well having spent all morning shuffling developing tanks, measuring jugs and developer bottles, the three strips of film have all been consistently processed. I am very pleased with the density of the negatives, when dry I will do a contact sheet so I can judge how well they will print.

You can see from the picture above, that the 13 minutes development time that digital truths massive dev chart suggests, is spot on. The results also show that you really do need to make a total and utter mess of things before you get a negative that will not print.
The light meter read negative at the centre
of the test strip.
There is a general guide to check whether a film has been correctly exposed and developed it should produce a continuously toned negative. The subjects deepest shadow should be perceptibly heavier than the clear of the film base. The areas that represent the brightest important detail in the negative must not be so dark that you can not read the printed words of a book through them on a sunny day as shown right. Its a quick way of checking to see if your negatives have been correctly developed.


The picture below shows the prints produced by the light meter read negatives in the centre of each of the test strips.

The difference between the top and centre is one and a half stops. bottom and centre is three-quarters of a stop. It is obvious that the longer you develop the less return you get for the time spent. Meaning that you will only get a slight improvement in the quality of your negatives for each minute of extra process time you give them over thirteen minutes.
These tests represent my own personal experiences I strongly encourage each individual to check this film out for themselves. The experiments I have carried out are not exhaustive and should only be used as a starting point.


Related posts:

Sorting out the test strips

Saturday, 24 December 2011

Keeping your negatives safe.


Is important! You need to make sure that the method you choose will keep your negatives flat and safe from damage. The cheapest way may not be the best course to take in the long run.

You can buy loose leaf pages in plastic or paper divided into six for 35mm film which will hold thirty-six frames cut into lengths of six. They have a white edge with ring binder holes that allow you to store the pages in albums/ folders or box folders. (I think the latter is the better solution from experience.) The white edge also means that you can write details on it like the method of development and/or a serial number, this will help you together with a contents list at the front of the album/folder to give you access to your negatives instantly.

The same type of leaves are used for medium format negatives 6x4.5 and 6x6. They are divided into four and the negatives are cut into lengths of four and three respectively.

It is important that the negatives are completely dry, before you load them into the storage leaf otherwise they will stick making it impossible to slide them in. If you still have trouble inserting them when they are dry you can snip off the corners of the leading frame of each strip.

Friday, 23 December 2011

Filing systerm.


This is down to personal choice as to what record keeping you attach to your processed films. You can write it in a notebook, a file on your computer or as I do along the top of the film sheet. What data should you record:
1. Date it was developed.

2. Make and type of film.

3. Reference number of the film for your files. I use format size and date of development as a reference number.

4. Developer used.

5. Dilution.

6. Development time.

7. Results.
The more comprehensive your records are the more you will use it, to refine the processing of your film. Ansel Adams believed in keeping meticulous records, this maybe part of the reason his pictures are so well printed.

Thursday, 22 December 2011

Spun dry?


This is the fastest way you can dry your negatives. I had forgotten about this method until recently. Why? because it is the first time I have had access to a spinner. I recollect that there was/is opposition from other photographers in the use of the centrifuge method but cannot recall for what reasons.

The process is quite simple, you leave the film in the spiral attach a long hook to the side of the drum so you can hange the spool from it, close the lid and run for one minute. When removed the film is completely dry. That's quick! and no drying marks!

Wednesday, 21 December 2011

Agfa APX sorting out the test strips for development..


With the test film exposed it's finding the time to process the strips. I have enough equipment that allows me to develop them one after the other. I will need at least a morning for cutting the film into lengths, setting out the chemicals and kit, develop,stop, fix and wash. Not forgetting that PMK Pyro developer can only be mixed in each case just before use.
The film was inserted into a Nikon F5 with automatic load which is a bit of a pain. If it was manual loading you would be able to mark the film before you shut the back and wind on to the first frame. I know from experience that the F5 has about 150 mm (6") lead before the first frame which would be an extra two shot if it was manually loaded making Agfa's APX a forty picture film. Each test strip is five frames long with two blanks to allow for error when cutting it to lengths of 235 mm (9").
This is the first time I have had to use my new darkroom in full black-out as I usually use a changing bag to load film into the process tank. I'm pleased to say there were no light leaks. So I could see where to cut the film in the dark I laid a rule on the work top with two bits of tape attached to it at 150 mm and 235 mm respectively. All I needed to do was pull the film from the cassette and cut to length at the tape marks. It surprised me how well this method worked. The remaining exposed film I wound back into the film holder to be processed later when I know the development time is right.
My working method for producing the test negatives:
  • Add Part A of the developer mix to 250 mls of filtered water (tap water will do) and wait till the temperature reads 21 degrees C.
  • Pre-soak for 1 minute. I have found that PMK Pyro developer is prone to air bells/bubbles forming on the film that are not always dislodged by taping the tank on the work top.
  • Add part B of the developer and make up to 300 mls in doing this it will bring the temperature down to its working level of 20 C. stir and pour into the processing tank.
  • Invert continuously for the first minute and tap tank on work top at the end.
  • Invert once ever 15 seconds. For 6.5 minutes.
  • Stop, fix and wash as normal.
  • Repeat the above twice more with developing times of 26 and 13 minutes respectively.
If all goes well you will get a set of beautifully toned negatives.


Related posts:

Test results

Tuesday, 20 December 2011

Darkroom fog!? Safe light.


No I'm not talking about the weather but about the lighting in your darkroom. Is it safe? Is it the right colour? Is it to close to the enlarger or developing dishes? How do you find out?

There is a simple test, you will need to cut some photographic paper into about 6x6 (150 x150mm) and lay them flat in various places with the lights off around the darkroom with a small object like a coin on the top. Don't forget to mark each piece with the location you have placed it in. Switch on the safe light(s) and leave them for five minutes.

Then develop all the pieces as you would normally, if they all come out blank then there is not a problem. However if you can see the image of the object/coin on any of them you know that the light is too strong in that place and will fog any paper you leave out. You could move the light further away. Now if all the bits of paper show signs of an image it means that the safe light is the wrong colour and will need to be changed or your darkroom is not light tight.

Monday, 19 December 2011

Dust in the darkroom.


If you look at a beam of light whether projected from your enlarger's negative carrier or a shaft of light shinning across a room you will notice lots of particals floating in the air. Dust over the course of time will settle on the upper surface's of your enlarger and lens.

It does not take long for a considerable amount of dust to build up on the surface of your lens greatly reducing the brilliance of light passing through it. You should make it a rule that once or twice a year you clean the lens thoughly. It is also a good idea to cover the enlarger at the end of each session with its cover if it has one or a black plastic bag this will greatly reduce the dust build up.

If you have a window in your darkroom that needs to be blacked out it is not a good idea to use curtains as these are dust traps. You are better off using a wooden shutter made of hard board painted matt black or a roller blind made of light tight material that has some way of being sealed along the sides.

What you have on the floor is also important. If it is carpet it needs to be removed, as this is a dust trap too. It should be an easy clean material like lino if you have floor boards or garage floor paint for concrete floors these keep the dust at bay making it easy to mop the floor with water, it also means that you do not have to vacuum very often leaving more time to print.

Sunday, 18 December 2011

What next for PMK Pyro?


This year I decided to push the boundaries of my black and white film photography with a bit of dangerous living; well, flamboyant then!!. By using three makes of film I have not tried before: Agfa's relaunched APX 100 35mm, Adox CHS 100 35mm and 120, Fuji neopane 400 35mm. All of whom are going to be finessed with PMK Pyro staining developer in to reveling their latent images.
The first of these to receive Pyro's tender kiss is Agfa's APX. I have had a quick look at Digital truth massive dev chart ( thanks guys) and have discovered that the data they hold could be out dated as it is for the original film emulsion. A quick film test (quick! just joking) as described in another post, to check the time and if needed adjust it. I'll be using the suggested dilution formula of 1+2+100 and the 13 minutes as the normal process time for comparison.
It is a fine bright warm day just right to choose a subject and take pictures for the test. Wow! that's the fastest 22 frames I've taken in a long time! So as not to waste the rest of the film I took a walk round the local area to use up the other frames. Film is becoming expensive. Now all I have to do is find the time to process the film.

Saturday, 17 December 2011

Drying cabinet.


The safest and one of the quickest ways of drying your film. The cabinet has a built in heater that gently blows warm air over the negatives lessening the amount of time that particles in the atmosphere can attach to your valuable film. They can be dry in fifteen minutes.

If, like me, you only have a small darkroom then a cabinet may not be practical within the room itself. You could place it outside but the problem I have with that is it looks like a gym locker, making it a blot on the landscape wherever you put it! Oh! and they're not cheap! Make your own mind up!!

Friday, 16 December 2011

The results of my first use of PMK Pyro


The results are not faultless. I will come to that later, first I have forgotten to mention that the films being processed are Ilford FP4+, used at ISO 125. 120 format producing a 6x6 negative. Now I'll outline the procedure used.
  1. The working solution was made up using filtered tap water at 21 degrees C and poured in straight away.
  2. Once the developer was in the tank I agitated it continuously for the first minute.
  3. The tank was inverted twice every 20 seconds and tapped to dislodge any bubbles.
  4. stopped, fixed and washed as normal.
I did not re-dip the film in the developer after fixing to intensify the staining. This is up to you but I was advised it did not make a noticeable difference.

Whenever I process a film I find that I'm a bit apprehensive as to what the outcome will be, even more so with a new developer! so just before I wash the film I have a little look to see if there is a negative, so far I have not been disappointed.

First impression, once the film was dry I noticed there weren't any water staining marks, that's a bonus. The film base has a slight mauve colour to it which increased in strength slightly with longer development times. The negatives overall were evenly processed. The contact prints revealed that there are dark spots on the neg's which I think may have been caused by air bubbles. I have just processed another film this time I gave it a two-minute pre-soak and there are no black spots on the negs.

To re-cap: Two minute pre-soak, pour developer in and agitate for first minute, then invert tank twice every twenty-seconds, stop,fix and wash as normal. You should get some very very fine grain negs.

I have printed four pictures so far. The first two on Foma 113 variant gloss, F11 grades 2.5 and 3 and they have a cool tone to them. The next two on Ilford multi-grade gloss, F11 grade 2 and 2.5, these have a warmish tone to them. Both papers were developed in Ilford -multi-grade print dev.

The pictures that appear in this post have been scanned from prints and do not convey how well they have printed. These are straight prints with no dodging or burning in. I wanted to show how well the negatives have printed and how evenly they have developed. I will be producing a final print set on FB paper at a later date using a mix of ordinary and warm tone developers.


Will I use Pyro again? Yes! it is likely to become my default film developer. The grain produced by this developer is minut to the point of making it difficult to see when focusing the negative for enlargement. I feel that the twenty-second double inversions of the tank is a bit fraught but I think it will get better the more I get used to it. Without Trevor's advice it may have taken a few more films to get it right. Thanks Trevor!


Other articles from this blog on PMK Pyro

What next?

Agfa test strips.

Working solution

Solution B

After bath

FP4+ development

Adox art 

PMK Pyro raw

Making up PMK Pyro from raw

Adox results

Negative comparison with PMK Pyro

PMK Pyro grain comparison

Drying the negatives.


Where to dry your film once they have been washed and you do not have a drying cabinet. It is not good practice to hang them near a vent or radiator. The turbulent air that these areas create can force hair, dust specs etc to land and stick to your damp film. One of the best places is in the bathroom where in most cases the room is at constant temperature and the level of dust is less because of the higher humidity.

You should attach a special film clip to the top end of the film and one to the bottom to add weight. This will also reduce curl once it has dried. The film is best hung wet and any excess water is removed with wiping tongs (double-sided squeegee). This also helps with the elimination of drying spots. I can tell you from experience that if these tongs are not spotlessly clean they will scratch your negatives. It is better to leave the film to air dry and remove the water with a well washed soft leather cloth, you keep especially for the job. You can wait till it is dry, use a film cleaner and soft lens cloth to remove the water marks. In both cases only wipe the shiney side of the film.

Thursday, 15 December 2011

Rodinal or Pyro which will I use.


I was first introduced to Pyro by Trevor Crone when he mentioned it in a post on the film and darkroom users forum a year or so ago. I purchased a packet of the developer shortly after from my favorite supplier Silverprint. It has sat on the shelf gathering dust waiting for a suitable project.
The worst weather in over a hundred years postponed my trip into London to stock up, leaving me without any of my default developer Ilford ID11. The deluge of snow had revived a project started in the last snows at the beginning of 2010. I was starting to build up a back log of exposed film. I like to develop used film straight away. I had two developers on the shelf that could produce enough developer for the job, Rodinal or Pyro, I plumped for Mister Hutchens PMK pyro partly because it was a staining developer and it may bring something extra to my pictures of the snow.

Related post:

First use of PMK Pyro.

What next for PMK Pyro.

Agfa APX sorting out the test strips

Agfa APX test results

PMK Pyro working Solution

Solution B PMK Pyro

PMK Pyro afterbath


Drying agent?


This is the final thing you do before hanging up your negatives to dry. This helps with the drying process by reducing the water tension allowing it to run more freely and minimising drying marks caused by the lime in the water.

Add three or four drops of wetting agent to the developing tank. Agitate the spiral in an up and down motion for a few seconds and leave for a minute. A further refinement is to add wetting agent to de-ionised water and transfer the spiral to it. Take the spiral out and peal the film from its grip or separate the two halves whichever you find easiest to do.

Wednesday, 14 December 2011

Washing your negatives


This is just as important as the developing, stop bath and fixer. The temperature of the water needs to be close to that of the previous process of 20 degree C.

The purpose of washing is to remove the last of the fixer from the emulsion and needs to be done thoroughly to ensure the longevity of the negatives.

Which method to use? One way is to empty the tank and refill with fresh water and agitate for a few seconds, this should be repeated several times. Another way is to use a wash hose that is specially made to fit into the top of the developing tank and attached to the tap. I personally favor this approach with my own refinements: after fitting the hose in place I open the tap till it is nearly fully open and leave for thirty seconds, this vigorusly removes the last of the fix that remains. Then slow the flow right down for the next ten to fifteen minutes. It is a simple straight forward procedure that has served me well over the years.

Fixing negatives and papers


It is important to fix your negatives fully, this will ensure their longevity.

Fixing removes the last of any light-sensitive material from the negatives stabilising and securing the images so they can be viewed in day light. The temperature of the fix should be the same as the developer and stop bath, 20 degrees C.
Most fixers nowadays are rapid fixers supplied in liquid concentrate form and will complete the fixing process in about two to five minutes. (always check the instructions on the bottle) over fixing will start to bleach the negative. These fixers are usually suitable for film and paper. There is a chance in the case of warm tone papers that they may suffer from bleaching of their warmth with rapid fixers, it would therefore be better to use a more traditional fixer made up from a powder to ensure no loss of tone.


Tuesday, 13 December 2011

Stop bath


Does what is says on the bottle! It is used instead of a wash as it helps to prolong the life of the fix and stops the developing process straight away. You must be careful not to contaminate the developer with stop, it will destroy it.

Stop can be obtained in two types of concentrated solution. One is odorless made from citric acid and the other acetic acid with a vinegar smell which can be quite pungent if used for prolonged periods in the darkroom, when processing prints in trays. Both have a colour change indicator added to the solutions so you can tell when it is exhausted.

Dilute the concentrated Stop one part solution to nineteen parts water (or as instructed on the bottle.) say 50 mls stop to a litre of water with a process time of one to two minutes, you will not gain anything by extending the stop time it is most active in the first few seconds. Agitate for the first thirty seconds, this ensures the developer has been completely deactivated, then ten seconds in every minute if you stop for two minutes.

Experience


There is no substitute for..................

In the initial stages of your quest to produce a good set of negatives with your first film, you are starved of knowledge and information and read everything you can lay your hands on. This is counter productive and becomes confusing as different people have their own method of arriving at the same result. Pick one practitioner with a simple method and stick with them, forsaking all others until you know what results will be obtained when you pull the film from the developing real.

The more straight forward the method the less things need to be checked when something go's wrong. What people do not tell you is that film processing is very forgiving and if you don't quite get the time right, the temperature is not spot on or you forget to invert the tank the right amount of times it will not make a vast difference to the final outcome. Possibly they will be slightly thiner or denser than normal but what is normal in your case? It is not until you have processed a number of films that you will truly know. Once you know what to exepect you can then personalise the method to get the negatives that suit your own taste.

Monday, 12 December 2011

Timing development


You should always base your process time on the latest information available for your usual developer. Then be prepared to use these figures as a guide or starting point. You should check each set of negatives carefully, if they are starting to look dark/dense then you will need to adjust the process time by say twenty per cent. If they are looking thin/light then a slight increase in process time is needed. It is a good idea to stick to one make of developer and film until you understand what it is capable of. By doing so, you will be able to extract every detail from the negative that was originally captured. With experience comes knowledge.

Developer shelf life.


The keeping qualities of photographic chemicals to a degree is dependent on the dilution of the mix. In the first instance you should always follow the manufactures recommendation when mixing stock solutions by only adding the chemical to that quantity of water thus giving you a known starting point. If you require a more dilute working developer you should only make this up just before you are about to use it. Once used it should be discarded.

Reusable developers are poured back into their containers when finished with. Each time you pour it back a little bit is used up, it is a good idea to keep these containers full to stop the developer going off. This can be achieved in several ways if it is a plastic bottle you can squeeze the air out just before you nip the cap up, add glass marbles to the bottle so increasing its level, use a concertina bottle or the plastic bag out of a wine box ( if using one of these make sure it has been thoroughly cleaned.)

Remember that developer that has been used is likely to go off more quickly. It is a good idea to keep a record on each bottle of how many film or prints and what format has been developed. When you think you have reached the maximum usage discard it and make a fresh batch.

Sunday, 11 December 2011

Agitating the developing tank.


The main reason for inverting the developing tank is to make sure that the film gets equal treatment in the developer. One of the best ways of achieving this is to tumble the tank by turning it from end to end.

Why do we agitate the tank? The developer interacts with the emulsion of the film. It vigorously attacks the silver it come into contact with and becomes exhausted. By inverting the tank you refresh this action, producing evenly developed negatives. It is
important to get this right. To little agitation will allow by-products of the process to build up, leaving pale-toned streamers as they slide to the bottom of the tank. Likewise excessive inversions will produce currents in the developer, creating uneven development. Most process times allow for agitation.
Once the developer is added you should agitate the tank for the first thirty seconds but before you put the tank down give it a slight twist and tap it on a hard surface ( it is a good idea to lay a soft towel down so you do not damage the tank) so you dislodge any air bells/bubbles that may have attached themselves to the film. Then you need to agitate for ten seconds in every minute of the process time about four inversion per ten seconds or as the developer manufacturers instruction advise. For example PMK Pyro recommend one inversion every fifteen seconds. 
I have used this inversion method from the start of my developing career ( no pun intended) and has produced consistent results every time. Once you have found a method that works for you; you should stick to it.

The Thermometer.


This is one of the most important pieces of kit in the darkroom. As already mentioned temperature is one of the main controlling factors in the processing of your films and prints. It is important that you have good quality thermometers that are graduated to at least half a degree but a quarter of a degree is better and one that has a thicker line at the vital 20 degrees C. It is a good idea to have a thermometer for each of the chemicals you use in the processing of your films and prints as it will stop cross contamination.Also there will be no hold ups if you break one. It is recommended that you keep to one type, preferably alcohol as it is safer than mercury. If a mercury thermometer breaks it will contaminate the chemicals it comes into contact with and fog any prints that are being processed at the time.

Saturday, 10 December 2011

What temperature?


20 degrees centigrade is the standard temperature that film development should be carried out at. It is also important that this temperature be maintained throughout the process. You may use a higher or lower temperature which will shorten or lengthen the development time. There is a risk that the negatives may not be fully developed; you should wherever possible follow the instructions as to time and temperature unless an alternative has been suggested by those instructions. With experience you will know what temperature and time combinations give good results. I personally always develop my film at 20 degrees C unless a higher or lower temperature is recommended.

Friday, 9 December 2011

Farmers reducer.


This is a follow on from my last post on reduction.

Over developed or over exposed negatives may need to be reduced to make them a better printing prospect. This is achieved with chemicals that strip silver from the final image. Like developing, reducing a negative requires practice so you get an idea of how much to take away. It is best carried out in a place that is well ventilated with diffused light so you can see the process at work. It is a good idea to pre-soak the film it will allow you more control by slowing the process down. With experience you will get to know at what point to remove the negative. The chemicals do not stop working instantaneously. Because you can repeat this procedure it is better to reduce the negative in small steps so as not to over do it.

Reducers can be supplied ready mixed or you can mix your own. The formula that follows is a proportional reducer for overdeveloped negatives:

Stock Solution A

  • Potassium Ferricyanide 7.5 grams.
  • Water 1 litre.

Stock Solution B

  • Sodium thiosulphate (Hypo crystals) 200 grams.
  • Water 1 litre.

Notes: Ferricyanide has good keeping qualitys if kept out of strong sun light. Once you have mixed the chemicals you should use immediately. If you are using a stepped method of reduction do not contaminate solution A with Solution B as it will stop working. Working temperature of 20 degrees. You can place a dry negative in solution A but will need to watch the process carefully for between 1-4 minutes then transfer to solution B for about 5 minutes.

Potassium ferricyanide is a poison. Avoid contact with your skin and do not breathe the fumes.

Checking development times?


How do you know that the negatives you are looking at are correctly developed and not under or over exposed. The only way to be sure is to do a test. What follows is a method to help you achieve this:
   Choose a subject like a view or still life to take a series of photographs.
   First you will need to determine what the correct exposure should be.
   Then set the camera settings to two stops under and take the picture.
   Follow this by setting it to one stop under and take another picture.
   Now enter the correct exposure settings and press the shutter.
   Next, one stop over and two stops over respectively.
   Once you have done this wind the film on two frames and repeat the procedure, once done do the same again with a two frame separation so you now have three test strips.
Once back in the darkroom cut the film into three strips. Give the first section of film half the recommended development time the second set twice the time and the third group the suggested process time. Then compare the combined results of exposure and development and you will be able to clearly see which was developed correctly. It's worth the cost of a film to know that your films have been correctly developed.

Thursday, 8 December 2011

How to keep Fiber base photographs flat


This must be one of the most frustrating things about fiber base paper. It comes out of the wash tank like a limp rag and when it is drying it curls up like corrugated plastic but there is no getting away from the fact that photographs on fiber base paper have that something extra and it is worth the trouble in making sure they are flat.

Over the years I have used the cartridge paper and heavy books route to keeping my prints flat. I could use a special machine that dry's the prints using heat but I prefer the slower air dried method.

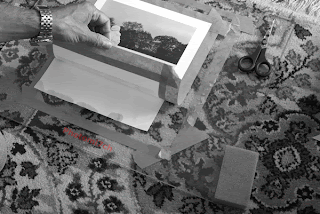
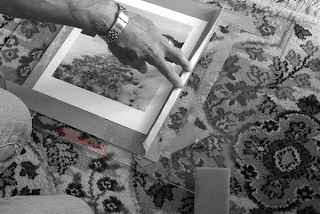
It wasn't until Dave Miller the founder of the film and darkroom users forum posted an article on his method for ensuring they dry flat, that life with FB paper has become so much easier. A big thank you to Dave for that article, without it I would still be using heavy books and would not be writing this post with my own refinement to his excellent method. My adaptation allows you to print right up to the edge with out trimming.

Equipment needed:

  1. Stick gummed tape to back of print
    A pane of glass large enough to cope with your largest print size.
  2. Adhesive brown paper tap that is made sticky by water. Available from most art suppliers.
  3. Craft knife.
  4. Scissors.
  5. Metal rule/ straight edge.
  6. Cartridge/ blotting paper.
  7. Sponge.
  8. Print squeege or leather.

My adaptation:

First of all you will need to remove any excess water from the print by hanging it for a short while and/or use a leather to dab it away.

  • Place pint on blotting paper before sticking to glass
    Cut a piece of cartridge/blotting paper slightly smaller than the print size.
  • Place on the glass.
  • Then place the photograph picture side down on the blotting paper.
  • Cut to length a strip of gummed brown adhesive tap.
  • Pull the tape tight and stick half the width on to the back of the print and smooth out. Remember that the print will still be damp so the tape will not need to be wetted.
  • Do the same for the other three sides. Once done turn the print over so it is picture side up.
  • sticking third strip of tape to glass
    Again cut a length of tape this time dampen it do not make it wet as it will not stick on contact but slide and fail to stick.
  • Pull the tape tight and stick to the tape at the top of the print half on and half off.
  • Wipe the damp sponge across the glass (again do not make wet as the tape will slide across the glass) and stick down.
  • Lift the print and place the blotting paper under the print and smooth down.
  • Next cut another length of tape for the bottom and do as before but once the tape is stuck to the tape and the glass is damp pull the print tight and stick down. This slight tension will keep the print flat.
  • Do the same for the sides.
  • Leaving to dry over night
    Leave to dry overnight.
  • To remove the prints once they are dry place a metal rule/straight edge along the side of the print and cut along all the sides with a craft knife. This will release the print perfectly flat.

Notes:


Used craft knife to free picture from glass
When moistening the tape to stick to the backing tape you only need to make it damp enough for it to contact stick - it is important that the whole length has been dampened. Then press it down firmly to the back of the print along its lengths and do the same when sticking tape to tape, otherwise it will allow the print to curl as it dry's, leaving a wavy edge. You can re-wet the print and lay it up again but it is better to get it right first time if you can.


To remove the tape from the glass it can be re-wetted and scraped off or place the glass in a dish of water to soak for about five to ten minutes.It will lift off with ease.

Tuesday, 6 December 2011

The story behind the Winter Picnic Photograph.


It was round about this time last year (November/December 2010) that the UK was in the grip of the worst cold spell for as it turns out a hundred years. The country may have just missed coming to a standstill but it stopped me in my tracks literally, as I couldn't get the truck off the drive. The ice was a solid two inches thick not allowing for any grip!

The snow brought a brand new look to the area that I had not seen before, so I thought I would go out and take some photographs of this fresh, clean new wonderland of soft edges. Armed with my Bronica SQAi 120 format camera loaded with FP4 film I trudged gingerly off into the countryside.

Picnic
I was quite surprised to find there we a lot of people out and about with the same idea, walking the dog, playing and enjoying their enforced day off work. As I strolled further afield the numbers thinned until I was alone enjoying the crisp white land the snow had laid out for me to photograph; so engrossed with the scenes before me I forgot how bitterly cold it was until my throbbing freezing fingers sent SOS messages to my brain and brought me back to reality -“Shhahhhoi!!! Its cold.!” Pulling my gloves on the best I could I made off in a hurry to warm up.

Briskly walking up a path by one of the lakes the path turns a corner at the top where there is a bench and from a distance it looks like someone is sitting there! As I got closer I could see it was two people! -”they must be mad!- and it looks like they are having a picnic!” As I got closer I could see steam from their cups as they ate their mince pies! An idea for this picture was forming as I approach them to ask if they would mind being in the photograph. They did not mind, so I walked back down the track a bit, set up the camera on the mono pod, took a light reading and pressed the shutter. You're right! I only used one frame, no back up or bracketing, the view that came to mind is the one I took. After the shot was taken I walked back and chatted for a while. Apparently they don't let a little bad weather get in the way of them coming to their favourite spot! I wish them the best of the season and moved on. Not so mad after all! I wish I had thought to bring a hot drink with me!

I am pleased to say that Picnic was one of the Pictures chosen for this years Film and darkroom users Year Book. Which can be obtained from Blurb.

FADU year books

Film Developing faults.


The most common faults that crop up in the course of processing a film.

    • Spots on the negative indicate two things: there was dust on the film at the time of exposure and/or fairly large round spots on the negative indicate that air bubbles were trapped against the film during the process and suggests insufficient agitation. This can be avoided by agitating for thirty seconds at the beginning of development and by tapping the tank on the bench. (some developers require longer agitation). It must be stressed that too vigious and lengthy agitation can induce the same problem. A way of helping to reduce air bubbles is to use a pre-soak. Some developers like PMK Pyro and Rollie's R3 require a pre soak as standard.
    • Black crescent-shaped kinks and clear patches more common with roll film but can happen with 35 mm cassettes, this happens where the film has been forced into the spiral making the film kink and touching the film beside it.
    • Lines are most commonly caused by the film running across a small piece of grit on the cassette opening. It can also happen by over tightening the film in the cassette and bad handling. One of the most common, which has happened to me, is the use of a squeegee to dry the film. I have not used one since.
    • Finger marks on negatives are caused by handling the film with wet, dirty and contaminated fingers. This can be eliminated by using disposable gloves during the wet process and cloth cloves when handling dry negatives.
    • White marks are caused by grease and fixer before development and dark marks by fingers covered in water or developer. Slight damage can be retouched.
    • Reversal of negative image is due in part or total to solarization making the negative into a positive; this happens when light gets to the unprocessed film during development. Care must be taken with the processing tank that the lid is fully secure before inverting.
    • Uneven image density is a sign that there is not enough developer in the tank or lack of agitation. A low-level of developer in the tank will show as a dark unprocessed line along the top edge of the film.
    • Reticulation is a lot of fine cracks in the emulsion this is caused by washing in too high a temperature or solutions greatly different in temperature. This can be avoided by making sure that the solutions only have a few degrees difference between them.
    • Deposits on the negative and discolouration. Hard water may cause a chalky deposit on the negative that cannot be washed away in water. It can be treated with a two percent solution of acetic acid, then washed in clean water. The same sort of problem may be due to the fix losing its acidity. A treatment would be to harden the negative in one percent solution of formalin, then wash in sodium carbonate followed by water. Yellow-white negatives may be due to deposits of sulphur from a decomposing fixer, it can be remedied by hardening in a one percent formalin solution and washing in a ten percent sulphite solution at thirty-eight degrees.