Pages

Saturday 11 August 2012

Stop not buffer.


One of the most popular over the counter acid stops.
Made from citric acid with colour indicator.
Stop is the second part of the development process, but how many of us give it a second thought. Most of us when we come to developing our first film tend to do what the manufacturers, friends and teachers suggest without delving into what the relationship is between these elements in the process. There is nothing wrong with this approach we are all eager to get on and see those all important first images. With success, we continue settling in to a way of doing things that produce good results. It's not until we start printing that some faults with the negatives rear their heads. Dust and hair marks being the most common but then there are those odd black spots appearing in the skies here and there. This is when the controversy about how we stop the development process comes to the fore.


There are two main categories. The more aggressive with chemicals and the gentler water stop. The later is not a stop and it is misleading to call it such.   It dilutes the developer to the point where it no longer has an affect on the emulsion this can and does lead to unevenly developed negatives and I cannot understand why it is recommended (for film only) other than to increase the longevity of the fix, a buffer or as a way of creating a certain style to the negative. 

Have been processed using a citric acid stop.
I personally prefer the more aggressive chemical route, when the stop go's in, the developer is stopped in its tracks producing a clean crisp negative but you need to be careful.

A popular choice in the make up of developers is Sodium carbonate, an alkali. When this comes into contact with an acid based stop it produces carbon dioxide gas that leads to blistering of the more sensitive film emulsion,( not the case with enlarging papers). It manifests its self as a pinhole in the denser areas of the negative. There are ways around this by using developers that are formulated from mild alkalis either balanced or borax which do not produce the damaging over heating or gas when used with acid stops.


A reflection of St Pauls in London.
Processed and printed using all Ilford products
Stops are made from several different acids the most popular is acetic with a pH dye indicator. The others are citric and boric. You can also use a simple solution of sodium bisulfite. Be careful which stop you choose as some produce green staining with some enlarging papers. Another precaution is to use the stop bath at a lower working temperature to the developer; I know this is a controversial move but I have used this method for years without any of the problems suggested by others.

Saturday 28 July 2012

Sinkings in the Orkneys


German Fleet at Scapa flow
It is a grey day as a young lad stands near the cliff edge on Hay one of the Orkney islands. He looks out over Scapa flow that is crowded with ships. The German fleet has been interned. He has heard that the war is over and that is why they are all here at the Navy’s most northerly base and guard to the North Sea.


While the boy is sat a top the cliff eating a bread and dripping sandwich, his eyes are drawn to some flashing lights, it looks like all the ships are winking at each other, little does he know that this is the order from rear admiral Von Reuter to his commanders confirming orders to scuttle the fleet. He looks on day dreaming about what life may be like now that the war has ended. He suddenly notices that all the ships he can see are flying the Imperial German Ensign from their main masts. While he looks on there are lots of small boats moving between the ships, if only he had a telescope he would be able to see what is going on in more detail but he still hasn’t got enough pocket money saved.


Whaling boat stranded on Battle Cruiser Moltke
The German sailors had been preparing for the scuttling for some days by  drilling holes in the bulk heads to help the passage of water through the ships. Once the order was given sea cocks and flood valves were opened, internal water pipes were smashed and all water tight doors and portholes left open. It was not until midday that  the scuttling was noticed.  Friedrich der Grosse was seen listing heavily to starboard. What remained of British naval forces at Scapa flow navel base sprang into action, but they were limited in the force they could take since the leaving of the fleet the day before . It was not until twenty minuets after midday that Admiral Fremantle on manoeuvres with the fleet  received a message that the German fleet was sinking. He immediate turned round and steamed back at full speed to Orkney. He radioed ahead to order all available boats to try and stop as many ships sinking as possible. By the time Admiral Fremantle returned it was only the large battle ships that were still partly afloat. The last ship to sink was the battle-cruiser Hindenburg at five o'clock.
Battle cruiser Seydlitz


The young boy up on the cliff had lost all track of time it was getting late, he would be 'for it' by the time he got home, with a clip round the ear from his mum. He had resigned himself to it but had a great story to tell his friends when he got to school the next day. On his way home he wondered what those faint popping sounds were. The tragedy of those sounds were that nine Germans were killed and sixteen wounded when the British boarded their ships to stop the sinking's. 

Battleship Bayern listing heavily


I know you are probably thinking what has this got to do with photography. The funny thing is this was all sparked off by an article in Black and white Photography magazine about post cards. Which lead me to a box of  cards that was given to me by my Gran. In among them are a collection of twenty pictures of ships, of these fourteen show the sinking of the German fleet at scapa flow at the end of the Great War. The photographer who took these shots probably used 127 or 120 format film in a box Browne or fold out camera of the time.


For more information on the Sinking of the fleet.


Saturday 7 July 2012

The masking frame


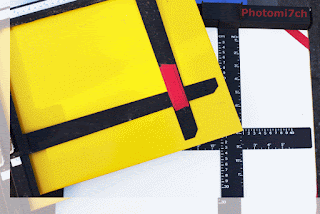
Also called an easel they come in different sizes. It is a good idea to pick one that is larger than your current needs therefore not limiting the proportions of your enlargements. The main reasons for using a masking frame are to hold the paper flat, to reconfigure the composition, allow the margins to be adjusted to the various format sizes you wish to use and to crop out some of those bits that creep in at edges, that you didn't see before you pressed the shutter. 

The frames come with two or four independently adjustable blades on a yellow or white base. I have noticed that some blades are not set at right angles to each other so it is a good idea to check them at various settings with a set square to make sure they are true. Also make sure that the edges of the blades are not bevelled under. This will reflect the light and produce a thin black line around the edge of the picture. It can be a nice affect but one you should have control over. The light colour of the baseboard is so you can see the projected negative, enabling you to frame the image before you put the photo paper in place.

When using single weight papers on a white baseboard, it is possible for the light to pass through the paper and be reflected back, changing the value of the exposure. You can stop this by laying a dark coloured card on the baseboard with the light sensitive paper on top.

The most versatile of the masking frames is the four blade, it allows you to mask the image by only having to move the blades of the frame without having to re-a line the whole easel each time. It also gives better control over how big or small you make the margins and in some cases gives you the ability to produce borderless prints. The versatility of these frames makes them quite expensive to purchase.

Saturday 30 June 2012

Adox in PMK Pyro results.

Test stips at twenty and ten
Minutes

The results are in! This has turned out to be one of the most exasperating tests to date. There have been problems all along the way from getting the exposures right to developing the film. Having said that there have been some surprises.

As with the Agfa test the film was exposed at box speed ISO 100 in the Nikon F5. This is where the process changes apart from the test method. The PMK Pyro used was one I made from raw material that did not include EDTA disodium in the mix and a reduced amount of Sodium Metaborate in solution B.

Sequence of development:

         Pre-soak - it makes no difference with this film. It is not prone to air bell/bubbles sticking to the film.
         Developer - to be made up immediately before use at 21 degrees C.
         Development times - for this test were 5, 10, and 20 minutes respectively.
         Tank inversions - continuously for the first minute and then once every fifteen seconds.
         Stop, Fix and wash - as normal.
         After bath - was not used and would have made little difference with this mix.
Notes:
Adox CHS 100 PET 35mm is not like other black and white film it has a noticeable thinner film base which is coloured blue. The cassette this film came in was not light tight which almost ruined the test. I only discovered this after the film had been exposed, when removing the film from the cassette it fell to bits. I have read a forum thread saying that the 120 roll film has the same problem. Adox you need to up your game! It is appalling quality control.


Pre-soak water after use
If you use a pre-soak the water will come out blue.


The ten minute development time is the one suggested by Digital truth, which made it the reference time the other test strips were to be judged against.


Results
All the test strips including the one thats a no show.
The test strip to show the best density of negative is the twenty minute one, having said that they are still a bit on the thin side. This does not take away from the fact that they are fully toned and well defined. There is no sign of grain when enlarged to 485 mm (19”) by 340 mm (13.5”). When printing the negatives I'm having to use grade three, normally I would expect to be using grade two, this could be due to the lack of EDTA in the mix of Pyro used. I'm also disappointed that the five minute test strip shows no negatives at all, from previous experience the shorter/half development times have a faint out line. In this case I can only put it down to the faulty film cassette. The ten minute test strip is very thin when compared to the Agfa test strips it is thinner than the half development time. Which suggests that normal development in this case should be greater than twenty minutes.

Over sized enlargment


With all the time and effort put into this test the last thing I was expecting was to be let down by bad manufacture. Of the thirty six exposures on the film around about  ten frames are unaffected by some light damage luckily the majority of these are from the test exposures that put in an appearance. If there was going to be any question marks I was thinking it would be from the developer but it did not disappoint, the only thing to note was when i poured it from the developing tank it was a lovely pink rose colour.

Will I be using the film again? Yes! only because I have a roll of 120 on the shelf if the negatives show any light damage then I will not use it again. How can I say that when I use a lot of out of date film? With out of date film at least you know that the results could be iffy. You don't expect it from new in date stock.
Used PMK Pyro.

Wednesday 27 June 2012

Making up PMK Pyro from Raw.


This is the first time I've mixed a developer from scratch. I find when  preparing for something that is new, it seems to take an inordinately long time to set up. This has been no different and I can understand why more people do not mix for themselves.
Before you start.
If you have just purchased new scales it is a good idea to check how accurate they are. First thing to do is place the scales where you plan to make up the mix and zero them.The table that follows is a simple and affective way of checking the accuracy.

These weights came from the royal mint:

Coin test
        ●         1p – 3.56 grams.
         2p – 7.12 grams.
         5p – 3.25 grams.
         10p – 6.5 grams.
         20p – 3.0 grams.
         50p – 8.0 grams.
         £1 – 9.5 grams.
         £2 – 12 grams.

An alternative to using scales is the Twenty P mix. This is where twenty p coins are used as a counter balance to weighing out the powders. While talking about alternative ways of measuring out you can use measuring spoons. This could be a more reliable way of ensuring that each mix is consistent. If you measure out the chemicals with number of spoons it will not matter that the powders have changed in volume by absorbing moisture or drying out.


With the checks out of the way what next? How much are you going to make up as stock solution? I know from previous use that it will keep for a very long time, even years. I personally prefer only to have small amounts of developer on the shelf ready for use. This is partly because I use several different film and paper developers.  Anchells Darkroom Cookbook  suggests that you make up part A at 750 mls and part B at 1400 mls; well that is a large amount for a first mix not only that what happens if you get it wrong  or heaven forbid it does not work. Luckily Trevor Crone has published the weights for a smaller amount:


Solution A to make 250mls:
         Metol 2.5 grams
         Sodium metabisulphite 5.0 grams.
         Pyrogallol 25.0 grams.

Solution B to make 500mls

         Sodium Metaborate 125 grams.
Stock solution should be made up with distilled/de ionised water. EDTA-disodium is an optional ingredient It adds gold tone to the silver of the film.

Trevor suggests a reduction of 10 grams for solution B to help combat separation when mixed. He has also said that to his knowledge it has not affected the quality of his negatives.  I can confirm the drop out is reduced but I think this is mainly due to the reduction of powder. Although these quantities are more reasonable  I made my batch up at half these weights.


Other bits
Paper cup cake holders are a good idea for pouring the powders into when it comes to measuring out but they will only cope safely with small weights. You can get plastic cups to do the job which maybe a better route to take if you plan to mix all your own chemicals.

Common sense should prevail when it comes to measuring out these powders. Gloves and a breathing mask should be the minimum safety precautions taken. If the powder gets air born it will irritate the lining of your nose. Also if you get it on your hands it  will irritate or burn your skin. So please be sensible.  


Adox CHS 100 Pet ISO 100 35mm flim.
Developed in PMK Pyro,
Printed on silverproof paper,
Developed in Ilford warm tone.
Having purchased all the ingredients to mix it myself, is it more cost affective? The over the counter premixed price of PMK is about £9 for 10 litres. The cost of all the ingredients is around £39. The batch that I made up  was equivalent to ten litres and saved about 50p. Taking every thing into account scales, time, safety etc. etc., it may not be worth all the trouble and money as a one off. There are advantages to this method such as the flexibility of making up the quantities of developer, stop and fix you require and being able to try out other developers you would not normal be able to get from the mainstream. The main purpose for me was to ensure a ready supply of PMK Pyro. Now that I have started down this road as my stop,fix and other developers run out they will probably be replaced with powdered formulas.


Acknowledgements and Thanks to the following:


Paul C, for the royal mint weights. 
Mr S. Nichols for the 20 P mix.
Trevor Crone for the reduced PMK Pyro mix.

Saturday 23 June 2012

The Focus finder.


This is a wonderfully simple piece of darkroom equipment. Basicly it is a magnifying glass and mirror. It provides the user with the optimum sharpness for the enlargement by focusing on the grain of the negative. 

Also known as a grain magnifier it rests on the masking frame where it diverts a small amount of light from the projected negative to your eye as you look through the small magnifying lens. With one hand on the focusing control of the enlarger you gently turn the knob until the grain becomes sharp in the mirror. This translates to a sharp image at easel level; to maintain this accuracy a piece of waste photographic paper should be placed in the masking frame with the magnifier on top. It is easiest to focus on the grain with the enlarging lens set at its widest aperture and then re-checked at the working aperture. To make sure that the focus has not changed. 


Some focus finders can only be used in the central area of the projected image. This is because the angle of the light is more severe at the edges and corners. If you wish to check these areas to make sure that the whole negative is in focus you will need a magnifier that allows for this with a wider mirror and tilting aim.

Monday 18 June 2012

Post cards from the Humber!


Recently I teamed up with my wifefor a bit of an experiment and road trip. I loaded the Olympus mju compact with a roll of eight years out of date colour film. The idea was to share the camera between us taking pictures as we went along. Once the roll was finished I took it in to be developed at snappy snaps. No special instructions were given. The results speak for themselves. What if the film had been blank? Notch it up to experience and move on. Wouldn't it have been a waste of time and money? No! we still have the memories of an afternoon well spent, plus we had the 'mystery' to look forward too!


Saturday 9 June 2012

Light meter.


The weather has been great this past week and not one to pass up such a rare opportunity I have moved my office to the end of the garden where it is shaded  by some silver birch trees. If it was not for the shade I would not be able to see the computer screen.


As you know from previous posts I have become quite smitten with my Zero 6x9 deluxe camera. It's lack of through the lens metering! Your right no lens, I have had to revert to using a hand held one. NO! I'm not going to take another camera with TTL with me. Why load myself down, believe it or not even with a tripod it is lighter than my standard kit. Besides I don't need the light readings to be that spot on especially when needing to account for reciprocity.


While writing this I'm joined by a baby starling. It looks like the one I saved from the jaws of the cat the other day. The bird seems happy for me to be here as he/she walks up to and around the chair I'm sitting in looking for local delicacies. It appears I'm the last thing it needs to worry about.


Two types of hand held light meter
I have two types of meter to choose from they are tried and trusted run of the mill units. The oldest one uses a selenium cell which is a type of photovoltaic / solar cell. When the front of the meter is exposed to the light it produces a small current which moves a needle that indicates how much light there is. This type of meter is batteryless but one of the down sides is in low light situation it requires a certain light level to read accurately.


The other light meter is a CdS unit or Cadmium Sulfide cell that has a greater low light sensitivity. This light meter works by regulating the energy in the battery rather than producing a current as in the former. With this type of meter it can suffer from drifting this is where the meter has been shown a bright light temporarily making it blind. The cell has a memory and can fool you into thinking the level of light has not changed. It is a good idea to let the meter read the scene for several seconds to make sure it has read it properly.


Note the starling casting a
critical eye over the
photographs.
Todays meters do not suffer from this they use silicon blue or gallium arsenide photocell coupled to a memory chip  so are unlikely to have a time lag in changing light conditions.

My light meters are general purpose, they read reflective light from a fairly large area of the subject which is about 30 degrees. They round this reading to an average of 18% ( a mid grey) no matter how dark or bright the scene is. This is where the zone system ( See Ansel Adams The Negative for more info) comes into its own or a system of your own to allow for it. I have my own method that works well with a little bit of intuition thrown in. Well! Most of the time.

Since writing this my CdS light meter has passed away. It will be missed.

Wednesday 6 June 2012

Pyro PMK Raw what is needed


I have been purchasing PMK Pyro as a set of pre-mixed powders just like ID11 and D76. Two of the most popular mass produced powdered film developers; just add water and away you go. Recently I have needed to replace my stock of PMK developer so went to Silverprint my regular supplier to replenish the stock, only to be told that they no longer did mixed batches for sale over the counter. They advised me they stock all the ingredients for self mixing. This took me aback, several expletives entered my head (which were not expressed) what was I going to do! I have a number of tests planned for developing other makes of film let alone the projects on going.


Raw chemicals to make up PMK Pyro
I raised the question on the film and darkroom forum and after the responses  came back (thank you all) I decided to buy the individual ingredients; it is quite expensive to set up, partly due to the way the powders are sold but should make it cheaper over time. This raised the thought of making up all the chemicals I used in the darkroom from powder, meaning they will be as fresh as possible at the point of use. 


What will you need? To start with a set of scales, they do not have to be that expensive but should be able to read very small amounts. The relevant powdered chemicals which are, Metol, Sodium Bisulphite (Sodium metabisulphite), Pyrogallol, EDTA di-Sodium (optional) and Sodium Metaborate (Kodalk).

Monday 4 June 2012

Adox art series to be developed in PMK pyro.


Adox art series CHS 100. ISO 100


It has been a long time since I mentioned that I was going to do a test development using PMK Pyro on Adox  CHS 100 art series. What with the weather being unseasonally wet and other things getting in the way I have not been able to do the test exposures. I prefer to take the pictures outside on a bright day without fast moving clouds. Something that has not been forthcoming. The light level needs to be constant for the eighteen frames it takes to produce three test strips of two F numbers over and two F numbers under the metered reading. 


I'm pleased to say that the other day, weather and time to expose the film coincided which has resulted in a film waiting to be developed. Something that requires a spare four hours to do whether all in one go or over several days. See Agfa test formethod.

Saturday 5 May 2012

Light striped prints


Another printing fault is light pollution known as fog. This is assuming it hasn't happened in the camera.


The dark line you see running up this picture
 it the result of light
getting to the light sensitive material. Fogging .

         It Could be where stray light from a darkroom not properly blacked out has found its way to the light sensitive side of the the paper you're using.

         Your safe light is too close to the enlarger and or the wrong colour.

         It can also happen if your enlarger leaks light when being used.

         Badly stored and out of date paper can also be fogged.

The causes of these faults, also point to ways of curing them. This post suggests a way of detecting light induced fog.

Sunday 22 April 2012

Zero pinhole camera Project double take.


Camera Zero 6x9 delux
FP4+ 120 format, 6x6 neg,
 developed in PMK Pyro no afterbath,
Printed on silver proof paper gloss
Developed in Moersch 6 blue tone.
My attitude when using the Zero camera has become very relaxed. My approach is to look at the scene, roughly point the camera at the subject, take a light reading, calculate the exposure and open the shutter for about the right amount of time. Once taken move on to the next one. I'm not sure if this is such a good thing as I'm making a number of double exposures, which have turned out well more from luck than design.


Camera Zero 6x9 delux,
FP4+ 120 format, 6x6 neg,
developed in PMK Pyro with afterbath
printed on silver proof paper matt
 developed in Ilford warm tone
This has led to project double take but lets be honest basing an idea on a set of lucky mistakes does not bode well for the results. But then history is littered  with stumbled upon ideas that have gone well. With this in mind I'm going to carry on with the blindfold method of not winding on. I could be more controlled by making single shots and then combining the negatives in the enlarger to produce a double exposure but  this may take away the element of surprise and randomness to the results. With that said there needs to be some planning to the picture taking, so I'm going to use a location I know quite well in order to make the combination of double exposures easier to plan cutting down time looking for shots. It will be hit and miss anyway with this approach but hopefully not so many misses. The first roll is going to be a bit of an experiment so I'm not expecting many good printable photographs. But in this context what is going to be a good picture I think it will boil down to how well the combinations work together; once the first film is developed I'll be able to refine my method.


I'm setting the zero 6x9 deluxe to 6x6 neg size, loading FP4+ which will be developed in PMK Pyro using my revised method of inverting with an after-bath. I may not continue the bath for subsequent rolls if the photos look to soft. And so the project begins.

Friday 6 April 2012

Silverproof paper


This is the second run of budget priced paper marketed by Silverprint and has a matt finish. The first run was gloss. I have used the later and was impressed with the photographs it produced. With its grades being limited to two I was not put off.

Ilford FP4+,120 fromat 6x6 negative, Developed
in PMK Pyro and printed on
Silverproof paper Matt.
I originally purchased the gloss paper for contact prints and didn't really take much notice of how well they were being produced until I obtained a 12 x 16 slottie (Nova paper processor. which was the dirtiest bit of kit I have ever purchased second hand, a story for another post). The silver proof paper was the largest sized paper I had on the shelf and I was  impatient to see how well this new piece of kit worked. I was surprised by the tonality of the paper which lead me to make a series of photographs. It is a shame it was a limited retail run. It will missed.

Then a second batch was announced on Matt paper, which is a finish I'm not a fan of, but I'm always happy to try something new. This will also be a limited retail run, so if matt is your preference get some boxes in while you can.
Ilford FP4+ 120 Format 6x6 negative, Developed
in PMK Pyro and Printed on
Silverproof paper Matt.
The paper is completely different from what I'm used to. It is difficult to tell which is the emulsion side in the darkroom but with a little practice, the back has a slight  fibre feel to it which takes a time to get the hang of. First impressions are good, the photographs remind me of the cover page to Black and White Photography magazine in the way it looks and feels but has a depth to it that ink cannot replicate. It also does not have that richness of tone you get with gloss papers. Having said that, I like the difference and  expressiveness  it gives to the pictures it produces.   

Ilford FP4+ 120 format 6x6 negative, Developed
in PMK Pyro and printed on
Slverproof Paper Matt.
The pictures that complement this post were developed in a warm tone developer from Ilford with the enlarger set at grade two, initially it was set  at  grade three but I found that the pictures had to much contrast. On hindsight it may have been better to use an un-toned developer, but then I was not planing to use the proof paper for a full print session. I got carried away after the first test prints and I'm pleased I did.


Monday 2 April 2012

Processed print faults


Exhausted Developer
With all the processes that need to go well when producing a print in the darkroom it is surprising that faults are not more common. Even so the odd  one comes along to de-rail a good printing session. It does not matter how experienced you are sods law trips us all up!


Exhausred stop


Here are some of the most common faults: 


         Chemical fingers - this where odd irregular marks appear on the finished print usually at the edges. Make sure your hands are free from chemical contamination and dry before you handle photographic paper.

         Exhausted developer - fails to produced a full image once it has reached its completion time.
Exhausted Fix

         Wrongly diluted developer - produces faint grainy image. A bit like the above.

         Exhausted stop - leads to a purple tone to the white areas of the print.

         Exhausted fix - the slow brownish toning of the finished print in day light.


Related Posts:

Monday 19 March 2012

Prints to hard or to soft.

High contrast

What are the signs that a print has been printed to hard? The shadow areas are jet black with no detail and the highlights are blank  (the contrast is to great). Assuming that the negative being printed shows none of these traits then it can be corrected by the following:

         Use a softer grade of paper.
         Make sure that the exposure time is correct.
         The paper is in the developer for the right amount of time.
         Don't use a high contrast developer.
Low contrast
What signs make a soft print? It looks grey and foggy with little punch. No contrast. In this case it is almost the opposite to the above.

         Use a harder grade of paper.
         Increase the developing time. If the development time is to short it may cause cloudy spots.
         Make sure the developer is not too diluted.
         Also check that it is not exhausted. 

There are other possibilities:

         Your darkroom may not be light tight fogging the paper creating an overall grey cast.
         The paper maybe to old or has not been stored properly. 

Once you establish what the problem is, the cure will speak for it's self.

Related posts:

Evaluating your test strips
Darkroom fog.